Ever had that moment when you stare at a plain slice of bread, a lonely slab of cheese, and a clove of garlic and think, “There’s got to be something better”? I was in that exact spot last Tuesday, after a disastrous attempt at a classic grilled cheese that ended up looking more like a soggy pancake than anything worth bragging about. The kitchen was filled with the mournful sigh of a burnt buttered pan, the cheese oozing out in a tragic, un‑controlled river, and my confidence taking a nosedive faster than a soufflé in a cold draft. I dared a friend to a midnight snack showdown, and she tossed me a challenge: make a grilled cheese that could stand shoulder‑to‑shoulder with the best garlic bread you’ve ever devoured.
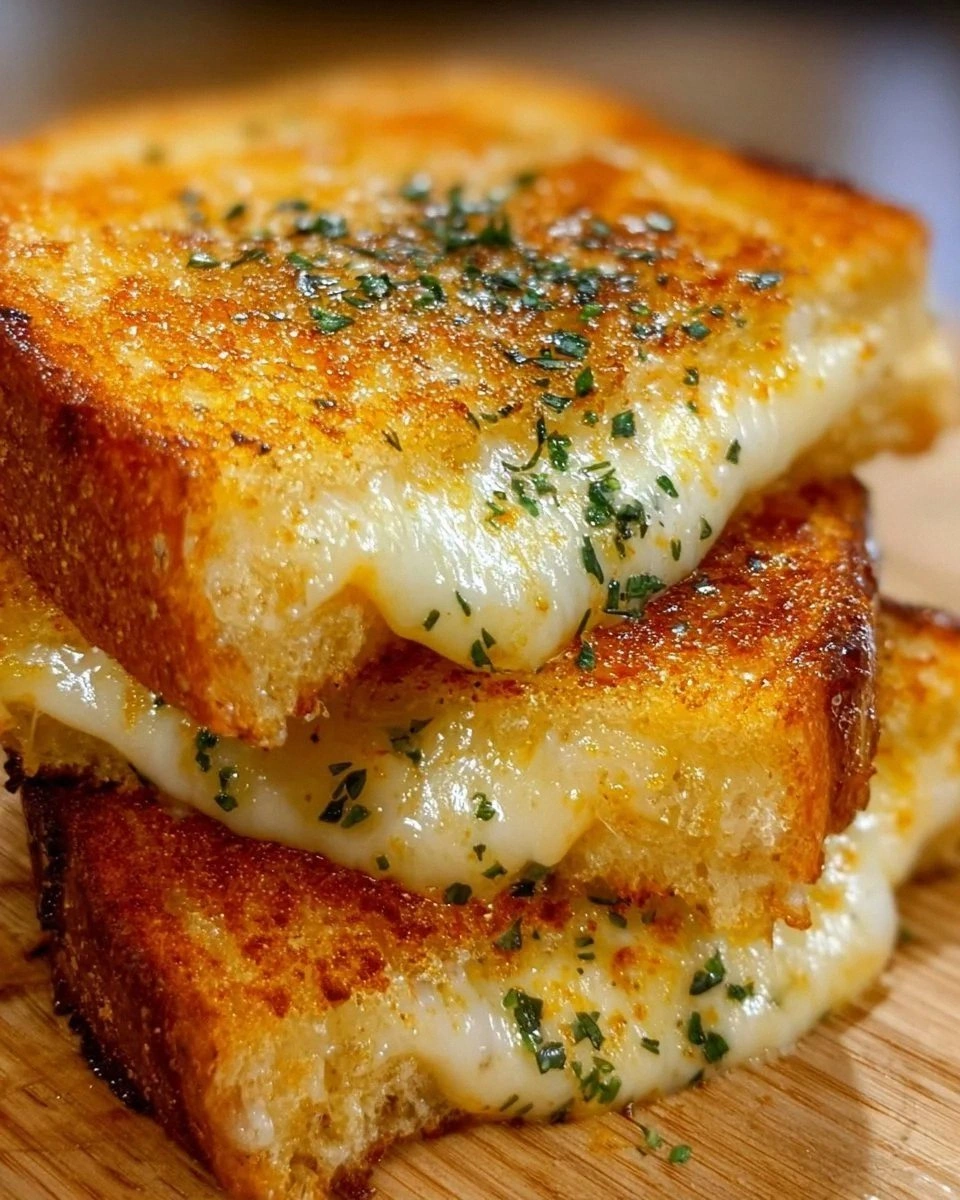
Picture this: the moment the butter hits the pan, you hear a sizzle that’s practically a drumroll, the garlic releases its aromatic perfume like a tiny fireworks display, and the bread begins to turn a golden‑brown that could rival a sunrise over the Mediterranean. The cheese, a molten blend of cheddar and mozzarella, stretches and pulls with the elegance of a yoga master, while the herbs—parsley and oregano—sprinkle a green confetti that adds a whisper of earthiness. The whole thing smells like a cozy café on a rainy day, the kind of scent that makes you want to hug the person who made it. When you finally bite into it, the crunch of the crust shatters like thin ice, giving way to a buttery, garlicky interior that’s creamy, cheesy, and just a tad herb‑kissed.
Most recipes for garlic‑bread‑style grilled cheese either drown the bread in butter, turning it into a greasy mess, or they under‑season the garlic, leaving you with a bland, forgettable sandwich. This version flips that script: we’re talking about a precise butter‑to‑bread ratio, a garlic‑infused spread that actually penetrates the crust, and a cheese melt that’s both stretchy and buttery without ever becoming oily. The secret? A quick “garlic butter” that’s brushed on before grilling, and a low‑and‑slow cooking method that lets the cheese melt uniformly while the bread crisps to perfection.
Okay, ready for the game‑changer? I’m about to walk you through every single step—mixing, spreading, grilling, and the final triumphant pull‑apart. By the end, you’ll be daring anyone to taste this and not go back for seconds, because honestly, I’ll be honest — I ate half the batch before anyone else got to try it. Let’s dive in and make the ultimate garlic bread grilled cheese that will forever change your sandwich expectations.
What Makes This Version Stand Out
- Flavor Explosion: The garlic butter isn’t just a surface coating; it seeps into the bread’s pores, delivering a punch of aromatic goodness in every bite.
- Texture Harmony: You get a crisp, buttery crust that shatters like thin ice, paired with a luxuriously creamy interior that stretches like velvet.
- Simplicity Meets Sophistication: Only eight ingredients, yet each plays a starring role, proving that you don’t need a pantry full of exotic items to create magic.
- Customizable Cheese Blend: Whether you love sharp cheddar, melty mozzarella, or a daring mix, the cheese melts uniformly without separating.
- Herb‑Infused Aroma: Dried parsley and oregano add a subtle earthiness that balances the garlic, turning a simple sandwich into a fragrant experience.
- Crowd‑Pleaser Factor: This sandwich has the power to unite even the pickiest eaters, from kids demanding “cheesy” to adults craving gourmet comfort.
- Make‑Ahead Friendly: Prep the garlic butter ahead of time, store it, and you’ll have a quick‑fire lunch solution for busy weekdays.
- Cooking Method Mastery: Low heat, covered pan technique ensures the cheese melts fully before the bread burns, a trick most recipes miss.
Inside the Ingredient List
The Flavor Base
The star of the show is the garlic butter. Three cloves of garlic, minced fine, release allicin—a compound that gives garlic its pungent bite and health‑boosting properties. When combined with softened unsalted butter, the mixture becomes a silky spread that coats each slice of bread like a warm hug. If you skip the garlic, you’ll end up with a bland, buttery slice that lacks that signature zing. For a milder version, roast the garlic first; it mellows the sharpness and adds a sweet, caramelized note.
Salt and pepper, though simple, are the unsung heroes. A pinch of salt amplifies the garlic’s flavor, while a dash of pepper adds a subtle heat that prevents the sandwich from feeling one‑dimensional. If you’re watching sodium, use a light hand with the salt and let the cheese do the heavy lifting. A good tip: sprinkle the salt on the butter before spreading—it dissolves evenly and ensures every bite is seasoned.
The Texture Crew
The bread choice is pivotal. I recommend sourdough or whole‑wheat because their sturdy crumb holds up to the buttery spread without becoming soggy. The crust of sourdough, with its natural tang, adds a subtle acidity that cuts through the richness of the cheese. If you use a super soft white bread, the sandwich may collapse under the weight of the melted cheese, resulting in a soggy disaster. Look for a loaf with a good crust-to-crumb ratio—think of it as the foundation of a skyscraper.
Butter, unsalted and softened, is the vehicle for the garlic and herbs. Using unsalted butter gives you control over the seasoning, preventing the sandwich from becoming overly salty. The softness ensures easy spreading, which is crucial for an even coat. If your butter is too cold, you’ll end up with clumps that burn unevenly; if it’s too melted, the bread will become soggy before it crisps.
The Unexpected Star
Cheese is the heart‑and‑soul of any grilled cheese, and here we’re using an 8‑ounce blend of cheddar and mozzarella. Cheddar brings sharpness and depth, while mozzarella contributes that coveted stretch and melt. The combination creates a flavor profile that’s both robust and silky. If you’re adventurous, throw in a sprinkle of Gruyère for a nutty undertone, or a dash of smoked gouda for a subtle smokiness.
The dried herbs—parsley and oregano—are optional but highly recommended. Parsley adds a fresh, almost citrusy pop, while oregano delivers an earthy, slightly bitter edge that balances the garlic. If you’re out of dried herbs, fresh ones work too; just double the amount because fresh herbs are less concentrated.
Everything's prepped? Good. Let's get into the real action...
The Method — Step by Step
Start by softening your butter if it isn’t already. Place the butter in a small bowl, add the minced garlic, dried parsley, and dried oregano. Mix until you have a uniform, aromatic paste. Power transition: This is the moment where flavor builds, so don’t rush it. The mixture should smell fragrant, like a garden after rain.
Take your four slices of bread and spread a generous layer of the garlic butter on one side of each slice. Use the back of a spoon or a butter knife to ensure an even coat, reaching all the edges. Kitchen Hack: If the butter is too soft, chill it for 5 minutes; it’ll firm up just enough to stay on the bread without dripping.
Heat a large skillet over medium‑low heat. Once the pan is warm, place two slices butter‑side‑down, buttered side touching the pan. This low heat is crucial; it allows the butter to melt slowly, preventing the garlic from burning.
Immediately top each slice with 4 ounces of the cheese blend, spreading it evenly to the edges. The cheese should cover the bread but not overflow. Watch Out: Adding cheese before the butter has fully melted can cause uneven melting and soggy spots.
Place the remaining two slices on top, buttered side up, creating a sandwich. Press down lightly with a spatula to ensure good contact between layers. This next part? Pure magic. The steam trapped inside will start to melt the cheese from the top down.
Cover the skillet with a lid and let the sandwich cook for 3‑4 minutes. The lid traps heat and moisture, allowing the cheese to melt thoroughly while the bottom crust turns a beautiful golden‑brown. You’ll hear a faint hiss—listen for that as your cue.
After the cheese is melted, carefully flip the sandwich using a wide spatula. Cook the other side for another 2‑3 minutes, uncovered, to crisp the top crust. Kitchen Hack: Sprinkle a tiny pinch of extra salt on the top crust right after flipping; it enhances the crunch and flavor.
When both sides are golden and the cheese is oozy, remove the sandwich from the pan and let it rest on a cutting board for about a minute. This rest allows the cheese to set slightly, preventing a messy spill when you slice.
Slice the sandwich diagonally for that classic grilled‑cheese aesthetic. The cut reveals the molten interior, and the aroma will hit you instantly—think of a warm blanket on a chilly evening.
Serve immediately, perhaps with a side of tomato soup or a crisp green salad. Future pacing: Picture yourself pulling this out of the pan, the whole kitchen smelling incredible, and your friends hovering for a bite. That’s the moment of triumph.
That's it — you did it. But hold on, I've got a few more tricks that'll take this to another level...
Insider Tricks for Flawless Results
The Temperature Rule Nobody Follows
Most home cooks crank the heat up to “get it done fast,” but that’s a recipe for burnt butter and under‑melted cheese. Keep the heat at medium‑low (around 300°F on an electric stove) and be patient. The low heat ensures the butter caramelizes without burning, while the cheese gets the time it needs to melt uniformly. A friend tried blasting the heat once—let's just say the sandwich turned into a blackened brick.
Why Your Nose Knows Best
Never rely solely on timers; let your senses guide you. The moment the butter sizzles and releases that nutty aroma, you know the pan is ready. When the cheese starts to bubble and you hear a gentle pop, that’s your cue that the melt is happening. Trusting your nose and ears prevents overcooking and ensures that perfect golden crust.
The 5‑Minute Rest That Changes Everything
After the sandwich is cooked, resist the urge to dive in immediately. Let it sit for five minutes; this short rest lets the cheese settle, preventing it from spilling out when you cut. It also allows the steam to redistribute, keeping the interior moist while the crust stays crisp. I used to skip this step and end up with cheese on the plate—big mistake.
Butter‑Infused Crust Trick
For an extra‑crispy edge, brush a thin layer of melted butter on the outer sides of the bread just before the final flip. This adds a glossy finish and a buttery crunch that rivals the best bakery‑style garlic bread. It’s a tiny step that makes a massive difference in texture.
Cheese Layering Secrets
Instead of dumping all the cheese in one go, spread half, add a thin slice of bread, then top with the remaining cheese. This double‑layer technique creates a cheese “core” that stays molten longer, giving you that delightful pull‑apart effect. It’s a pro tip that elevates the sandwich from good to unforgettable.
Creative Twists and Variations
This recipe is a playground. Here are some of my favorite ways to switch things up:
Spicy Jalapeño Kick
Add thinly sliced jalapeños to the cheese layer for a subtle heat that cuts through the richness. The peppery bite pairs beautifully with the garlic, creating a balanced spice profile.
Tomato Basil Bliss
Layer fresh tomato slices and a few torn basil leaves between the cheese. The acidity of the tomato brightens the buttery base, while basil adds a fragrant, summery note.
Smoky Bacon Crunch
Cook crisp bacon strips and crumble them into the sandwich before adding the cheese. The smoky, salty crunch adds depth and makes the sandwich feel hearty enough for brunch.
Vegan Delight
Swap the butter for olive oil, use a plant‑based cheese blend, and opt for a sturdy whole‑grain baguette. The garlic oil still delivers that aromatic punch, and the vegan cheese melts surprisingly well.
Herb‑Infused Olive Oil Drizzle
After cooking, drizzle a little herb‑infused olive oil over the top. It adds a glossy finish and a fresh, herbaceous aroma that lifts the entire dish.
Storing and Bringing It Back to Life
Fridge Storage
Wrap the sandwich tightly in parchment paper, then place it in an airtight container. It will stay fresh for up to 2 days. Reheat in a skillet over medium heat, pressing gently to restore the crisp crust.
Freezer Friendly
Wrap each sandwich individually in foil, then seal them in a freezer‑safe bag. They’ll keep for up to 2 months. When ready to eat, thaw in the fridge overnight, then reheat in a preheated oven at 350°F for 10‑12 minutes, or in a skillet with a splash of water to steam the interior.
Best Reheating Method
For the ultimate revival, use a skillet on medium‑low heat, add a tiny splash (about a teaspoon) of water to the pan, and cover it for a minute. The steam revives the cheese’s meltiness while the bottom regains its crunch. No soggy leftovers here.