I was in the middle of a frantic Saturday night, trying to impress a group of friends who had just declared a “no‑bake” challenge. The kitchen was a battlefield of half‑baked brownies, soggy cookie dough, and a blender that sounded like a jet engine. I swear I could hear the timer on the oven mocking me, while my guests were already drooling over the idea of something sweet, airy, and effortless. That’s when the craving hit me like a tidal wave: I needed a dessert that didn’t require an oven, didn’t melt my patience, and could be scooped up in a single bite. I rummaged through the pantry, grabbed a block of cream cheese, a bag of shredded coconut, and a few pantry staples, and the rest is history.
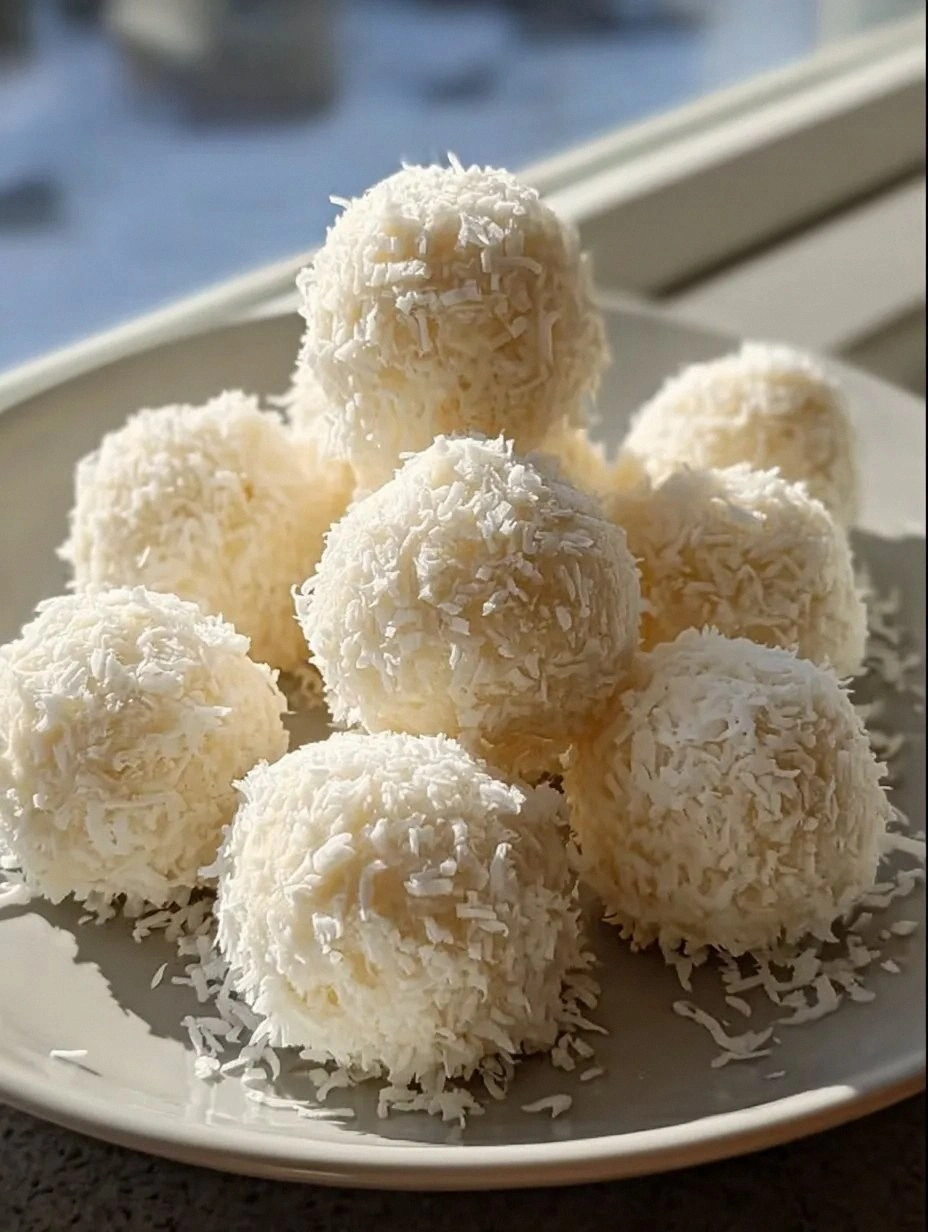
Picture this: a bowl of creamy, tangy cream cheese mingling with the buttery melt of softened butter, all sweetened just enough to make your taste buds do a little happy dance. As I folded in the powdered sugar, the mixture turned a soft, pale ivory that smelled faintly of vanilla, like a whisper of a bakery on a quiet street. Then I tossed in the coconut, and the whole thing transformed into a fragrant, tropical cloud that reminded me of a beach sunrise—soft, warm, and impossibly inviting. When the dough finally held together, I rolled it into perfect, bite‑size snowballs and gave them a final dusting of toasted coconut that crackled like fresh snow under a boot.
Most recipes for coconut snowballs either call for a confusing blend of melted chocolate and coconut oil, or they demand a bake‑and‑cool routine that turns the whole kitchen into a sauna. Those methods usually end up with a dense, gummy mess that feels more like a rubber ball than a melt‑in‑your‑mouth treat. This version, however, skips the heat entirely and relies on the natural creaminess of the cheese and butter to bind everything together. The result? A snowball that feels as light as a cloud, with a coconut crust that shatters delicately on the first bite, releasing a burst of tropical flavor that lingers like a vacation memory.
I’m about to reveal a tiny secret that most recipes completely overlook: a splash of melted butter at the very beginning. This not only adds richness but also creates a glossy sheen that makes the snowballs look professionally plated, even if you’re the only one in the kitchen. I dare you to taste this and not go back for seconds—because once you’ve experienced the perfect balance of tangy cheese, sweet sugar, and toasted coconut, you’ll be hooked. Let me walk you through every single step — by the end, you’ll wonder how you ever made it any other way.
What Makes This Version Stand Out
- Texture: The interior stays creamy and soft thanks to the cream cheese, while the exterior boasts a crisp coconut coat that snaps delightfully with each bite.
- Flavor: A subtle tang from the cheese balances the sweet coconut, creating a flavor profile that feels both familiar and exotic.
- Simplicity: No oven, no stovetop, just a bowl, a spatula, and a handful of pantry staples—perfect for lazy evenings or last‑minute gatherings.
- Speed: From start to finish you’re looking at under an hour, with most of that time being hands‑on fun rather than waiting.
- Crowd Reaction: Guests often ask “What’s the secret?” and you can smile, knowing the secret is that you didn’t have to turn on the oven.
- Ingredient Quality: Using full‑fat cream cheese and real shredded coconut (not the powdered kind) makes the snowballs richer and more authentic.
- Make‑Ahead Potential: These can be prepared a day in advance, stored in the fridge, and still taste fresh—ideal for potlucks.
- Versatility: Swap the coconut for toasted almonds, or drizzle with melted chocolate for a twist that keeps the recipe fresh.
Inside the Ingredient List
The Flavor Base
The hero of this recipe is cream cheese. Its tangy, slightly sour profile cuts through the sweetness of the coconut, creating a balanced flavor that’s neither cloying nor bland. If you skimp on the cream cheese, the snowballs become flat and lose that luxurious melt‑in‑your‑mouth feel. For the best result, use a full‑fat block, let it soften at room temperature, and avoid the low‑fat versions that can turn grainy when mixed. A quick tip: give the block a gentle pat with a kitchen towel to remove excess moisture before blending.
The Texture Crew
Unsalted butter is the silent workhorse that brings everything together. When melted, it coats the shredded coconut, toasting it lightly and adding a glossy finish to each snowball. Skipping the butter will leave the coconut dry and the snowballs crumbly. If you’re dairy‑free, coconut oil works as a substitute, but expect a slightly more pronounced coconut flavor. Use a light hand when melting—just until it’s liquid, not bubbling.
Powdered sugar provides the sweet backbone without adding any gritty texture. Because it’s finely ground, it dissolves instantly into the cream cheese, ensuring a silky mouthfeel. If you prefer a less sweet version, cut the amount in half and add a pinch of honey for a natural sweetness boost. Remember, the sugar also helps the coconut adhere during the final roll, so don’t eliminate it entirely.
The Unexpected Star
Almond flour might seem out of place, but it acts as a binder that keeps the snowballs from falling apart when you roll them. It adds a subtle nutty undertone that complements the coconut beautifully. If you’re allergic to nuts, swap it for an equal amount of oat flour or even extra shredded coconut—just be aware the texture will be a touch softer.
The Final Flourish
Shredded sweetened coconut is the star that gives these snowballs their name. The sweetened variety adds a caramelized depth, while the shredded texture creates a fluffy exterior that toasts beautifully. If you opt for unsweetened coconut, increase the powdered sugar by a tablespoon to maintain balance. Toast the coconut lightly in a dry pan before folding it in; this step adds a nutty aroma that makes the whole kitchen smell like a tropical bakery.
Everything's prepped? Good. Let's get into the real action…
The Method — Step by Step
In a large mixing bowl, combine the softened cream cheese and melted butter. Use a handheld mixer on low speed to blend them until the mixture is smooth and glossy. You’ll notice a silky sheen forming—that’s the first sign you’re on the right track. Tip: Scrape the sides of the bowl frequently to ensure a uniform blend.
Add the powdered sugar and vanilla extract to the bowl. Mix on medium speed until the sugar dissolves completely and the mixture becomes light and airy. At this point, the aroma of vanilla should fill the kitchen, making your stomach grumble in anticipation. Watch Out: If the mixture looks grainy, continue mixing for another 30 seconds—sometimes the sugar needs a bit more time to fully incorporate.
Stir in the almond flour and a pinch of salt. The almond flour will absorb excess moisture, giving the dough a firm yet pliable consistency. If the mixture feels too sticky, sprinkle in a tablespoon more almond flour; if it feels too dry, drizzle a teaspoon of milk or extra butter.
Fold in 1 cup of the shredded coconut gently with a spatula. The coconut should be evenly distributed, creating speckles of tropical goodness throughout the batter. This is the moment where the dough starts to hold together—press it lightly between your fingers; it should feel cohesive but not overly wet.
Cover the bowl with plastic wrap and chill the mixture in the refrigerator for 20‑30 minutes. This cooling step firms up the butter, making it easier to roll the snowballs without them melting on your hands. While you wait, pre‑heat a non‑stick skillet over medium‑low heat and toast the remaining ½ cup of shredded coconut until it turns a golden amber and releases a nutty fragrance.
Once the dough is chilled, scoop out a tablespoonful and roll it between your palms into a smooth ball about 1‑inch in diameter. If the dough sticks, dip your hands briefly in cold water (the Kitchen Hack from earlier). Place each ball onto a parchment‑lined tray, and repeat until all the dough is used.
Immediately roll each chilled ball in the toasted coconut, pressing gently so the coconut adheres to every crevice. The toasted coconut should cling like a second skin, giving each snowball a crisp outer layer that will shatter delightfully when bitten into.
Re‑chill the finished snowballs for another 15 minutes to set the coating. This final chill ensures the interior stays firm and the coconut crust remains attached. Serve them straight from the fridge, or let them sit at room temperature for five minutes if you prefer a softer bite.
That's it — you did it. But hold on, I've got a few more tricks that'll take this to another level. Trust me, these extra touches are the difference between “good” and “hands‑down the best version you'll ever make at home.”
Insider Tricks for Flawless Results
The Temperature Rule Nobody Follows
Never, ever roll the snowballs when the mixture is warm. Even a few degrees above room temperature can cause the butter to soften too much, making the dough sticky and difficult to shape. Keep the bowl in the fridge for at least 20 minutes after each mixing stage; this ensures the butter re‑solidifies and the dough becomes pliable again. I once tried to skip the second chill, and the balls fell apart like soggy marshmallows—lesson learned.
Why Your Nose Knows Best
When toasting coconut, trust your sense of smell more than a timer. The moment you detect a warm, nutty aroma, it’s time to pull the pan off the heat. Over‑toasting not only adds bitterness but also dries out the coconut, making it less adhesive. A quick sniff test saves you from a batch of bitter snowballs and guarantees that golden‑brown finish we all love.
The 5‑Minute Rest That Changes Everything
After rolling the snowballs in toasted coconut, give them a brief 5‑minute rest on the tray before the final chill. This pause allows the coconut coating to set and adhere more firmly, preventing it from flaking off when you serve. I tried skipping this step once, and the coating slid off like a slippery eel—definitely not the presentation I was aiming for.
Butter‑Boost for Extra Shine
A light brush of melted butter on the finished snowballs right before the final chill adds a subtle sheen that makes them look restaurant‑ready. It also adds an extra layer of flavor that complements the toasted coconut. Use a pastry brush and a thin coat—too much butter will make them greasy.
Freeze for Future Fun
If you’re making a big batch, freeze the rolled balls (uncoated) on a baking sheet for 30 minutes, then transfer them to a zip‑top bag. When you’re ready to serve, simply roll them in toasted coconut and chill for a quick 10‑minute finish. This method keeps the texture consistent and saves you from a last‑minute scramble.
Creative Twists and Variations
This recipe is a playground. Here are some of my favorite ways to switch things up:
Chocolate‑Dipped Delight
After the final chill, dip half of each snowball in melted dark chocolate and let it set on parchment. The contrast of rich chocolate with the tropical coconut creates a decadent bite that’s perfect for chocolate lovers.
Lemon Zest Burst
Add one tablespoon of finely grated lemon zest to the cream cheese mixture. The citrus note lifts the richness and adds a fresh pop that pairs beautifully with the coconut.
Nutty Crunch
Replace half of the shredded coconut with finely chopped toasted almonds or pistachios. The nutty crunch adds texture diversity and a subtle earthy flavor.
Spiced Holiday Version
Stir in a pinch of ground cinnamon, nutmeg, and a dash of ground cloves into the batter. Roll the finished balls in a mixture of coconut and a sprinkle of powdered sugar for a festive, aromatic treat.
Berry‑Infused Surprise
Fold in a tablespoon of freeze‑dried raspberry powder into the dough for a tangy burst and a beautiful pink hue. The berries add a subtle tartness that balances the sweetness.
Storing and Bringing It Back to Life
Fridge Storage
Place the snowballs in an airtight container lined with parchment paper. They’ll stay fresh for up to five days, retaining their texture and flavor. Keep them in the coldest part of the fridge to prevent the coconut from softening.
Freezer Friendly
Freeze uncoated snowballs on a tray for 30 minutes, then transfer to a zip‑top bag. They’ll keep for up to three months. When you’re ready to serve, roll them in toasted coconut and chill for 10 minutes before plating.
Best Reheating Method
If the snowballs have hardened too much, let them sit at room temperature for five minutes, then give them a quick 10‑second blast in the microwave on low power. Add a tiny splash of water (about a teaspoon) before microwaving; the steam revives the creamy interior without melting the coconut coating.