It started with a kitchen mishap that would have made me curse the word “taco” for a week. I was trying to make a quick dinner, chopping onions, seasoning a pound of ground beef, and when the skillet slipped, the whole pot went into a fiery, meaty avalanche that left my stove smelling like a carnivore’s dream. I laughed at the chaos, but the taste was unmistakably delicious—savory, smoky, and just the right amount of heat. That night, I dared myself to turn that accidental mess into a recipe that would keep the flavor alive without the mess.
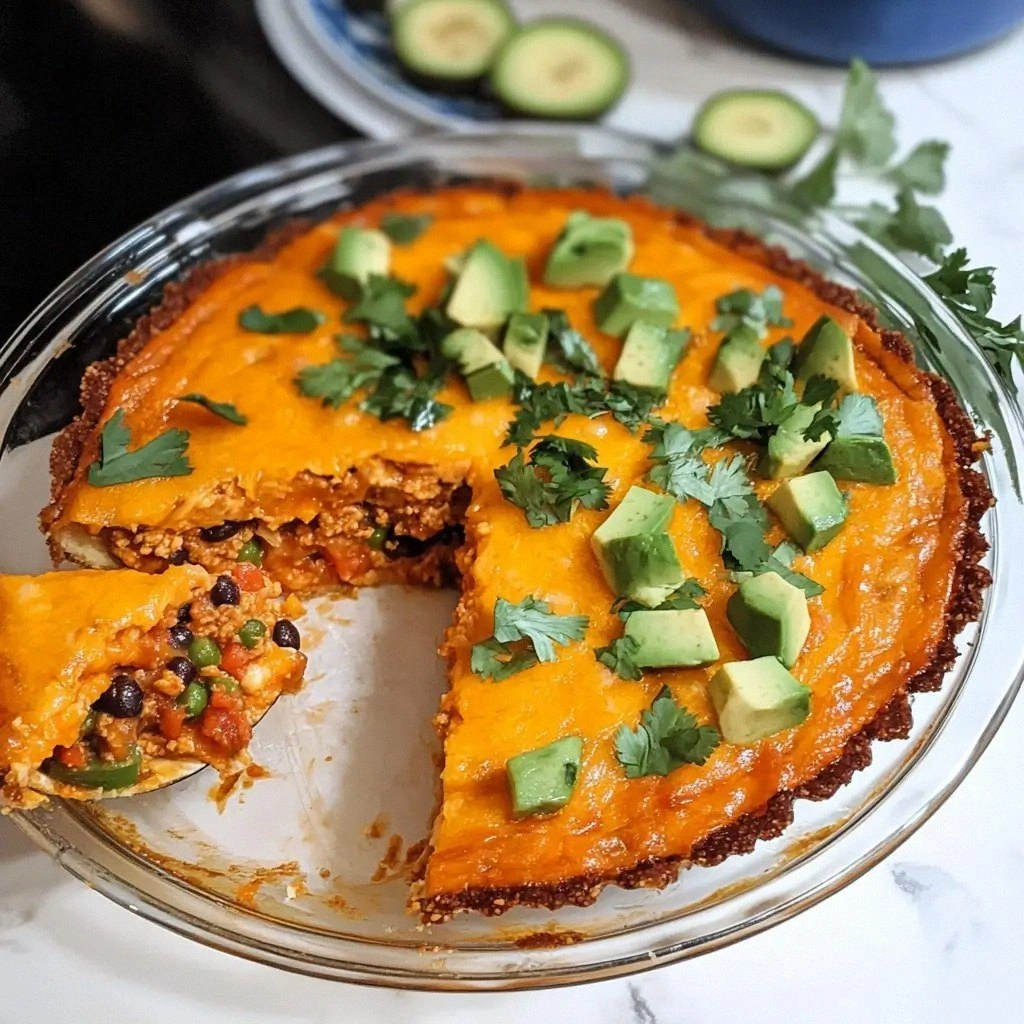
Picture this: a golden crust of crushed low‑carb tortilla chips, a bubbling layer of cheese that stretches like a lazy cat, and a medley of fresh salsa, diced tomatoes, and cilantro that dance on your tongue. The sizzle of the meat, the sharp pop of a lime wedge, the gentle crunch of the chips—every element sings together. I was so obsessed with the texture that I spent hours testing different chip brands, settling on one that gives a satisfying crunch that doesn’t crumble into mush. The result? A crustless taco pie that feels like a comfort food hug in a pie dish.
What sets this version apart is not just the absence of a crust, but the way the flavors are layered and the simplicity of the method. I’ve trimmed the ingredients to a lean, keto‑friendly list that still delivers the depth of a traditional taco pie. The cheese blend melts into a silky sauce, the meat stays juicy, and the salsa keeps the dish bright. I promise you, this is hands down the best version you’ll ever make at home, and I dare you to taste this and not go back for seconds.
There’s one secret ingredient that most people overlook: a splash of lime juice added right before baking. It brightens the entire dish and gives the cheese a subtle tang that keeps the flavors from getting flat. I’ll walk you through every single step, from prepping the meat to the final bake, so by the end you’ll wonder how you ever made it any other way. Let’s dive in.
What Makes This Version Stand Out
- Flavor: The combination of seasoned ground beef, a blend of cheddar and Monterey Jack, and a bright salsa creates a taste profile that’s both comforting and exciting.
- Texture: The crushed tortilla chips provide a crisp, crunchy base that contrasts perfectly with the molten cheese topping.
- Zero Crust: By eliminating the traditional pie crust, we cut carbs dramatically while still achieving a satisfying bite.
- Speed: The entire process takes less than an hour, making it ideal for week‑night dinners.
- Versatility: This recipe serves as a canvas for variations—add avocado, jalapeños, or swap in ground turkey.
- Make‑Ahead Friendly: Assemble the pie, refrigerate, and bake when you’re ready. No last‑minute scrambling.
- Kid‑Friendly: The familiar taco flavors make it a hit with children who might otherwise resist keto meals.
- Nutrition: With 350 calories, 25g protein, 30g carbs, and 15g fat per serving, it’s a balanced option for those watching macros.
Alright, let’s break down exactly what goes into this masterpiece…
Inside the Ingredient List
The Flavor Base
Ground beef is the heart of this pie, and I recommend a leaner cut, like 80/20, to keep the fat content in check while still providing moisture. Season it with a generous 2 tablespoons of taco seasoning, which brings a punch of cumin, chili powder, and garlic that permeates every bite. If you’re feeling adventurous, add a dash of smoked paprika for a subtle smokiness that echoes the accidental stovetop explosion that inspired this recipe.
Salsa is the next hero in the flavor lineup. A ¾ cup of fresh, chunky salsa gives the pie a bright, zesty lift that cuts through the richness of the cheese. If you’re in a pinch, a low‑sugar salsa verde works just as well, but the tomato base gives that classic taco vibe. Keep the salsa cold until you’re ready to bake; this prevents the pie from becoming soggy.
The Texture Crew
Cheese is the glue that holds everything together, and I’ve chosen a blend of shredded cheddar (1½ cups) and Monterey Jack (1 cup). The cheddar gives a sharp, tangy bite, while the Monterey Jack melts smoothly, creating a velvety top that’s irresistible. Feel free to swap in pepper jack if you want a mild kick.
Crushed low‑carb tortilla chips (2 cups) form the base. They provide that satisfying crunch and a subtle corn flavor that pairs beautifully with the beef. Make sure to crush them finely; too chunky and you’ll get a lumpy texture, too fine and you’ll lose the crunch. A pinch of salt to taste rounds out the flavor profile.
The Unexpected Star
Diced tomatoes (½ cup) add a splash of juiciness that keeps the pie from drying out during baking. They also introduce a natural sweetness that balances the spice. If you prefer a more robust tomato flavor, consider adding a spoonful of tomato paste, but keep the quantity small to avoid overwhelming the other flavors.
Chopped onions (¼ cup) and cilantro (¼ cup) provide a fresh, herbal brightness that cuts through the richness. The onions add a subtle crunch and depth, while the cilantro offers a citrusy lift that’s essential in any taco dish. Don’t skip them; they’re the final flourish that brings everything together.
Everything’s prepped? Good. Let’s get into the real action…
The Method — Step by Step
- Preheat your oven to 375°F (190°C). While the oven warms, heat a large skillet over medium heat. I always use a cast‑iron pan because it distributes heat evenly, giving the meat a nice sear. As soon as the skillet is hot, add the ground beef, breaking it apart with a wooden spoon.
- Cook the beef until it’s browned and no longer pink, about 7–8 minutes. Drain any excess grease to keep the dish from becoming greasy. This step is crucial; a greasy pie will mask the fresh flavors of the salsa and cheese.
- Add the taco seasoning to the meat, stirring until the beef is evenly coated. The seasoning should release its aroma, filling the kitchen with a comforting scent that makes you want to dig in right away. Let the mixture cook for another 2 minutes so the spices can bloom.
- Stir in the salsa, diced tomatoes, onions, and cilantro. The mixture should look moist but not soupy; if it’s too wet, let it simmer for an additional minute to evaporate excess liquid. This is the moment of truth—your pie’s flavor base is forming.
- Transfer the meat mixture into a 9‑inch pie dish. Spread it evenly, ensuring the top is smooth. I use a spatula to level the surface, which helps the cheese melt uniformly.
- Sprinkle the crushed tortilla chips over the meat, pressing them lightly into the surface. The chips should be evenly distributed so every bite gets that satisfying crunch.
- Combine the cheddar and Monterey Jack cheeses in a bowl, then spoon the mixture over the chips. The cheese should cover the chips completely, creating a thick, golden layer that will melt into a silky sauce. Finish with a drizzle of lime juice for a bright, tangy note.
- Bake the pie for 20 minutes, or until the cheese is bubbly and the chips are golden brown. Watch the edges; they should pull away slightly from the dish, indicating a crisp base. If the top seems too dark, cover it loosely with foil.
- Remove the pie from the oven and let it rest for 5 minutes. This resting period allows the cheese to set, preventing it from sliding off when you slice. The aroma at this point is irresistible—think warm, cheesy, and slightly citrusy.
- Serve hot, optionally garnished with fresh cilantro, a dollop of sour cream, and sliced avocado. The creamy avocado and tangy sour cream balance the richness, making every bite a harmonious blend of textures.
That’s it—you did it. But hold on, I’ve got a few more tricks that’ll take this to another level…
Insider Tricks for Flawless Results
The Temperature Rule Nobody Follows
Many people bake at 350°F, but raising the temperature to 375°F gives the cheese a better golden crust and the tortilla chips a crispier crunch. If you’re using a convection oven, lower the temperature by 25°F to avoid burning the top. I’ve found this small tweak makes a huge difference in texture.
Why Your Nose Knows Best
Before you put the pie in the oven, pause and sniff the skillet. A deep, savory aroma signals that the meat is fully cooked and the spices have released their oils. If the smell feels flat, let it cook a few more minutes; a good aroma is the first indicator of a great dish.
The 5-Minute Rest That Changes Everything
After baking, let the pie rest for exactly five minutes. This short pause allows the cheese to set and the flavors to meld. When you cut into the pie, you’ll see a beautiful, molten center that doesn’t slosh out, giving you that perfect bite every time.
Keep the Chips Crunchy
If you’re prone to soggy chips, sprinkle a pinch of baking soda over the crushed chips before adding them to the pie. The soda neutralizes acidity and keeps the chips crisp even after baking. It’s a simple trick that many overlook.
Add a Splash of Lime for Brightness
A tablespoon of fresh lime juice added just before baking brightens the entire dish. It cuts through the richness of the cheese and adds a subtle zing that elevates the flavor profile. If you’re a fan of citrus, you can increase the amount to two tablespoons.
Creative Twists and Variations
This recipe is a playground. Here are some of my favorite ways to switch things up:
Avocado Crunch Version
Swap the crushed tortilla chips for thinly sliced avocado. The avocado adds a creamy texture that contrasts with the melted cheese. Just toast the slices briefly before adding them to avoid a soggy result.
Jalapeño Heat Boost
Add a handful of fresh or pickled jalapeños to the meat mixture for a fiery kick. The heat pairs wonderfully with the lime zest, creating a layered spice profile that keeps the dish exciting.
Chicken Taco Pie
Replace the ground beef with shredded rotisserie chicken. The chicken’s delicate flavor works well with the same spice blend, and the pie remains keto‑friendly. Just make sure to shred the chicken finely so it mixes evenly.
Cheese‑Only Delight
For a low‑carb, dairy‑centric version, eliminate the meat entirely. Use a mixture of cheddar, Monterey Jack, and mozzarella, and top with crushed cheese crackers. The result is a savory, melt‑in‑your‑mouth cheese pie that satisfies cheese cravings.
Mexican Street Tacos Twist
Serve the pie in small, individual ramekins instead of a large dish. This turns the pie into bite‑sized tacos that are perfect for parties or a fun dinner for kids. Garnish each ramekin with a dollop of guacamole.
Vegan Variation
Use crumbled tofu or tempeh seasoned with taco spices, and replace the cheese with a vegan cheese blend. The tofu adds protein, while the vegan cheese melts beautifully, keeping the dish satisfying and plant‑based.
Storing and Bringing It Back to Life
Fridge Storage
Store the cooled pie in an airtight container for up to three days. The tortilla chips will maintain their crunch, and the cheese will stay firm. When you’re ready to eat, simply reheat in the oven at 350°F for 10 minutes to revive the crispness.
Freezer Friendly
Wrap the pie tightly in plastic wrap and place it in a freezer bag. It will keep for up to two months. Thaw overnight in the refrigerator before reheating. Adding a splash of water to the top before baking will help keep the cheese from drying out.
Best Reheating Method
The oven is the best choice for reheating, as it restores the crispy base and melts the cheese evenly. Preheat to 350°F, place the pie on a baking sheet, and heat for 12–15 minutes. If you’re in a hurry, microwave for 2 minutes, but be prepared for a slightly softer crust.