When the last slice of cake vanished in a blink, I was left with a kitchen that smelled like burnt sugar and a mind that craved something sweet enough to drown in. The disaster of a burnt brownie, the frantic scramble for a replacement, and a sudden burst of inspiration all converged that night. I stared at my pantry, feeling the weight of every forgotten recipe, and decided that the only way to recover from that sweet tragedy was to create a dessert that would make the whole house sing. This is not just another berry trifle; it’s the antidote to culinary mishaps and the ultimate comfort in a bowl.
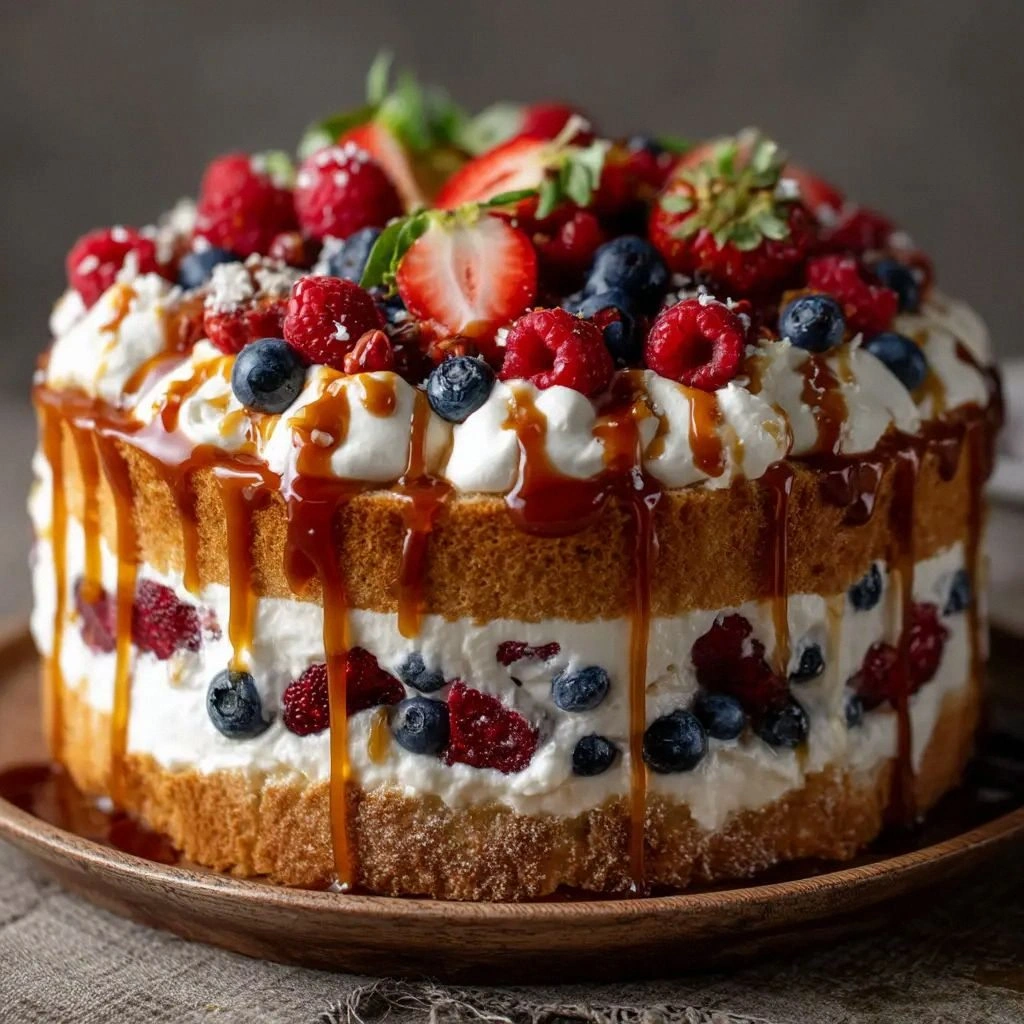
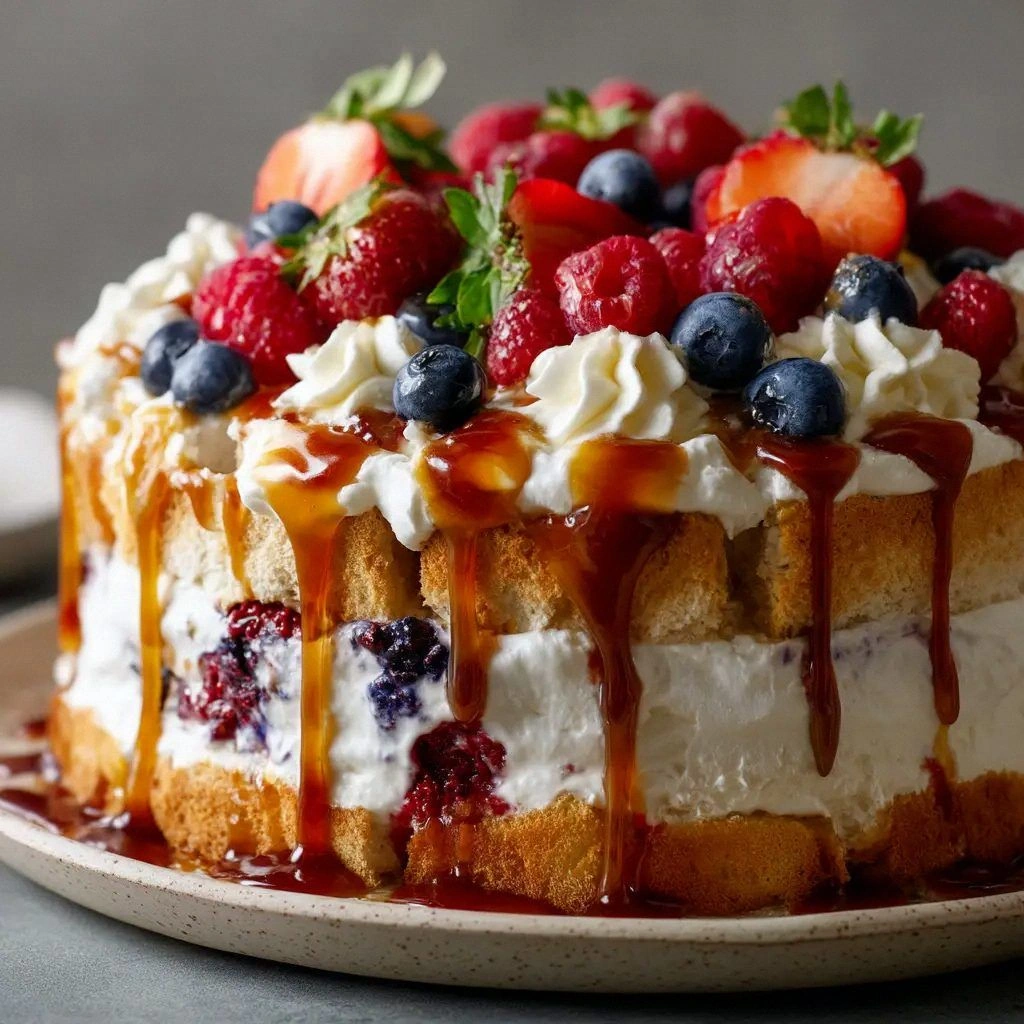
Picture the moment: a bowl of fresh, glistening berries, their skins reflecting the kitchen light like tiny jewels. The air is thick with the citrus tang of lemon, the faint perfume of vanilla, and the sweet whisper of sugar that promises a burst of flavor. As the berries mingle, their juices mingle, forming a syrupy glaze that coats each fruit like velvet. The sound of the spoon clinking against the bowl is the soundtrack to a dessert that will turn any ordinary gathering into a celebration. The texture is a symphony—juicy berries, airy whipped cream, and the subtle crunch of cake cubes—all dancing together in a harmonious crunch that shatters like thin ice when you bite into it.
What makes this version stand out is not just the ingredients but the philosophy behind it. I’ve taken the classic trifle, stripped away the fluff, and built a recipe that is both simple and spectacular. Every element is chosen to enhance the others, creating a balance of sweetness, tartness, and creaminess that is hard to find elsewhere. The result is a dessert that is as visually stunning as it is delicious, with layers that reveal themselves like a well‑written story. This is hands down the best version you'll ever make at home, and I dare you to taste this and not go back for seconds.
But there’s a twist that most trifle recipes get completely wrong. I’ve added a splash of fresh lemon juice to the berries, a trick that brightens the flavor profile and keeps the berries from turning brown. And the instant pudding mix? I’ve used it to create a silky base that holds the berries in place, so every bite is a perfect harmony of textures. Stay with me here—this is worth it. Let me walk you through every single step—by the end, you'll wonder how you ever made it any other way.
What Makes This Version Stand Out
- Flavor: The combination of fresh berries, lemon, and vanilla pudding creates a layered taste that evolves with each spoonful, from tart to sweet to creamy.
- Texture: The crisp cake cubes contrast beautifully with the silky pudding and airy whipped cream, delivering a delightful mouthfeel.
- Simplicity: No baking required—everything comes together in minutes, making it a go-to dessert for busy evenings.
- Uniqueness: The use of instant pudding as a binding agent is a game‑changer, ensuring the trifle stays together even after chilling.
- Crowd Reaction: Guests leave asking for the recipe, and you can proudly say you’re the dessert hero of the night.
- Ingredient Quality: Using fresh, seasonal berries and a high‑quality cake elevates the entire dish.
- Make‑ahead Potential: Prepare the layers a day in advance, then assemble right before serving for maximum freshness.
- Visual Appeal: The layers of color—deep reds, purples, and white cream—make this trifle Instagram‑ready.
Inside the Ingredient List
The Flavor Base
At the heart of this trifle are the berries. I use a mix of strawberries, blueberries, blackberries, and raspberries for a rainbow of flavors and colors. Each berry brings its own personality—strawberries add sweetness, blueberries contribute a subtle tartness, blackberries give depth, and raspberries bring a bright, almost citrusy note. If you can’t find a particular berry, simply swap it for another; the result will still be delicious.
For those who prefer a slightly sweetened berry layer, I recommend using fresh berries rather than frozen. Fresh berries hold their shape better and provide a juicy burst that frozen ones can’t match. If you’re using frozen berries, thaw them gently in a colander and pat dry to avoid excess water that could dilute the pudding layer.
The Sweetener
The sugar in this recipe does more than sweeten—it caramelizes slightly when it melts onto the berries, adding a subtle depth of flavor. I use 1/4 cup of granulated sugar, which is just enough to bring out the berries’ natural sweetness without overpowering them. If you prefer a lower‑sugar version, replace the sugar with a natural sweetener like honey or maple syrup; keep in mind that the texture will change slightly.
When mixing sugar with berries, let them sit for a few minutes. This allows the berries to release their juices, which combine with the sugar to form a natural syrup that coats the fruit. This process also helps the berries stay fresh longer during the chilling period.
The Binding Agent
The instant vanilla pudding mix is the unsung hero that keeps the trifle together. It thickens the milk into a silky custard that gently lifts the berries, preventing them from sinking to the bottom. The vanilla flavor enhances the berries and the cream, creating a cohesive taste profile.
To prepare the pudding, whisk the dry mix into 2 cups of cold whole milk until it thickens within 5 minutes. The pudding should be thick enough to hold its shape when spooned onto the berries but still creamy enough to blend with the whipped cream later. If you’re using a low‑fat or dairy‑free milk, you may need to adjust the ratio slightly to achieve the right consistency.
The Texture Crew
Heavy whipping cream adds a luxurious texture that balances the tartness of the berries. I whip the cream with 1/2 cup powdered sugar and 1 tsp vanilla extract until it forms stiff peaks. The peaks should hold their shape when you lift the whisk, indicating that the cream is ready to be folded into the trifle.
For a lighter version, replace the heavy cream with a mixture of Greek yogurt and a splash of milk. This will give you a tangy, creamy layer that still supports the berries without the heaviness of full‑fat cream.
The Final Flourish
The cake is the base that anchors the trifle. I use a 16 oz loaf of angel food cake or pound cake, depending on your preference. Angel food cake is light and airy, which lets the berries shine, while pound cake offers a denser, buttery texture that adds richness.
Cut the cake into bite‑size cubes or crumble it into small pieces. If you’re using angel food cake, consider lightly dusting the cubes with powdered sugar to enhance the sweetness and add a subtle crunch. The cake not only provides structure but also absorbs excess moisture, keeping the trifle from becoming soggy.
Everything's prepped? Good. Let's get into the real action...
The Method — Step by Step
- Start by washing your berries under cold running water. Gently pat them dry with a paper towel—this removes excess moisture that can make the pudding run. Once dry, transfer them to a large mixing bowl. Add the 1/4 cup of granulated sugar and 1 tablespoon of fresh lemon juice. Toss the berries until they’re evenly coated; the sugar will begin to draw out juices, creating a natural syrup. This step is crucial for flavor and texture; I dare you to skip it and taste the difference.
- While the berries are resting, whisk the instant vanilla pudding mix into 2 cups of cold whole milk. Use a whisk or a stand mixer on low speed until the mixture thickens and reaches a custard consistency—usually about 5 minutes. The pudding should be thick enough to hold its shape when spooned, yet smooth enough to blend with the whipped cream later. This is the glue that keeps the trifle from collapsing.
- Whip the heavy cream in a chilled bowl until it forms stiff peaks. Add 1/2 cup powdered sugar and 1 tsp vanilla extract, then continue whipping until the mixture holds firm peaks. The cream should be airy yet stable, ready to be folded into the trifle. This step is the moment of truth—if the cream is too runny, the layers will merge; if too stiff, it will be difficult to fold.
- Prepare your cake by cutting the loaf into bite‑size cubes or crumbling it into small pieces. If you’re using angel food cake, consider sprinkling the cubes lightly with powdered sugar for a subtle sweetness and a gentle crunch. Place the cake pieces at the bottom of a clear trifle dish, creating a solid base that will hold the other layers.
- Add a generous layer of the berry mixture over the cake. Gently spoon the berries, ensuring they’re evenly distributed. The berries should sit on top of the cake, not buried, so each bite has a burst of fruit. This step is where the colors start to show, and the aroma will fill the kitchen.
- Now pour the thickened pudding over the berries. The pudding should coat the fruit and cake, forming a smooth, silky layer. Use a spatula to gently spread it, but avoid stirring too vigorously—watch out for the berries to break apart. If you’re worried about the berries sinking, press them gently into the pudding with the back of a spoon.
- Finish with a final layer of whipped cream, spreading it smoothly over the pudding. Use a spoon or a piping bag for neat swirls. The whipped cream should sit on top like a cloud, adding a light, airy finish that contrasts with the dense cake and pudding below.
- Cover the trifle dish with plastic wrap and refrigerate for at least 2 hours, preferably overnight. The chilling process allows the flavors to meld, the pudding to set, and the berries to release their juices into the layers. When you’re ready to serve, remove the plastic wrap, give the trifle a quick stir, and garnish with fresh mint or a dusting of powdered sugar if desired. That’s it — you did it. But hold on, I've got a few more tricks that'll take this to another level…
Insider Tricks for Flawless Results
The Temperature Rule Nobody Follows
Temperature is everything in a trifle. I always chill the mixing bowls and whisk for at least 15 minutes before whipping the cream. This keeps the cream colder, allowing it to reach stiff peaks faster and preventing it from becoming too dense. A slightly cooler pudding mix also helps maintain its structure once chilled. If you’re in a hurry, use a blender to whisk the pudding; just be careful not to overmix, or you’ll end up with a rubbery texture.
Why Your Nose Knows Best
Before you start layering, give the berries a sniff. A strong, fresh aroma indicates ripe fruit. If the berries smell flat, they’re probably past their prime. Fresh berries not only taste better but also hold up better during chilling, preventing mushy layers. If you’re using frozen berries, thaw them slowly at room temperature for 30 minutes; this preserves their shape and flavor.
The 5-Minute Rest That Changes Everything
After whipping the cream, let it rest for 5 minutes before using it in the trifle. This short pause allows the air bubbles to settle, resulting in a smoother, fluffier texture. I’ve seen friends skip this step and end up with a dense, heavy cream that clumps. The rest also gives you a chance to adjust the sweetness—add a touch more powdered sugar if needed.
Use a Clear Dish for a Showstopper
The trifle’s visual appeal is half the fun. A clear glass or crystal dish showcases the layers, making the dessert look like a piece of art. If you don’t have a clear dish, a dark glass will still work, but the colors won’t pop as much. I like to line the dish with parchment paper for an extra touch of elegance.
Keep the Berries Fresh with a Splash of Lemon
Adding a tablespoon of fresh lemon juice to the berries not only brightens the flavor but also helps keep the berries from oxidizing and turning brown. The acid in the lemon acts as a natural preservative, extending the trifle’s freshness during the chilling period. I always mix the lemon juice with the sugar before tossing the berries to ensure even coating.
Creative Twists and Variations
This recipe is a playground. Here are some of my favorite ways to switch things up:
Chocolate Berry Trifle
Swap the vanilla pudding mix for chocolate instant pudding. Add a handful of chocolate chips to the berry layer for extra richness. Top with a drizzle of melted chocolate for a decadent finish.
Almond Joy Trifle
Use an almond flour cake and sprinkle toasted shredded coconut between layers. Add a splash of coconut milk to the pudding for a tropical twist. Finish with a sprinkle of toasted almonds on top.
Summer Citrus Trifle
Replace half the berries with sliced orange and grapefruit segments. Add a teaspoon of orange zest to the pudding for an extra zing. Garnish with a sprig of fresh rosemary for an aromatic touch.
Berry Cheesecake Trifle
Incorporate a layer of cream cheese mousse between the pudding and whipped cream. Use a pound cake base for a denser texture. This gives the trifle a cheesecake-like richness.
Gingerbread Berry Trifle
Use a gingerbread loaf for a holiday twist. Add a pinch of ground ginger to the pudding mix. Sprinkle a dash of nutmeg over the top for warmth.
Vegan Berry Trifle
Replace the heavy cream with coconut cream whipped to stiff peaks. Use a dairy‑free instant pudding mix. Swap the angel food cake for a vegan sponge cake to keep it fully plant‑based.
Storing and Bringing It Back to Life
Fridge Storage
Store the assembled trifle in the refrigerator for up to 48 hours. Cover tightly with plastic wrap to prevent the top from drying out. The layers will stay crisp, and the berries will remain juicy.
Freezer Friendly
For longer storage, wrap the trifle in two layers of plastic wrap and a foil sheet. Freeze for up to 3 weeks. When ready to serve, thaw overnight in the refrigerator before topping with fresh whipped cream.
Best Reheating Method
Reheating a trifle isn’t recommended, but if you must, gently warm the pudding layer in a microwave at 30-second intervals, stirring each time. Add a splash of water to keep it moist. Re‑whip the cream if it has settled before topping the trifle.