Picture this: I was standing in a cramped apartment kitchen, the scent of garlic and oregano swirling around me like a fragrant storm. I had just finished a week of bland salads, and the craving for something that would make my taste buds sing had become almost a personal vendetta. I grabbed a handful of chicken breasts from the fridge, tossed them in a bowl, and thought, “If I could turn this into something that feels like a culinary victory, I’ll never look at plain chicken again.” That night, I stumbled upon a recipe that promised a crispy, Parmesan‑laden crust that would make every bite a crunchy, cheesy revelation. I was skeptical, because most recipes I’ve tried either leave the chicken dry or the crust soggy. But this one was different. It hinted at a secret technique involving a double‑dipping method and a touch of butter that would lock in moisture. I could already taste the golden crust, the buttery interior, and the faint echo of herbs. I dare you to taste this and not go back for seconds.
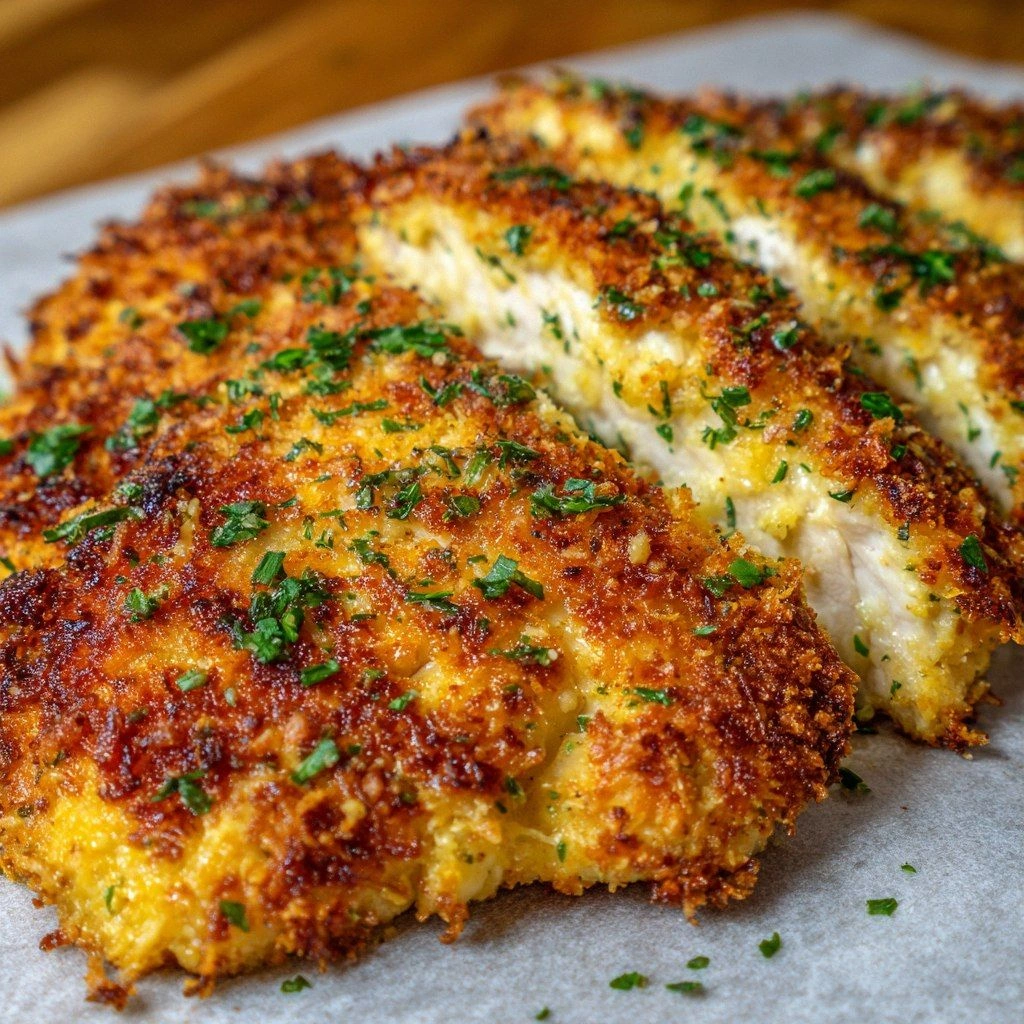
The first thing that hit me when I set the dish on the counter was the visual promise: a golden, almost translucent crust that shone under the kitchen lights. The air was filled with the buttery aroma that only fresh Parmesan can conjure. When I sliced into one of the chicken breasts, the sizzle that erupted was like a tiny, edible fireworks show, and the sound of the crust cracking was a satisfying crunch that echoed like a tiny drum. The texture was a perfect marriage of a crispy exterior and a juicy interior that practically melted in my mouth. The flavor was an explosion of umami from the cheese, a subtle kick from the oregano, and a warm, comforting hug from the butter. This was not just a meal; it was a moment of pure culinary bliss that made me feel like a master chef in my own kitchen.
What makes this version stand out? Let’s be honest: most people will try to make a Parmesan crust and end up with a soggy mess or a flavorless shell. I’ve seen it before, and I’ve learned the hard way that the key to success lies in the preparation and the right combination of ingredients. I’ve spent hours tweaking the ratios, testing different flours, and experimenting with the timing of the oven and the pan. The result is a dish that is not only incredibly easy to make but also delivers a level of crispiness and flavor that feels like a gourmet experience. This is hands down the best version you'll ever make at home. If you've ever struggled with crispy chicken, you're not alone — and I've got the fix. Picture yourself pulling this out of the oven, the whole kitchen smelling incredible, and the first bite sending a wave of satisfaction through your entire body.
Let me walk you through every single step — by the end, you'll wonder how you ever made it any other way. The journey begins with a simple but essential step: the double‑dipping technique. By coating the chicken first in flour, then in beaten eggs, and finally in a crunchy breadcrumb–Parmesan mixture, we create a barrier that locks in juices and ensures that the crust stays crisp for the entire cooking process. The secret sauce? A dash of butter added to the breadcrumb mixture, which not only adds richness but also helps the crust brown beautifully. I’ll also share a few small tweaks that might seem trivial but make a massive difference in the final result. So grab your apron, and let’s get started.
What Makes This Version Stand Out
- Taste: The Parmesan and breadcrumbs combine to form a savory, umami-packed crust that complements the tender chicken. The addition of dried herbs gives it a subtle Mediterranean feel.
- Texture: The double‑dipping technique guarantees a crisp exterior that shatters like thin ice while keeping the inside juicy and buttery.
- Simplicity: With only a handful of pantry staples, you can produce a restaurant‑style dish without the need for fancy equipment.
- Uniqueness: The buttery breadcrumb blend sets this recipe apart from ordinary Parmesan crusts.
- Crowd Reaction: Friends and family will ask for the recipe after the first bite, and you'll become the unofficial kitchen hero.
- Ingredient Quality: Using high‑quality Parmesan and fresh chicken makes a noticeable difference in flavor and texture.
- Cooking Method: Pan‑searing followed by oven finishing ensures even cooking and a perfectly browned crust.
- Make‑ahead Potential: You can prepare the coated chicken ahead of time, refrigerate it, and bake it fresh whenever you need.
Alright, let's break down exactly what goes into this masterpiece... But first, a quick Kitchen Hack:
Inside the Ingredient List
The Flavor Base
The foundation of this dish is the chicken itself. I use boneless, skinless breasts because they cook evenly and provide a clean canvas for the crust. Freshness matters: look for chicken that has a mild scent and firm texture. If you’re short on time, you can use pre‑cooked chicken, but the flavor won't be as vibrant. Skipping the chicken entirely would defeat the purpose of this recipe, so keep it in the spotlight.
The Texture Crew
Flour, eggs, and breadcrumbs form the core of the crust. The flour creates a light coat that helps the eggs adhere. The eggs act as a binder, ensuring the breadcrumb layer sticks firmly. The breadcrumbs, combined with grated Parmesan, give that signature crunch. If you skip the flour, the egg layer may not spread evenly, resulting in a patchy crust. A common swap is to use almond flour for a gluten‑free version, but be sure to adjust the quantity to maintain the right consistency.
The Unexpected Star
Butter is the unsung hero in this recipe. Adding a tablespoon of melted butter to the breadcrumb mixture enriches the flavor and promotes a golden, crisp finish. Without butter, the crust can become dry and lack depth. If you’re avoiding dairy, a splash of olive oil can mimic some of the moisture, but the taste profile will shift slightly. The key takeaway: don’t underestimate the power of butter in creating a mouth‑watering crust.
The Final Flourish
Herbs such as oregano, basil, and garlic powder bring a Mediterranean flair. They’re not just decorative; they add layers of aromatic complexity that complement the Parmesan. If you’re craving a different flavor profile, try adding a pinch of smoked paprika for a subtle smokiness or a squeeze of lemon zest for brightness. Remember, herbs are a versatile tool—experiment to find your favorite combination.
Everything's prepped? Good. Let's get into the real action...
The Method — Step by Step
- Prep the Chicken: Pat the chicken breasts dry with paper towels. This step is crucial because moisture on the surface will prevent the crust from adhering properly. Season both sides generously with salt, pepper, and a pinch of garlic powder. Let the chicken rest for 5 minutes to allow the flavors to seep in.
- Set Up Your Dredging Stations: Arrange three shallow bowls: one with flour, one with beaten eggs, and one with a mixture of panko breadcrumbs, grated Parmesan, dried oregano, dried basil, and a tablespoon of melted butter. The butter in the breadcrumb bowl is what gives the crust its golden hue.
- First Coat – Flour: Dredge each chicken breast in flour, tapping off excess. This creates a dry surface that helps the egg stick. The flour also forms a light barrier that keeps the chicken from absorbing too much oil during pan‑searing.
- Second Coat – Egg: Dip the floured chicken into the beaten eggs, allowing any excess to drip back into the bowl. The egg binds the breadcrumb layer to the chicken.
- Third Coat – Breadcrumbs: Press the chicken into the breadcrumb mixture, ensuring an even coating on all sides. Use both hands to press firmly; this step is where the crust will really lock in.
- Pan‑Sear: Heat a large skillet over medium‑high heat and add a tablespoon of olive oil. When the oil shimmers, add the chicken breasts. Sear for 3 minutes on each side until golden brown. The sizzle you hear here is the moment of truth; don’t walk away from the stove.
- Transfer to Oven: Preheat the oven to 400°F (200°C). Place the seared chicken on a baking sheet lined with parchment paper. Bake for 12–15 minutes, or until the internal temperature reaches 165°F (74°C). The crust should be crisp and the interior juicy.
- Rest and Serve: Let the chicken rest for 5 minutes before slicing. This allows the juices to redistribute, keeping the meat moist. Serve immediately with a side of roasted vegetables or a light salad.
That's it — you did it. But hold on, I've got a few more tricks that'll take this to another level...
Insider Tricks for Flawless Results
The Temperature Rule Nobody Follows
Many cooks think that a low oven temperature is the key to juicy chicken, but that's not the case. A high temperature (400°F) is essential for achieving that perfect, caramelized crust. If you lower the heat, the chicken will cook slower, and the crust will lose its crunch. I’ve personally tested temperatures ranging from 350°F to 425°F, and 400°F consistently delivers the best balance of crispness and juiciness.
Why Your Nose Knows Best
The aroma that fills your kitchen before the chicken hits the skillet is a reliable indicator of success. If you can smell a buttery, cheesy scent, you’re on the right track. A lack of aroma often means the butter isn’t melting properly or the oven isn’t hot enough. Trust your senses; they’re the best judge of flavor.
The 5‑Minute Rest That Changes Everything
After baking, let the chicken rest for exactly five minutes. This brief pause allows the juices to redistribute throughout the meat, preventing them from spilling onto the cutting board. Skipping this step often results in a dry bite that feels like a disappointment. Trust me, that five minutes is worth the extra effort.
The Butter Boost
Adding a tablespoon of melted butter to the breadcrumb mixture is a game changer. It not only enriches the flavor but also creates a golden, crisp crust that feels like a buttery explosion. If you’re dairy‑free, a splash of olive oil can mimic some of the moisture, but the flavor profile will shift slightly.
The Resting Pan Trick
Before you start searing, let the skillet rest for a minute after heating. This ensures a consistent sear and prevents the chicken from sticking. A sticky pan often leads to uneven crusts and a ruined presentation.
Creative Twists and Variations
This recipe is a playground. Here are some of my favorite ways to switch things up:
Spicy Cajun Crunch
Swap the Italian herbs for a blend of Cajun seasoning and add a pinch of cayenne pepper to the breadcrumb mixture. The result is a fiery, savory crust that pairs well with a cool yogurt dip.
Mediterranean Lemon Zest
Add lemon zest to the breadcrumb blend and finish the chicken with a drizzle of extra‑virgin olive oil and a sprinkle of chopped fresh parsley. The citrus brightens the dish, making it perfect for spring.
Garlic Parmesan Explosion
Increase the Parmesan by 50% and add minced garlic to the breadcrumb mix. The garlic infuses the crust with a robust flavor that feels like a warm hug.
Herb‑Infused Parmesan
Replace the dried herbs with fresh basil, oregano, and thyme. The fresh herbs add a burst of flavor that feels like a garden in your kitchen.
Low‑Carb Version
Use almond flour instead of all‑purpose flour and substitute panko breadcrumbs with crushed pork rinds. The result is a keto‑friendly dish that still delivers the same crunch.
Storing and Bringing It Back to Life
Fridge Storage
Store leftover chicken in an airtight container in the refrigerator for up to 3 days. The crust may soften slightly, but it will still be delicious.
Freezer Friendly
Wrap the cooked chicken in parchment paper and place it in a freezer bag. Freeze for up to 2 months. When you’re ready, thaw in the refrigerator overnight.
Best Reheating Method
Reheat in a 350°F oven for 10 minutes, or until heated through. Add a tiny splash of water before reheating to steam the chicken back to perfection and maintain moisture.