I was standing in the middle of a kitchen that had seen better days, a place where the last batch of cookies had turned into a sticky mess that clung to the counter like a bad habit. The air was thick with the scent of caramelized sugar and toasted nuts, and I could hear the faint hiss of a pan that had overheated on the stove. That moment of culinary chaos sparked a daring idea: what if I could turn that sticky mess into a batch of bars that were both chewy and crunchy, with a cinnamon kick that would make my taste buds do a little happy dance? I’m not going to lie—when the first bite hit my tongue, it was like a warm hug from a cinnamon-scented blanket, and I knew right then that I had stumbled on something extraordinary.
Picture yourself pulling a tray of golden bars out of the oven, the kitchen filling with a scent that feels like a cozy winter morning, yet the bars themselves are perfectly chewy with a hint of nutty crunch. The first bite releases a cascade of sweet and spicy notes that linger long after the last crumb. The texture is a symphony: the exterior crisp, the interior soft, and the walnuts providing a satisfying bite that contrasts with the smooth honey glaze. If you’ve ever tried a bland, dry bar that feels like a lump of dough, this is the antidote that will have you reaching for seconds, and I dare you to taste this and not go back for a third round.
What sets this version apart is that it balances the humble ingredients into a masterpiece that feels like a dessert you’d find in a fancy bakery, but it’s made with pantry staples and a touch of culinary intuition. I’ve tweaked the ratio of flours to keep the bars moist without sacrificing structure, and the honey‑apple‑sauce combo adds a subtle tang that keeps the sweetness from becoming cloying. The cinnamon is not just a spice; it’s a flavor engine that drives the entire profile, turning each bite into a warm, comforting experience that feels both indulgent and wholesome. The result is a bar that holds its shape, yet yields to a gentle press, revealing a moist center that is impossible to resist.
I’ll be honest—when I first tasted the finished product, I ate half the batch before anyone else got a chance. But that’s how you know you’ve found something special; you can’t wait to share it with everyone. The best part? You can make this at home in a fraction of the time it takes to bake a cake, and it’s a crowd‑pleaser that will leave your guests asking for the recipe. So, if you’ve ever struggled to find the right balance of sweetness and chewiness in a bar, you’re not alone—and I’ve got the fix. Let me walk you through every single step—by the end, you’ll wonder how you ever made it any other way.
What Makes This Version Stand Out
- Flavor: The marriage of honey, applesauce, and cinnamon creates a depth that is both sweet and subtly tart, a flavor profile that is rarely achieved in simple bar recipes. This isn’t just a sweet treat; it’s a warm, aromatic experience that feels like a hug in a bite.
- Texture: The bars are chewy yet firm enough to hold a bite, with the walnuts adding a satisfying crunch that breaks the monotony of a single mouthfeel. The result is a multi‑layered experience that keeps your palate engaged.
- Simplicity: With only sixteen ingredients—most of which you already have in your pantry—this recipe is approachable for beginners and seasoned bakers alike. No need for exotic ingredients or specialized equipment.
- Uniqueness: The use of canola oil and applesauce keeps the bars moist without relying on butter alone, giving the dough a tender crumb that sets this recipe apart from the usual butter‑heavy bars.
- Make‑ahead Potential: These bars store well in the fridge or freezer, making them an ideal make‑ahead snack for busy days or special occasions. The glaze remains glossy and the bars stay soft even after a few days.
- Ingredient Quality: Each component is chosen for its contribution to flavor and texture. For example, whole wheat flour adds body and a subtle nutty note, while all‑purpose flour keeps the bars tender.
- Cooking Method: The combination of baking powder and baking soda ensures a light lift, while the honey glaze gives the bars a glossy finish that looks as good as it tastes.
Alright, let’s break down exactly what goes into this masterpiece...
Inside the Ingredient List
The Flavor Base
Whole wheat flour and all‑purpose flour form the backbone of the dough, providing structure and a slight nutty undertone. Whole wheat adds a rustic depth that balances the sweetness of honey, while all‑purpose keeps the bars tender. If you skip the whole wheat, the bars will taste a bit flatter; the contrast between the two flours is subtle but essential. A good rule of thumb is to use fresh, high‑quality flours for the best flavor; older flour can taste stale and affect the overall profile.
The Sweetness Engine
Granulated sugar gives the bars a classic sweetness, but the honey and applesauce introduce natural sugars that add complexity. Honey’s floral notes elevate the cinnamon, while applesauce provides moisture and a hint of tartness that keeps the bars from becoming overly sweet. If you prefer a vegan version, substitute the honey with maple syrup and keep the applesauce; the flavor will still be rich and satisfying. The combination of these sweeteners also helps the bars brown beautifully, creating a caramelized crust.
The Spice & Leavening Crew
Ground cinnamon is the star of the show, infusing the dough with warmth and depth. Baking powder and baking soda work together to create a light, airy crumb that prevents the bars from becoming too dense. The baking soda also reacts with the applesauce’s acidity, producing tiny bubbles that lift the dough. If you don’t have baking soda, you can increase the baking powder slightly, but the bars may not rise as well.
The Final Flourish
Walnuts provide a crunchy contrast and a buttery flavor that complements the honey glaze. Butter, melted, adds richness and helps the glaze set into a glossy finish. Vanilla extract and a splash of water add depth and help bind the mixture, ensuring the bars hold together after baking. If you’re looking for a nutless version, substitute the walnuts with dried cranberries or chopped dark chocolate for a different flavor profile.
Everything's prepped? Good. Let's get into the real action...
The Method — Step by Step
- Preheat and Prepare: Set your oven to 350°F (175°C) and line a 9x13-inch baking pan with parchment paper, leaving an inch of overhang on each side for easy removal. The parchment not only prevents sticking but also adds a slight crisp to the edges. While the oven heats, gather all your ingredients and measure them precisely—precision is key for the perfect texture.
- Combine Dry Ingredients: In a large mixing bowl, whisk together the whole wheat flour, all‑purpose flour, granulated sugar, cinnamon, baking powder, and baking soda. This ensures even distribution of leavening agents and spices. A quick sift of the dry mix can help remove any lumps and give the dough a smoother feel.
- Blend Wet Ingredients: In a separate bowl, whisk the egg, canola oil, applesauce, honey, vanilla, and water until the mixture is smooth and glossy. The water helps the wet mixture integrate seamlessly with the dry mix, preventing clumps. If you’re feeling adventurous, add a pinch of sea salt to enhance the overall flavor profile.
- Mix Wet and Dry: Pour the wet mixture into the dry mix and stir with a rubber spatula until just combined. Over‑mixing can develop gluten and make the bars tough. The dough should be thick but pliable, with a slight tackiness that’s easy to spread.
- Add Walnuts: Fold in the chopped walnuts until they’re evenly distributed throughout the batter. The walnuts add a satisfying crunch and a burst of buttery flavor that complements the honey glaze. If you prefer a lighter texture, you can reserve a portion of the walnuts for topping.
- Transfer to Pan: Spoon the batter into the prepared pan, using a spatula to smooth the top. The overhang will help lift the bars later, and a smooth surface ensures even baking. Press the batter down slightly to eliminate air pockets that could cause uneven rise.
- Bake: Place the pan in the preheated oven and bake for 25–30 minutes, or until a toothpick inserted into the center comes out clean. The bars should develop a golden brown crust, and the edges will start pulling away from the pan. The aroma of cinnamon and honey will fill your kitchen, making it impossible to resist the temptation.
- Cool and Glaze: Remove the pan from the oven and allow the bars to cool in the pan for 10 minutes. While they’re still warm, pour the remaining honey over the top, letting it seep into the bars. The honey glaze will set into a glossy finish as the bars cool, creating a beautiful sheen.
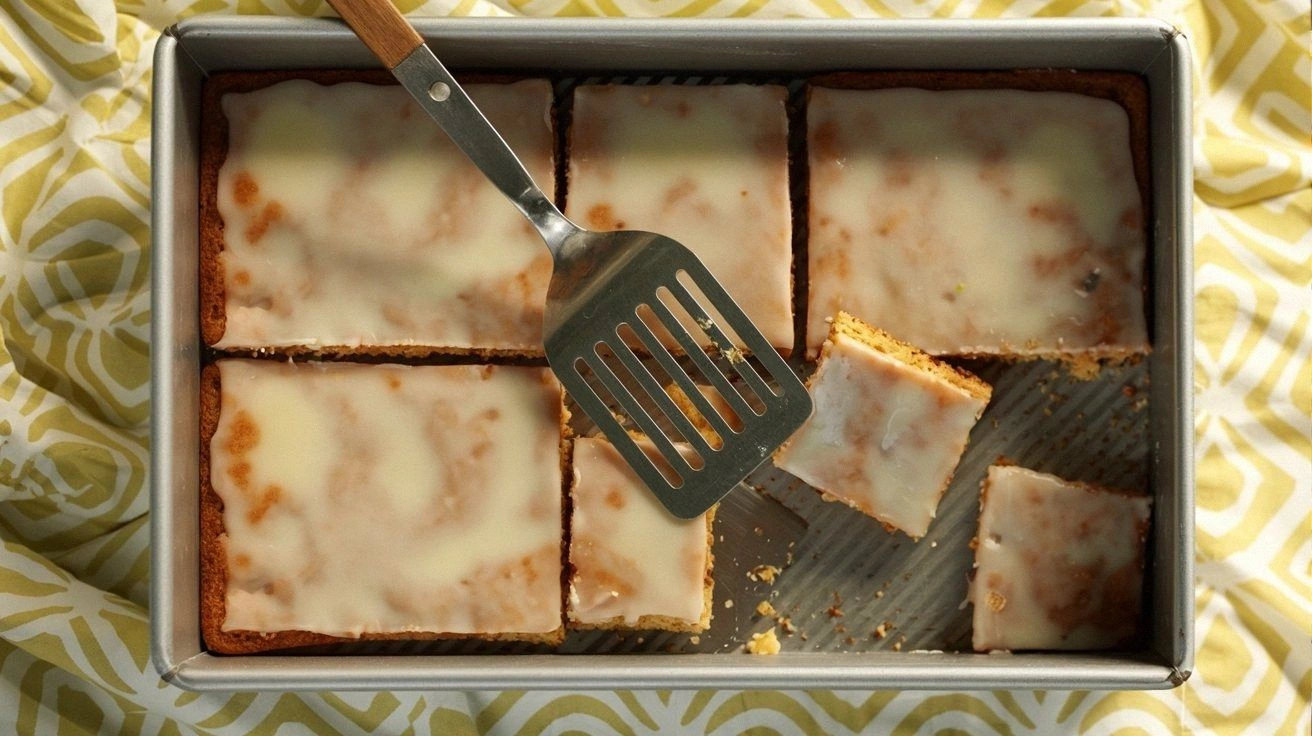
- Cut and Serve: Once the bars have cooled completely, lift them out of the pan using the parchment overhang. Place on a cutting board and cut into squares or bars. Serve immediately or store in an airtight container for up to a week.
That's it — you did it. But hold on, I've got a few more tricks that'll take this to another level...
Insider Tricks for Flawless Results
The Temperature Rule Nobody Follows
Many bakers bake at 375°F, but lowering the temperature to 350°F gives the bars a chance to rise evenly without burning the edges. The slower bake allows the honey glaze to set properly, creating that glossy finish. I once tried 375°F and the bars were too dark on the outside while the center remained undercooked. Stick to 350°F and you’ll get a consistent, beautiful result every time.
Why Your Nose Knows Best
During the first 10 minutes of baking, keep an eye on the aroma; it should smell like toasted sugar and warm cinnamon. If you notice a metallic or burnt smell, the oven temperature is too high. Smell is the quickest way to judge doneness, and it’s a skill that seasoned bakers rely on.
The 5-Minute Rest That Changes Everything
After removing the bars from the oven, let them rest in the pan for exactly five minutes before adding the glaze. This short rest allows the heat to distribute evenly, preventing the bars from cracking when the glaze is added. The bars will also firm up slightly, making them easier to cut.
Keep the Parchment Overhang
The parchment overhang is not just for convenience; it also helps the bars maintain their shape during cooling. Without it, the bars can sag or stick to the pan, making cutting difficult. Pull the bars out gently, and the parchment will lift them cleanly.
Use a Digital Scale
Weighing ingredients ensures consistency, especially when scaling the recipe up or down. A digital scale can be a game changer; it eliminates guesswork and guarantees that the bars come out the same every time. Even the difference of a teaspoon can alter the texture.
Watch Out: If you’re using a convection oven, reduce the temperature by 25°F to avoid over‑browning.
Creative Twists and Variations
This recipe is a playground. Here are some of my favorite ways to switch things up:
Chocolate Chip Surprise
Fold in a cup of dark chocolate chips before baking. The chocolate adds a rich, bittersweet layer that complements the honey and cinnamon. The result is a decadent treat that feels like a dessert bar.
Almond Butter Boost
Swap the walnuts for almond butter and chopped almonds. The almond butter adds a creamy texture and a nutty aroma that pairs well with the cinnamon. This variation is perfect for those who love a richer, buttery bite.
Maple & Pecans Edition
Use maple syrup instead of honey and add a cup of pecans. The maple gives a deeper sweetness, while the pecans provide a buttery crunch. This version has a Southern feel that’s perfect for fall gatherings.
Coconut Crumble
Add a cup of shredded coconut to the batter and sprinkle toasted coconut on top before glazing. The coconut adds a tropical twist and a delightful chew. The bars will have a beach‑inspired aroma that transports you to warm shores.
Spiced Orange Twist
Replace half of the honey with orange marmalade and add a teaspoon of orange zest. The citrus adds brightness and a refreshing contrast to the warm spices. The bars will feel lighter, almost like a dessert in a jar.
Raspberry & Walnut Delight
Incorporate a cup of fresh or frozen raspberries into the batter and reserve a handful of walnuts for topping. The berries add tartness, while the walnuts provide crunch. This version is a perfect match for berry lovers.
Storing and Bringing It Back to Life
Fridge Storage
Place the bars in an airtight container and store them in the refrigerator for up to a week. The cool temperature keeps the honey glaze from melting and preserves the chewy texture. When you’re ready to eat, let them sit at room temperature for a few minutes to soften.
Freezer Friendly
Wrap individual bars in parchment paper and then place them in a freezer bag. They’ll stay fresh for up to three months. When you want a quick snack, pop a bar into the microwave for 15–20 seconds, and it will be almost as good as fresh.
Best Reheating Method
To reheat, preheat your oven to 300°F (150°C). Place the bars on a parchment‑lined tray and warm them for 8–10 minutes. Add a tiny splash of water before reheating to create steam, which helps the bars regain their softness and prevents the glaze from drying out.