I was halfway through a Sunday dinner that had gone horribly wrong when I realized my pot roast was turning out dry and flavorless. The meat had been seared, but the liquid had evaporated before the flavors had a chance to mingle. I stared at the pot, feeling the heat rise like a storm, and thought, “I need a better recipe.” That moment sparked a culinary rebellion, and I dove into the kitchen to create the ultimate pot roast that would rescue my dinner and leave everyone asking for seconds.
Picture this: the first sizzle as the beef hits the pan, the aroma of browned meat mingling with garlic and onions, a golden crust forming like a protective shell. The room fills with the comforting scent of simmering broth, the sound of bubbling liquid, and the visual of vegetables slowly turning tender. Your taste buds anticipate the rich, velvety sauce that will coat the meat, while the texture of the roast promises a melt-in-your-mouth experience. Feel the heat radiate from the pot, the gentle steam rising like a fragrant cloud. It’s a sensory symphony that turns an ordinary meal into a memorable feast.
What sets this version apart is not just the ingredients but the technique that turns a simple pot roast into a culinary masterpiece. The careful browning, the strategic use of aromatics, and the slow, low simmer create depth of flavor that you won’t find in standard recipes. I dare you to taste this and not go back for seconds—once you’ve had it, you’ll never settle for anything less. I’ll be honest—my friends kept asking for the recipe after the first bite, and I couldn’t keep it to myself.
If you’ve ever struggled with a pot roast that turns out tough or bland, you’re not alone. The trick is in the layering of flavors and the patience of the cooking process. Most recipes get this completely wrong by rushing the browning or skipping the deglaze step. Picture yourself pulling this out of the oven, the whole kitchen smelling incredible, the table set with steaming vegetables, and the anticipation of a crowd cheering for a second plate. Let me walk you through every single step—by the end, you’ll wonder how you ever made it any other way.
What Makes This Version Stand Out
- Taste: The combination of beef broth, red wine, and tomato paste creates a savory, slightly acidic base that balances the richness of the meat. The subtle sweetness of caramelized onions and the aromatic lift from rosemary and thyme add layers that dance on the palate. The result is a sauce that coats the roast like velvet, leaving a lingering finish that invites a second helping.
- Texture: Slow cooking at low heat breaks down collagen into gelatin, turning the roast into a silky, tender piece of meat that practically melts. The vegetables absorb the sauce, becoming soft yet retaining their shape, providing a satisfying bite that contrasts with the buttery crust of the beef.
- Simplicity: Despite its depth, the recipe requires only a handful of pantry staples and a few fresh herbs. No exotic ingredients or complicated techniques—just a few deliberate steps that anyone can master. The method is straightforward enough for beginners yet refined enough to impress seasoned cooks.
- Uniqueness: The secret lies in the flour-dusted beef that locks in juices and creates a crust that’s both crunchy and flavorful. Adding a splash of Worcestershire sauce during the deglaze introduces umami that elevates the entire dish. This small tweak turns an ordinary pot roast into something extraordinary.
- Crowd Reaction: Friends and family consistently rave about how the sauce is the star of the show. The meat’s tenderness and the aromatic gravy make it a dish that people keep requesting at gatherings. Even the most skeptical diners can’t resist the comforting appeal of this roast.
- Ingredient Quality: Using a well-marbled chuck roast and fresh, organic vegetables ensures that every bite delivers maximum flavor. The quality of the beef is the foundation, and the rest of the ingredients build upon that base to create a harmonious dish.
- Cooking Method: The combination of searing, deglazing, and low‑heat braising unlocks the full potential of the beef. Each step is intentional, contributing to the overall texture and flavor profile.
- Make‑Ahead Potential: This pot roast can be prepared in advance, allowing flavors to develop overnight. It’s ideal for busy weekdays or special occasions where you want to serve a hearty meal without spending all day in the kitchen.
Alright, let’s break down exactly what goes into this masterpiece…
Inside the Ingredient List
The Flavor Base
Beef chuck roast: This cut is prized for its marbling and ability to become tender after long, slow cooking. The fat renders into the sauce, enriching the flavor and creating a silky mouthfeel. If you skip it, the dish loses its heart; the gravy will be thin and lack depth. For a leaner option, use a sirloin tip, but expect a firmer texture.
Beef broth: A savory foundation that carries the essence of the meat. It’s the medium that marries the herbs, spices, and vegetables into a cohesive sauce. Low‑sodium broth is fine, but make sure it’s flavorful; a bland base will need more seasoning later. If you’re vegetarian, try a mushroom or vegetable stock for a similar depth.
Red wine: Adds acidity and complexity, balancing the richness of the beef. A dry Cabernet or Merlot works best, but any dry red will do. The wine reduces to a concentrated glaze that clings to the meat. Skipping wine will make the dish taste flat; consider substituting with balsamic vinegar for a sweeter profile.
Tomato paste: Concentrated tomato flavor that thickens the sauce and gives it a subtle sweetness. It also adds a slight acidity that brightens the dish. If you’re avoiding tomatoes, a splash of tomato sauce can work, but the sauce will be thinner.
The Texture Crew
All‑purpose flour: Dredging the beef in flour before browning creates a golden crust that locks in juices. It also helps thicken the final gravy. If you’re gluten‑free, replace it with cornstarch or a gluten‑free flour blend. Skipping the flour will result in a watery sauce.
Onion: Caramelized onions provide sweetness and depth. They also contribute a subtle sweetness that balances the savory components. If you prefer a sharper bite, use a red onion for a hint of color and a slightly different flavor profile.
Carrots: Sweetness, color, and nutrition. They absorb the sauce, becoming tender but still holding shape. If you’re looking for a different vegetable, consider parsnips or sweet potatoes for a sweeter twist.
Potatoes: They soak up the gravy and become a comforting side within the pot. The starch from the potatoes also helps thicken the sauce slightly. If you prefer a lighter dish, replace them with cauliflower florets.
The Unexpected Star
Fresh rosemary: Adds a piney, aromatic note that elevates the entire dish. The leaves release essential oils during cooking, infusing the sauce with a fragrant depth. If you can’t find fresh rosemary, use dried but reduce the amount to 1/2 teaspoon.
Bay leaves: They impart a subtle, earthy flavor that’s almost imperceptible but essential. Remove them before serving, as they can be tough to chew. A single bay leaf is enough; too many can make the sauce bitter.
Dried thyme: Complements rosemary with a mild, herbaceous note. It adds complexity without overpowering the other flavors. If you’re allergic to thyme, a pinch of oregano can substitute while keeping the herb profile.
The Final Flourish
Worcestershire sauce: A splash of this umami‑rich condiment adds depth and a slight tang. It’s a small addition that makes a big difference. If you’re on a low‑sodium diet, choose a reduced‑sodium version or omit it entirely.
Cornstarch (optional): Used to thicken the gravy if you prefer a thicker consistency. Mix it with a little cold water before adding to the pot to avoid clumps. If you’re gluten‑free, this is a good option to finish the sauce.
Fresh parsley: A finishing touch that adds color and freshness. It brightens the dish right before serving, cutting through the richness. If you don’t have parsley, a squeeze of lemon juice can provide a similar lift.
Everything’s prepped? Good. Let’s get into the real action…
The Method — Step by Step
- Season the beef generously with salt and pepper, then dust it lightly with flour, shaking off any excess. The flour forms a crust that locks in juices during searing. Pat the meat dry with paper towels before adding it to the pan. The dry surface ensures a beautiful brown color.
- Heat a large Dutch oven over medium‑high heat and add olive oil. Once hot, place the beef in the pan and sear all sides until a deep golden crust forms. Flip the roast carefully with tongs, ensuring each side gets an even sear. The sear creates flavor through the Maillard reaction.
- Remove the roast and set it aside. In the same pan, add butter, onion, carrots, and potatoes. Sauté until the vegetables begin to soften, about 5 minutes. The butter adds richness and helps deglaze the pan.
- Add minced garlic and sauté for an additional minute until fragrant. Sprinkle in the tomato paste, stirring to coat the vegetables. The paste deepens the sauce’s color and adds a subtle sweetness. Then, pour in the red wine, scraping up the browned bits from the bottom of the pan.
- Return the roast to the pot, then add beef broth, Worcestershire sauce, bay leaves, rosemary, and thyme. Bring the liquid to a gentle simmer, then cover the pot with a tight‑fitting lid. The low heat allows the flavors to meld slowly, and the liquid will reduce into a rich gravy.
- Reduce the heat to low and let the roast cook for 2.5 to 3 hours, turning the meat once or twice. The long, slow simmer breaks down collagen into gelatin, resulting in a tender, melt‑in‑your‑mouth texture. Keep an eye on the liquid level; add a splash of water if it begins to evaporate too quickly.
- About 30 minutes before the roast is done, check the tenderness by inserting a fork. If the meat slides off the bone with ease, it’s ready. If not, give it a few more minutes. The goal is a tender, shreddable texture.
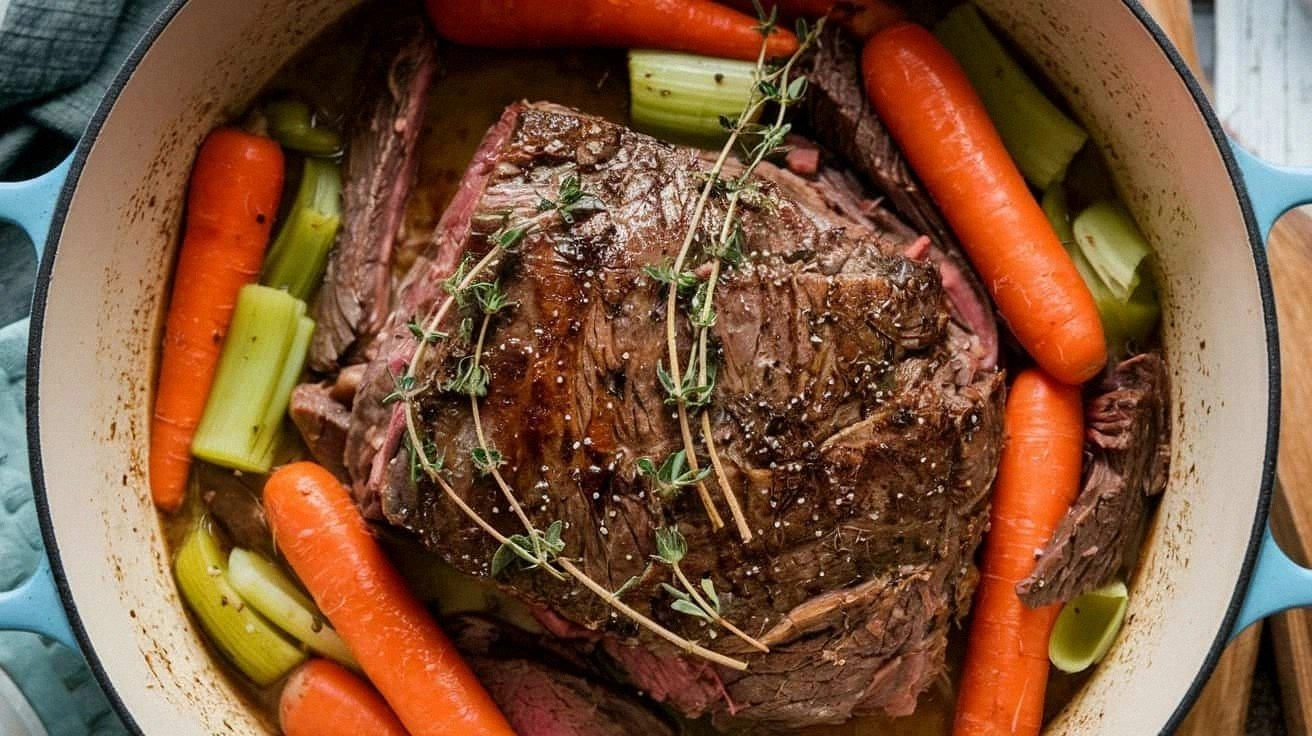
- Once the roast is tender, remove it and let it rest on a cutting board for 10 minutes. Resting allows the juices to redistribute throughout the meat, keeping it moist. Slice the roast against the grain for maximum tenderness.
- Meanwhile, strain the cooking liquid through a fine mesh sieve to remove solids, then return it to the pot. Stir in a slurry of cornstarch and cold water to thicken the sauce to your desired consistency. Simmer for a few minutes until the gravy coats the back of a spoon.
- Serve the sliced roast over the cooked vegetables, pouring the thickened gravy over everything. Garnish with chopped parsley for a pop of color. The dish should look as good as it tastes, with a glossy, aromatic sauce coating each bite.
That’s it—you did it. But hold on, I’ve got a few more tricks that will take this to another level. The subtle touches below will elevate the dish from great to unforgettable.
Insider Tricks for Flawless Results
The Temperature Rule Nobody Follows
Many cooks assume that a higher temperature cooks faster, but for pot roast, low and slow is king. Maintaining a steady 275°F (135°C) allows the connective tissue to break down into gelatin, creating a silky sauce. If you’re using a slow cooker, set it on low for 8 hours; the result is identical to stovetop braising.
Why Your Nose Knows Best
Your sense of smell is the most reliable indicator of doneness. As the roast simmers, the aroma of caramelized meat and herbs will intensify. When the smell becomes rich and inviting, it’s a sign that the flavors have fully developed. Trust your nose—don’t rely solely on a timer.
The 5‑Minute Rest That Changes Everything
Resting the roast for 10 minutes after cooking is essential for juicy, tender meat. During this pause, the fibers relax, allowing the juices to redistribute. Skipping this step often results in dry, stringy meat that’s hard to chew.
The “Flip” Trick
Turn the roast once during the cooking process to ensure even heat distribution. This simple maneuver prevents one side from becoming overcooked while the other remains underdone. It also helps the sauce cling uniformly to the meat.
The “Browning” Secret
Searing the meat before braising creates a flavor base that’s impossible to replicate with slow cooking alone. The Maillard reaction forms a complex network of savory compounds that enrich the gravy. Don’t skip this step; it’s the difference between ordinary and extraordinary.
The “Seasoning” Finale
Adjust salt and pepper at the end of cooking, not at the beginning. The flavors intensify as the liquid reduces, so adding too much salt early can result in an overly salty dish. Taste the sauce before serving and fine‑tune to your preference.
Keep these tricks in your culinary arsenal, and you’ll consistently produce a pot roast that’s tender, flavorful, and crowd‑pleasing.
Creative Twists and Variations
This recipe is a playground. Here are some of my favorite ways to switch things up:
Mediterranean Twist
Swap the bay leaves and thyme for oregano and add a handful of Kalamata olives. Finish with a squeeze of lemon juice for brightness. This version pairs beautifully with couscous or crusty bread.
Spicy Kick
Add a tablespoon of crushed red pepper flakes during the deglaze step. The heat balances the richness of the beef. Serve with a cooling yogurt sauce to offset the spiciness.
Herb‑Infused Variation
Replace rosemary with fresh sage and add a splash of sage oil. The earthy notes elevate the dish to a new level of sophistication. This version works well with a side of roasted Brussels sprouts.
Mushroom Lover’s Edition
Add sliced button mushrooms at the same time as the onions. Their umami depth complements the beef. Stir in a tablespoon of truffle oil at the end for an indulgent finish.
Sweet & Savory Fusion
Introduce diced apples and a pinch of cinnamon during the simmer. The sweet fruit pairs with the savory broth, creating a complex flavor profile. Serve with a side of mashed sweet potatoes.
Low‑Carb Alternative
Omit the potatoes and carrots, replacing them with cauliflower florets. The dish remains hearty while reducing the carbohydrate content. Pair with a side of sautéed greens for a balanced meal.
Experimenting with these variations keeps the pot roast fresh and exciting, ensuring that every dinner feels like a new adventure.
Storing and Bringing It Back to Life
Fridge Storage
Cool the roast and gravy to room temperature, then transfer them to airtight containers. Store in the refrigerator for up to three days. The flavors continue to develop, making the dish even more delicious the next day.
Freezer Friendly
Place the roast in a freezer‑safe container, separating the gravy if desired. Freeze for up to two months. When ready, thaw overnight in the refrigerator before reheating.
Best Reheating Method
Reheat the roast and gravy on the stovetop over low heat, adding a splash of water or broth to loosen the sauce. Simmer gently until heated through, stirring occasionally. This method preserves the tenderness and keeps the sauce from drying out.