It started with a simple craving for a midnight snack and a disastrous attempt at a classic s’more. I was in the middle of a pizza night, the oven was still humming, and I decided to whip up something sweet without any preparation. I tossed a handful of chocolate chips into a bowl, sprinkled them on top of a mound of marshmallows, and set the whole thing on a baking sheet. The result was a sticky, soggy mess that looked more like a melted dessert than a crunchy cookie. That moment was a wake‑up call: I needed a better recipe.
The scent of cocoa and vanilla wafted through the kitchen, mingling with the faint sweetness of brown sugar. My eyes caught the glossy sheen of the butter as it melted, the flour dusting the countertop like powdered snow. The sound of the whisk beating against the bowl was rhythmic, almost hypnotic. When I finally took the first bite, the cookie crackled under my teeth, revealing a molten center that melted into a gooey, marshmallow‑laden core. The texture was a paradox of crisp edges and chewy heart, a flavor explosion that made my taste buds dance.
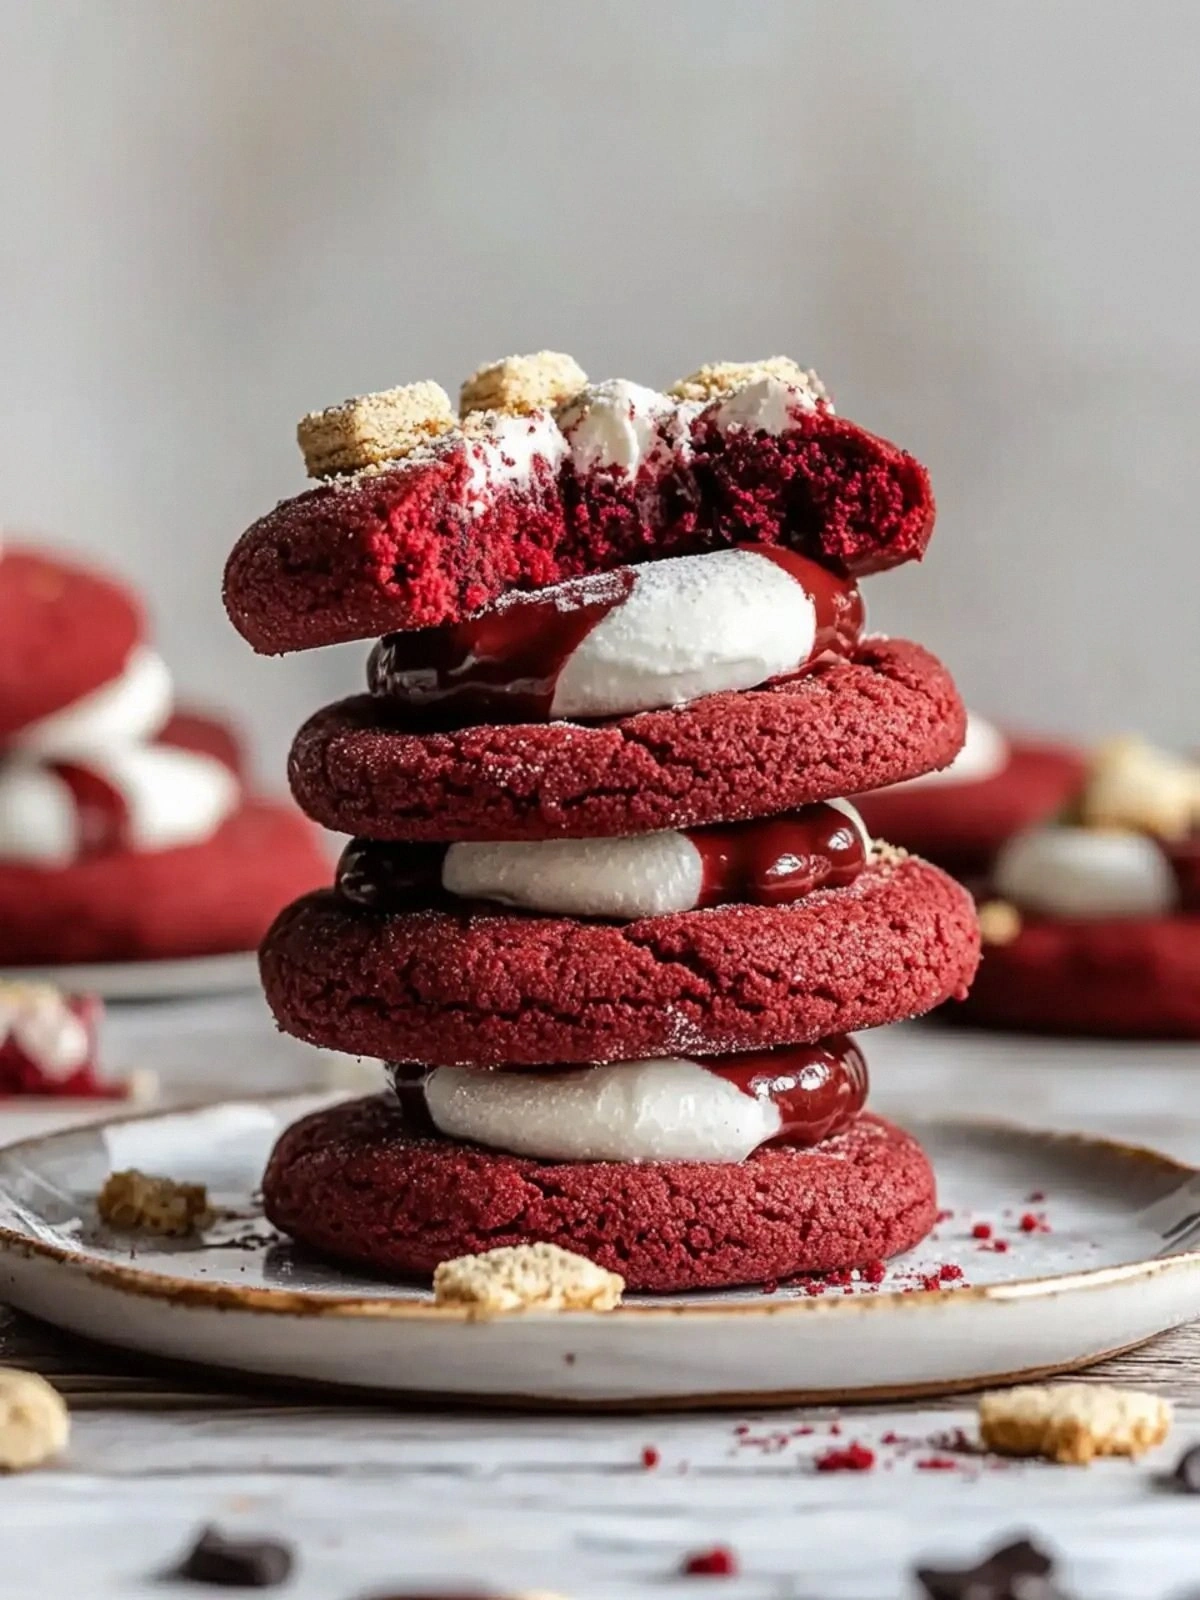
What sets this version apart from every other cookie recipe you’ve ever tried is the intentional layering of flavors and textures. The red velvet base gives it a dramatic color that’s almost theatrical, while the white chocolate chips add a subtle sweetness that balances the cocoa’s bitterness. The crushed Oreos create a crunchy contrast that breaks the monotony of the soft cookie, and the marshmallows are toasted just enough to caramelize without burning. The result is a cookie that feels like a dessert, a snack, and a party trick all at once. If you think you’ve seen everything, think again.
I’ll be honest — I ate half the batch before anyone else got to try it. The first bite was like a fireworks show in your mouth, the second a gentle hug, and the third a sweet, lingering after‑taste that made you crave more. Most recipes get this completely wrong. Here’s what actually works: the precise ratio of butter to flour, the right amount of cocoa, and the secret step of adding a splash of red food coloring at the very end. Picture yourself pulling these cookies out of the oven, the whole kitchen smelling incredible, and watching the golden tops gleam like tiny suns.
Okay, ready for the game‑changer? I dare you to taste this and not go back for seconds. This is hands down the best version you’ll ever make at home. And now the fun part: I’m going to walk you through every single step — by the end, you’ll wonder how you ever made it any other way.
I’ve spent countless evenings experimenting with cookie dough, and every time I thought I had it nailed, the texture would disappoint or the flavor would be flat. After a thousand trials, I finally cracked the code. The secret lies in the harmony between the wet and dry ingredients, the timing of when you fold in the chocolate chips, and the final touch of toasted marshmallows. The result is a cookie that’s moist on the inside, crisp on the edges, and bursting with a melty, sweet center. This isn’t just another cookie recipe; it’s a culinary revelation that will have your friends begging for the recipe. I promise you, once you taste it, you’ll never settle for ordinary cookies again.
What Makes This Version Stand Out
- Color: The vibrant red hue is achieved with natural red food coloring, giving the cookies a dramatic visual impact that’s perfect for any occasion.
- Texture: Crisp edges and a chewy center create a mouthfeel that feels like a crunchy wafer meets a gooey marshmallow.
- Flavor Layering: The combination of cocoa, white chocolate, and toasted marshmallows delivers a complex flavor profile that satisfies sweet cravings.
- Ease: The recipe requires minimal steps and no fancy equipment, making it accessible for both novice and experienced bakers.
- Make‑ahead: The dough can be prepared up to 24 hours in advance, and the cookies keep well in an airtight container.
- Versatility: Swap in dark chocolate chips or use mini marshmallows for a different twist, and the cookies adapt effortlessly.
- Party‑Ready: The striking appearance and delicious taste make these cookies an instant crowd‑pleaser at gatherings.
- Nutrition: With 350 calories per serving, these cookies strike a balance between indulgence and satisfaction.
Alright, let's break down exactly what goes into this masterpiece...
Inside the Ingredient List
The Flavor Base
Butter is the backbone of this cookie, providing richness and a buttery aroma that lingers long after you finish. If you skip it, the cookie will feel dry and flat. For an extra touch of indulgence, opt for European‑style unsalted butter, which has a higher fat content and delivers a creamier texture.
All purpose flour gives the cookies structure. It’s essential for the cookie to hold its shape during baking. Using cake flour or bread flour will alter the crumb; cake flour will be too tender, bread flour will be chewy and dense. If you’re gluten‑sensitive, try a 1:1 blend of oat and rice flour for a similar result.
Cocoa powder is the star that gives the cookie its signature dark undertone. Dark cocoa provides a richer, slightly bitter flavor that balances the sweetness. If you prefer a milder taste, use Dutch‑process cocoa, but be sure to reduce the sugar slightly to compensate.
The Texture Crew
Baking soda is the leavening agent that creates lightness and helps the cookie rise just enough to keep the interior soft. Skip it, and the cookies will be flat and heavy. Keep the baking soda fresh; old soda won’t lift the dough.
Salt is the flavor enhancer that brings out the chocolate and balances the sweetness. A pinch of salt is all you need; too much will make the cookie taste metallic.
Brown sugar adds moisture and caramel notes, while granulated sugar provides a crisping effect on the cookie's surface. Together, they create a balanced sweetness that doesn’t overwhelm the chocolate.
The Unexpected Star
Egg and egg yolk are crucial for binding and adding richness. The yolk contributes fat, giving the cookie a tender crumb. If you’re vegan, try using a flax egg or aquafaba as a substitute, but the texture will differ slightly.
Vanilla essence amplifies the overall flavor profile. A high‑quality vanilla extract adds depth; avoid imitation vanilla as it can taste chemical.
Red food coloring is the visual secret that transforms ordinary chocolate cookies into a vibrant red velvet treat. Use natural beetroot or paprika powder for a subtle, food‑safe alternative if you prefer a more organic approach.
The Final Flourish
White chocolate chips add a creamy sweetness that contrasts beautifully with the dark cocoa. They melt into the dough, creating pockets of gooey delight. For a darker twist, swap them for dark chocolate chips.
Oreo cookies provide a crunchy element that breaks the uniformity of the cookie’s texture. Crush them into bite‑size pieces before folding them in to ensure even distribution. If you’re on a low‑sugar diet, use a sugar‑free cookie brand.
Marshmallows are toasted to caramelize their surface, turning them golden and slightly crisp. This step is essential for that signature s’more flavor. Use mini marshmallows for a more uniform melt.
Everything's prepped? Good. Let's get into the real action...
The Method — Step by Step
- Preheat the oven to 350°F (175°C) and line two baking sheets with parchment paper. The parchment prevents sticking and ensures even baking. While the oven heats, let the butter sit at room temperature for 10 minutes; this makes it easier to cream with the sugars.
- In a large mixing bowl, beat the butter until it’s light and fluffy. Add the brown sugar first, then the granulated sugar, and continue beating until the mixture is pale and airy. This aeration is key to achieving a light crumb.
- Add the egg and egg yolk, one at a time, beating after each addition until fully incorporated. The yolk adds richness and helps bind the dough, while the egg keeps the structure intact. A small whisking error can lead to a dense cookie.
- Stir in the vanilla essence and the red food coloring until the dough is a uniform deep red. The color should be vivid but not too saturated; adjust as needed with a few more drops.
- Whisk together the flour, cocoa powder, baking soda, and salt in a separate bowl. This dry mix ensures even distribution of leavening agents. If you notice clumps, sift the mixture before adding it to the wet ingredients.
- Gradually fold the dry mixture into the wet dough, mixing until just combined. Over‑mixing will develop gluten and produce a tough cookie. The dough should be thick but pliable.
- Fold in the white chocolate chips, crushed Oreos, and toasted marshmallows. The marshmallows should be slightly toasted beforehand to prevent them from melting too quickly in the oven. This step adds a delightful crunch and gooeyness.
- Drop rounded tablespoonfuls of dough onto the prepared baking sheets, spacing them about 2 inches apart. The cookies will spread slightly, so give them enough room.
- Bake for 12–14 minutes, or until the edges are set and the tops have a slight sheen. The center should still feel soft; it will firm up as they cool. The aroma at this point will be intoxicating.
- Remove from the oven and let the cookies cool on the sheet for 5 minutes before transferring them to a wire rack. This allows the interior to set without steam buildup. Once cooled, enjoy the first bite and watch the marshmallow melt into the chocolate.
That's it — you did it. But hold on, I've got a few more tricks that'll take this to another level...
Insider Tricks for Flawless Results
The Temperature Rule Nobody Follows
Many bakers bake at 375°F, but that can burn the edges before the center sets. Baking at 350°F gives the cookies time to rise gently and develop a perfect golden crust. If your oven runs hot, rotate the trays halfway through for even baking.
Why Your Nose Knows Best
A well‑baked cookie emits a buttery, chocolatey aroma that signals readiness. When the scent is warm and inviting, the cookies are at their peak. Trust your nose; it’s a reliable indicator of doneness.
The 5‑Minute Rest That Changes Everything
Letting the cookies rest on the sheet for 5 minutes allows the heat to distribute evenly, preventing a soft center that hardens too quickly. This short pause also lets the marshmallows settle, reducing the risk of them sliding off.
The Secret Ingredient Swap
If you want a lighter flavor, replace half the white chocolate chips with white chocolate nibs. They offer a crunchy texture and a subtle bitter note that complements the cocoa.
The Chill Trick
For an extra chewy cookie, chill the dough for 30 minutes before baking. This firming step allows the cookies to maintain their shape and prevents excessive spreading.
The Final Touch of Crunch
Sprinkle a pinch of sea salt on top of each cookie before baking. The salt crystals add a savory contrast that elevates the sweet profile and brings out the chocolate’s depth.
Creative Twists and Variations
This recipe is a playground. Here are some of my favorite ways to switch things up:
Chocolate‑Infused Red Velvet
Add a tablespoon of espresso powder to the dry mix for a mocha flavor. The coffee enhances the chocolate notes and gives the cookie a sophisticated edge.
Nutty Crunch
Replace half the Oreo crumbs with chopped pecans or walnuts. The nuts add a buttery crunch and a subtle caramel flavor that pairs well with the marshmallows.
Minty Surprise
Fold in a teaspoon of peppermint extract after the dry mix. The mint provides a refreshing contrast to the sweetness, making the cookie feel lighter.
Coconut Twist
Use shredded coconut instead of white chocolate chips for a tropical flavor. The coconut adds chewiness and a sweet, nutty aroma.
Spiced Variation
Add a pinch of ground cinnamon and a pinch of cayenne pepper to the dry mix. The spice blend gives the cookie a warm, spicy kick that’s surprisingly balanced.
Gluten‑Free Adaptation
Swap the all purpose flour for a 1:1 blend of gluten‑free all‑purpose flour and xanthan gum. This substitution keeps the cookie tender and prevents it from becoming too crumbly.
Storing and Bringing It Back to Life
Fridge Storage
Place the cooled cookies in an airtight container with a paper towel to absorb excess moisture. Store them in the refrigerator for up to 5 days. The cold environment keeps the marshmallows from melting and preserves the cookie's texture.
Freezer Friendly
For longer storage, wrap each cookie individually in plastic wrap and place them in a freezer bag. Freeze for up to 3 months. Thaw at room temperature for 30 minutes before serving to regain the chewy center.
Best Reheating Method
Reheat the cookies in a 300°F oven for 4–5 minutes, or microwave on low power for 15–20 seconds. Add a tiny splash of water to the cookie sheet before reheating; the steam helps the marshmallows re‑soften and the cookie stays moist.