Picture this: a rainy autumn afternoon, the kind where the world feels like it’s wrapped in a cozy blanket, and you’re standing in front of the stove with a half‑finished grilled cheese that looks more like a sad, soggy pancake than the culinary masterpiece you were promised. I was battling that exact disaster when a friend dared me to “make a grilled cheese that could double as a dessert and a drink.” I laughed, I rolled my eyes, and I said, “Sure, why not?” Little did I know that this reckless challenge would become the birth of the most rebellious sandwich you’ll ever taste.
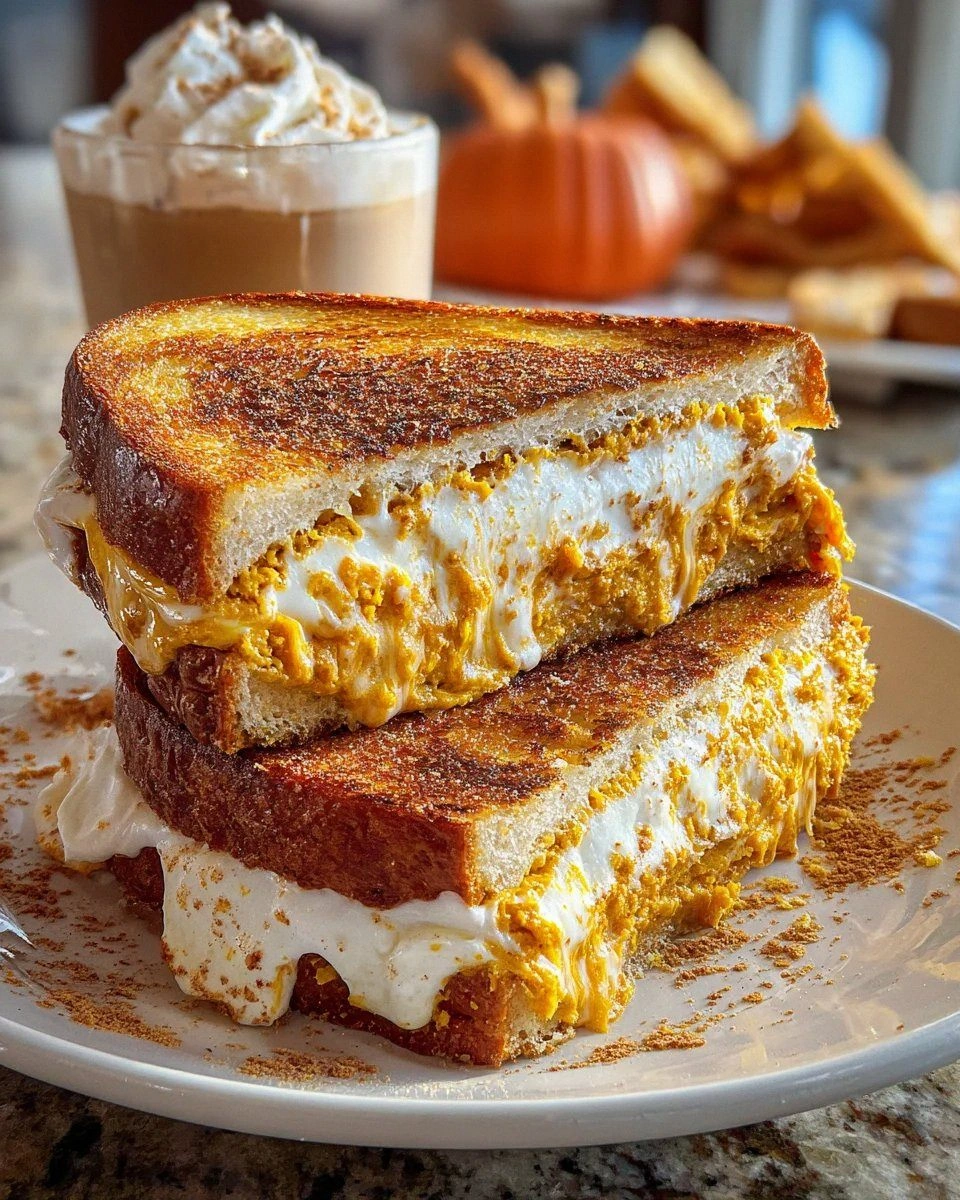
The kitchen soon filled with the intoxicating scent of toasted bread, the sweet earthiness of pumpkin, and a whisper of maple that made my nose do a little happy dance. The sound? A satisfying sizzle that sounded like applause from a tiny, buttery orchestra. My hands felt the warm, buttery crust as I lifted the sandwich, and the cheese stretched like golden sunrise ribbons. Then, the grand finale: I dunked the whole thing into a chilled glass of cream soda, topped it with a generous scoop of vanilla ice cream, and watched the fizz swirl around like a mischievous ghost. The first bite? A perfect collision of salty, sweet, creamy, and fizzy that made my taste buds throw a tiny parade.
This isn’t just another pumpkin‑spice grilled cheese. Most recipes treat pumpkin as a side note, a garnish, or a bland spread that gets lost under a mountain of cheese. This version flips the script, turning pumpkin into the star of the show while still honoring the classic gooey, buttery crunch we all love. I’ve combined the comforting nostalgia of a fall‑time sandwich with the playful surprise of a float, creating a dish that’s equal parts comfort food and party trick. The result is a sandwich that sings, a float that dazzles, and a memory that sticks around longer than the last bite of your favorite dessert.
And here’s the secret I’m about to reveal: the technique of layering a thin pumpkin‑spice spread between two distinct cheeses, then sealing it with a butter‑kissed brioche that can stand up to the soda’s fizz without turning soggy. I dare you to taste this and not go back for seconds. Let me walk you through every single step — by the end, you’ll wonder how you ever made it any other way.
What Makes This Version Stand Out
- Flavor Fusion: The sweet, earthy pumpkin puree meets sharp white cheddar and melty Havarti, creating a taste explosion that balances savory and sweet like a perfectly timed joke.
- Texture Triumph: Thick‑cut brioche gives you a buttery crunch, while the cheese stretch feels like a warm hug that never lets go.
- Simplicity Meets Wow: Only ten ingredients, all pantry‑friendly, yet the final presentation feels like a dish from a five‑star brunch menu.
- Unique Float Factor: Dipping the sandwich into a chilled cream soda with vanilla ice cream turns an ordinary bite into a fizzy, creamy adventure.
- Crowd Magnet: This sandwich sparks conversation; people will ask, “What’s in that?” and you’ll get to brag about your culinary rebellion.
- Ingredient Quality: Using thick‑cut brioche or sourdough ensures the bread holds up, while premium white cheddar adds a bold tang.
- Cooking Method Magic: The pan‑sear technique locks in moisture, and the final flip creates those coveted caramelized edges that shatter like thin ice.
- Make‑Ahead Potential: Prep the pumpkin‑spice spread ahead of time, store it, and assemble the sandwiches whenever the craving strikes.
Inside the Ingredient List
The Flavor Base
Canned pumpkin puree: This is the heart of the sandwich, delivering that unmistakable autumnal aroma and a velvety texture that coats the bread like a silk sheet. Skipping it would leave you with a bland cheese sandwich that screams “just another grilled cheese.” If you can’t find canned pumpkin, use freshly roasted and pureed pumpkin, but make sure it’s strained well to avoid excess moisture.
Pumpkin pie spice: A blend of cinnamon, nutmeg, and ginger that adds warmth and a nostalgic kick. It’s the spice that whispers “holiday” without being overpowering. A pinch too much can dominate the cheese, so stick to the recommended amount. You can substitute with a homemade mix of equal parts cinnamon and nutmeg plus a dash of ginger for a fresher profile.
Maple syrup: Just a drizzle brings a subtle caramel sweetness that balances the saltiness of the cheese and the earthiness of the pumpkin. It also helps the pumpkin spread spread evenly without clumping. If you’re watching sugar, try agave nectar; the flavor shift is minimal.
The Texture Crew
Sharp white cheddar cheese: Offers a bold, tangy flavor that cuts through the pumpkin’s sweetness, creating a delicious contrast. It also melts beautifully, forming that glorious stringy pull we all crave. If you can’t find white cheddar, a sharp aged gouda works as a stand‑in.
Havarti or mozzarella cheese: These milder cheeses bring creaminess and a melt‑in‑your‑mouth texture, ensuring the sandwich isn’t just sharp but also luxuriously smooth. They act as a bridge between the pumpkin spread and the cheddar. For a twist, try smoked mozzarella for an extra layer of depth.
The Unexpected Star
Thick‑cut brioche or sourdough bread: This isn’t your ordinary white bread; the brioche’s buttery richness or sourdough’s tangy chew provides a sturdy yet tender vessel for the filling. The crust turns golden and crisp, while the interior stays soft enough to let the flavors mingle. If you’re gluten‑free, use a sturdy gluten‑free loaf, but toast it a bit longer to achieve the same crunch.
Unsalted butter: The golden glue that creates that irresistible crust. It also adds a subtle richness that elevates the entire sandwich. Melt it just enough to coat the bread without burning; this ensures an even, glossy finish.
The Final Flourish
Chilled cream soda: The fizzy partner that transforms the sandwich into a float. Its vanilla‑forward flavor complements the pumpkin and maple, while the carbonation adds a playful texture. Use a high‑quality brand for the best mouthfeel; generic sodas can be flat or overly sweet.
Vanilla ice cream: The creamy crown that softens the soda’s bite and adds a luscious, cold contrast to the hot sandwich. It’s the secret weapon that makes this dish feel like a dessert and a snack in one. For a dairy‑free version, try coconut‑milk ice cream; the flavor shift is delightful.
Ground cinnamon or nutmeg (optional): A final dusting adds an aromatic lift that makes the whole experience feel like a warm hug. It’s optional, but trust me, it’s the cherry on top of this flavor sundae.
Everything's prepped? Good. Let's get into the real action...
The Method — Step by Step
Start by making the pumpkin‑spice spread. In a small saucepan over low heat, combine 1 cup canned pumpkin puree, 2 teaspoons pumpkin pie spice, 2 tablespoons maple syrup, and a pinch of salt. Stir constantly for about 3 minutes until the mixture is glossy and fragrant. That sizzle when it hits the pan? Absolute perfection. Once done, set aside to cool slightly; this will prevent the butter from melting too quickly later.
While the spread cools, shred 1 cup sharp white cheddar and 1 cup Havarti or mozzarella. Mix the two cheeses together in a large bowl. This blend guarantees a bold tang from the cheddar and a creamy melt from the Havarti, creating a symphony of flavors that dance on your palate.
Take 8 slices of thick‑cut brioche or sourdough and lay them flat on a clean surface. Spread a generous layer (about 2 tablespoons) of the pumpkin‑spice mixture on each slice. Make sure the spread reaches the edges; this prevents dry bites and ensures every mouthful is packed with flavor.
Evenly distribute the cheese mixture over four of the slices, then top each with the remaining four slices, pumpkin side down, creating four complete sandwiches. Press lightly with your hands so the layers bond without squashing the bread.
Now, melt 4 tablespoons unsalted butter in a large non‑stick skillet over medium‑high heat. Once the butter foams and turns a light amber, gently lay the sandwiches in the pan. You should hear a satisfying sizzle that signals the crust is forming.
Watch Out: If the butter starts to brown too quickly, lower the heat; burnt butter will give the sandwich a bitter aftertaste.Cook each side for about 3‑4 minutes, or until the bread turns a deep golden‑brown and the cheese inside is fully melted. You’ll know it’s ready when the edges start pulling away from the pan and the cheese begins to ooze at the corners. Flip carefully with a spatula; the sandwich should hold together like a well‑trained gymnast.
While the last sandwich finishes, pour 2 cups chilled cream soda into four tall glasses, leaving a little room at the top. Drop a generous scoop (about ½ cup) of vanilla ice cream into each glass. The soda will fizz up, creating a frothy crown that looks like a mini fireworks show.
Finally, place each hot grilled cheese on a plate, drizzle a tiny drizzle of extra maple syrup if you like, and serve it alongside the soda‑ice‑cream float. For an extra aromatic finish, sprinkle a pinch of ground cinnamon or nutmeg over the sandwich. Picture yourself pulling this out of the pan, the whole kitchen smelling incredible... and then dunking it into the fizzy float. That moment? Pure magic.
That's it — you did it. But hold on, I've got a few more tricks that'll take this to another level...
Insider Tricks for Flawless Results
The Temperature Rule Nobody Follows
Most home cooks crank the heat to “high” hoping for a quick crust, but that’s a recipe for burnt butter and soggy interiors. Keep your skillet at medium‑high, around 350°F (175°C) if you have an infrared thermometer. This temperature lets the bread toast evenly while giving the cheese time to melt without escaping. I once tried “max heat” and ended up with a charcoal‑flavored disaster; lesson learned.
Why Your Nose Knows Best
Before you flip the sandwich, trust the aroma. When the butter‑brown scent turns nutty and the pumpkin‑spice notes rise, you’re at the perfect moment to turn. If you rely solely on a timer, you’ll miss that golden window. Your nose is a built‑in timer—listen to it.
The 5‑Minute Rest That Changes Everything
After you pull the sandwiches from the pan, let them rest on a wire rack for five minutes. This short pause lets the cheese settle, preventing a gooey mess when you bite in. It also allows the steam to escape, keeping the crust crisp. Skipping this step is the fastest way to soggy disappointment.
Butter‑Brush Technique
Instead of slathering butter on the bread before cooking, brush a thin layer on each side just before it hits the pan. This technique gives you a uniform crust without excess grease. It also prevents the pumpkin spread from sliding off during the flip.
Float‑First, Sandwich‑Later
For the ultimate sensory experience, serve the float first, let the fizz settle a second, then dunk the sandwich. The soda’s carbonation will lightly soften the outer crust, creating a delightful contrast between the crisp exterior and the melty interior. I tried the reverse once—soda splashed everywhere and the sandwich got soggy. Trust the order.
Creative Twists and Variations
This recipe is a playground. Here are some of my favorite ways to switch things up:
Apple Cider Float
Swap the cream soda for chilled hard apple cider and add a drizzle of caramel sauce over the sandwich. The cider’s crispness pairs beautifully with the pumpkin, and the caramel adds a buttery depth that feels like a holiday treat.
Spicy Jalapeño Kick
Stir in finely diced jalapeños into the pumpkin spread and use pepper jack cheese instead of cheddar. The heat cuts through the sweetness, creating a daring balance that will impress anyone who loves a little fire.
Nutty Crunch
Fold a handful of toasted pecans or walnuts into the cheese mixture. The nuts add a satisfying crunch and a buttery flavor that complements the pumpkin’s earthiness. It’s like adding a surprise textural note to a love song.
Vegan Version
Replace the butter with coconut oil, use vegan cheddar and mozzarella alternatives, and swap the ice cream for a plant‑based vanilla scoop. The result is still indulgent, and the coconut oil adds a subtle tropical hint that’s unexpectedly delightful.
Breakfast Burrito Fusion
Wrap the assembled sandwich in a large flour tortilla, grill it like a quesadilla, and serve with a side of maple‑syrup‑drizzled scrambled eggs. This turns the dish into a handheld breakfast feast that’s perfect for on‑the‑go mornings.
Storing and Bringing It Back to Life
Fridge Storage
Wrap any leftover sandwiches tightly in parchment paper, then place them in an airtight container. They’ll keep fresh for up to 2 days. When you’re ready to reheat, let them sit at room temperature for 10 minutes before proceeding to the pan.
Freezer Friendly
Individually wrap each sandwich in plastic wrap, then store them in a zip‑top freezer bag. They’ll survive up to 1 month without losing flavor. To reheat, thaw overnight in the fridge, then follow the reheating method below.
Best Reheating Method
Heat a non‑stick skillet over medium heat, add a thin pat of butter, and re‑heat each sandwich for 2‑3 minutes per side. Add a tiny splash of water (about a teaspoon) to the pan and cover with a lid for the last minute; the steam revives the crust and melts the cheese perfectly. Avoid microwaving—it makes the bread rubbery.