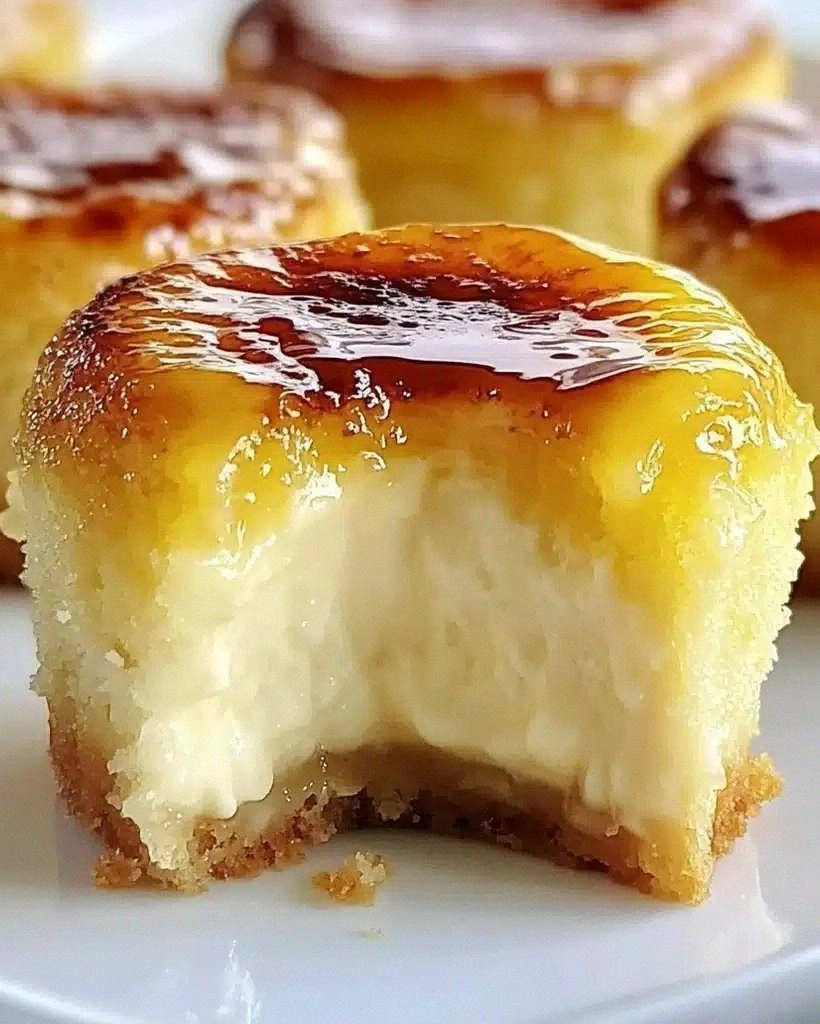
I still remember the exact moment these mini crème brûlée cheesecakes with caramel topping stole my heart. It was supposed to be a quiet Tuesday evening, just me and my kitchen, attempting to impress nobody but myself. The original plan? Classic crème brûlée. Simple. Elegant. Predictable. Then disaster struck — my water bath leaked, my custard curdled, and I was left with a pan of sweet scrambled eggs that would make even the most patient grandmother weep. In my desperation, I reached for cream cheese, thinking "what's the worst that could happen?" Forty-five minutes later, the most incredible aroma filled my apartment, and I pulled out these golden-topped beauties that made my neighbors knock on my door asking if I'd opened a bakery.
Let me paint you a picture of what happened next. The first bite was like watching fireworks explode in slow motion — that familiar crack of caramelized sugar giving way to silky cheesecake, followed by the rich cascade of homemade caramel that somehow managed to taste like childhood memories and grown-up sophistication in the same breath. The edges had developed those coveted tiny cracks that signal perfect texture, while the centers remained impossibly creamy, like velvet suspended in dessert form. I stood there in my flour-dusted apron, holding a warm mini cheesecake, completely forgetting that I'd just experienced what I now call "the great custard catastrophe of 2023."
Here's what makes this version absolutely irresistible: we're taking everything you love about crème brûlée — that theatrical sugar crust, the luxurious custard base, the way it makes you feel like you're dining in a Parisian café — and marrying it with the approachable comfort of cheesecake in perfect, poppable portions. No water baths required, no fear of scrambled eggs, and absolutely no need for culinary school training. Just you, some simple ingredients, and about an hour of your time to create something that'll make your dinner guests think you've been secretly taking pastry classes.
Stay with me here — this is worth it. We're about to embark on a journey that involves torching sugar (safely, I promise), creating the smoothest cheesecake batter you've ever seen, and drizzling warm caramel that'll make you question why you ever bought that stuff in a jar. By the end of this, you'll not only master the art of mini crème brûlée cheesecakes, but you'll also understand exactly why this hybrid dessert is about to become your new signature dish. Let me walk you through every single step — by the end, you'll wonder how you ever made it any other way.
What Makes This Version Stand Out
Texture Perfection: We're achieving that impossible balance between the ethereal lightness of crème brûlée and the satisfying density of cheesecake. The secret lies in whipping just enough air into the cream cheese while keeping the heavy cream addition minimal, creating a texture that melts on your tongue but still gives you something substantial to sink your teeth into. It's like eating a cloud that's been to finishing school.
No-Fail Technique: Most recipes get this completely wrong — they treat these like regular mini cheesecakes and end up with rubbery, overbaked disasters. Here's what actually works: we start them hot to set the structure, then drop the temperature to finish gently, ensuring they stay creamy while developing that gorgeous golden top. No cracks, no sinkholes, no disappointment.
Theater Factor: Let's be honest — half the fun of crème brûlée is the tableside torching. These mini versions give you that same dramatic moment, but multiplied by twelve. Picture yourself pulling out a tray of these, handing your guests mini torches, and watching their faces light up (literally) as they caramelize their own sugar. Dinner party game officially changed.
Make-Ahead Magic: Unlike traditional crème brûlée that demands last-minute caramelization, these little beauties can be prepped up to three days ahead. Bake them, chill them, and simply torch the sugar when you're ready to serve. The caramel topping? That keeps for two weeks in the fridge, meaning you can be dessert-ready in under five minutes.
Flavor Complexity: We're not just dumping sugar and cream cheese together and calling it a day. The addition of vanilla bean paste (yes, paste — not extract) creates those gorgeous black specks that signal serious dessert business, while a whisper of lemon zest brightens everything and makes the caramel taste more caramel-y. It's like flavor layering for people who don't have time for culinary school.
Portion Control (Sort Of): Here's my confession — I ate half the batch before anyone else got to try it. But in my defense, these are perfectly portioned mini desserts that feel indulgent without the commitment of a full slice of cheesecake. They're dangerously poppable, and you'll find yourself reaching for "just one more" approximately seventeen times.
Universal Appeal: I've served these to everyone from picky toddlers who only eat beige foods to food snobs who won't touch dessert unless it's molecular gastronomy. They all reach for seconds. There's something about the combination of familiar flavors in an unexpected format that makes people lose their dessert inhibitions.
Inside the Ingredient List
The Flavor Base
Graham cracker crumbs form the foundation of our crust, but don't just grab any box off the shelf. Look for the ones with "honey" in the name — they bring a deeper, more complex sweetness that plays beautifully with the caramel topping. If you can't find honey grahams, regular ones work fine, but add an extra teaspoon of sugar to compensate. The crumbs should be fine but not powdery — think coarse sand, not dust. This texture ensures they'll bind properly with the butter without becoming brick-like.
Melted butter might seem straightforward, but here's where most people go wrong: they use it hot. Hot butter melts the sugar prematurely and can create a greasy crust that falls apart when you try to unmold these beauties. Let your melted butter cool for five minutes — it should be warm and liquid, but not screaming hot. This small pause makes the difference between a crust that holds together like a dream and one that crumbles into sadness.
The Texture Crew
Cream cheese is obviously the star here, but not all blocks are created equal. Skip the low-fat version — I know, I know, but trust me on this one. Full-fat cream cheese creates that luxurious mouthfeel we're after, and honestly, if you're making mini crème brûlée cheesecakes with caramel topping, you're not here for health food. Make sure it's properly softened (see my kitchen hack above) and use a good quality brand. Cheap cream cheese can be grainy or have a slightly sour aftertaste that'll ruin all your hard work.
Granulated sugar serves double duty here — it sweetens the cheesecake and helps create that gorgeous golden top when we brûlée. Regular white sugar works perfectly, but if you want to get fancy, superfine sugar dissolves more easily into the cream cheese and creates a more even caramelized layer. Don't substitute brown sugar in the cheesecake — it'll make the color muddy and the flavor too molasses-forward.
Heavy cream is what transforms these from regular mini cheesecakes into crème brûlée impersonators. It lightens the texture and adds that signature richness that makes people close their eyes when they take a bite. Don't substitute half-and-half or milk — they don't have enough fat to create the right texture, and you'll end up with something closer to cheesecake soup.
The Unexpected Star
Vanilla extract is fine in a pinch, but vanilla bean paste? That's where the magic happens. Those tiny black specks don't just look professional — they distribute vanilla flavor more evenly than extract, and they don't evaporate during baking like alcohol-based extracts can. If you can't find paste (check the baking aisle near the extracts), scrape out half a vanilla bean instead. Your cheesecakes will look like they came from a Parisian pâtisserie.
Eggs might seem boring, but they're doing serious work here. They provide structure, richness, and that gorgeous yellow color that makes these look like sunshine on a plate. Use large eggs, not extra-large or medium — the ratio matters in mini desserts. And please, please don't skip the room temperature rule here. Cold eggs can cause your cream cheese to seize up, creating a lumpy batter that no amount of mixing will smooth out.
The Final Flourish
That final two tablespoons of sugar for the brûlée topping? Don't substitute anything else here. Coarse sugar like demerara or turbinado creates the most satisfying crack when you break through with your spoon, but regular granulated works perfectly too. The key is creating an even, thin layer — too thick and you'll have burnt sugar on top of raw sugar underneath. Too thin and you won't get that dramatic crack we're after.
Everything's prepped? Good. Let's get into the real action...
The Method — Step by Step
- Preheat your oven to 350°F (175°C) and position a rack in the center. This isn't the time for shortcuts — a properly preheated oven ensures your cheesecakes start cooking immediately, setting the structure before they have a chance to sink or crack. Line a 12-cup muffin tin with paper liners, but here's the pro move: spray the liners lightly with cooking spray. This prevents the cheesecakes from sticking and makes unmolding a breeze. Trust me, there's nothing sadder than a perfect mini cheesecake that tears apart when you try to remove it.
- Create the crust by combining your graham cracker crumbs, melted butter, and sugar in a medium bowl. The mixture should look like wet sand and hold together when you squeeze it — if it's too dry, add another teaspoon of melted butter; too wet, add more crumbs. Press about one tablespoon of the mixture into the bottom of each liner, using the bottom of a shot glass or your fingers to compact it firmly. This isn't the time to be gentle — a well-packed crust won't fall apart when you add the filling.
- Make the filling by beating the cream cheese in a stand mixer fitted with the paddle attachment on medium speed for exactly two minutes. You're not trying to incorporate air here — just making it smooth and creamy. Add the sugar gradually, letting it fully incorporate before adding more. This prevents graininess and ensures your sugar dissolves completely. Scrape down the bowl religiously — cream cheese loves to hide in corners and create lumps that'll ruin your smooth texture.
- Add the eggs one at a time, beating just until incorporated after each addition. Overbeating here incorporates too much air, which can cause your cheesecakes to puff up like balloons and then collapse into sad little craters. The batter should look smooth and glossy, like melted ice cream. Add the vanilla extract and heavy cream, mixing just until combined. Your finished batter should pour off your spatula in a thick ribbon.
- Divide the batter among your prepared crusts, filling each liner about three-quarters full. Tap the pan gently on the counter to release any air bubbles — you'll see them rise to the surface and pop. This prevents those unsightly holes that can form during baking. The batter should come just below the top of the liner, leaving room for expansion without overflowing.
- Place the muffin tin on a baking sheet (this catches any potential overflow and prevents burnt sugar smells in your oven) and slide it into your preheated oven. Bake for exactly 20 minutes, then check them. The centers should still jiggle slightly when you gently shake the pan — they continue cooking from residual heat. If they're still liquid in the center, give them another 2-3 minutes, but watch them like a hawk. Overbaked mini cheesecakes become dense and rubbery.
- Cool them in the pan for exactly 10 minutes — no more, no less. This allows them to set enough to handle but prevents them from overcooking in the hot pan. Then carefully lift them out using the paper liners and place them on a wire rack to cool completely. Don't rush this step — warm cheesecakes will melt your caramel later, creating a sticky mess instead of those gorgeous drizzles we're after.
- Once completely cool, refrigerate for at least 2 hours or up to 3 days. This step isn't optional — cold cheesecake cuts cleanly and holds its shape when you add the caramel. Plus, the flavors meld and develop during chilling, creating that complex taste that makes people ask for your secret. Cover them loosely with plastic wrap, but don't seal them completely — condensation can make the tops sticky.
- When you're ready to serve, make the caramel topping by combining sugar and water in a small saucepan over medium heat. Don't stir — just swirl the pan gently to help the sugar dissolve evenly. Once it starts to caramelize, watch it like you're defusing a bomb. The line between perfect amber and bitter burnt is approximately 30 seconds. Remove from heat when it's the color of an old penny and immediately drizzle over your chilled cheesecakes.
- The final flourish: sprinkle the remaining sugar evenly over the tops of your chilled cheesecakes. Use a kitchen torch held about 2 inches away, moving in small circles until the sugar melts and turns golden brown. Don't hold it in one spot or you'll burn holes through to the cheesecake. No torch? Place them under a broiler for 30-45 seconds, watching constantly. That sizzle when the hot sugar hits the cold cheesecake? Pure perfection.
That's it — you did it. But hold on, I've got a few more tricks that'll take this to another level...
Insider Tricks for Flawless Results
The Temperature Rule Nobody Follows
Here's the thing that separates the pros from the home bakers who wonder why their cheesecakes look like moon craters: temperature matters at every single stage. Your cream cheese needs to be room temperature, your eggs need to be room temperature, and your heavy cream should be slightly warm (30 seconds in the microwave does the trick). Cold ingredients don't incorporate smoothly, creating a batter that's either lumpy or overmixed to compensate. I learned this the hard way when I once tried to rush a batch using cold cream cheese — the result looked like cottage cheese mixed with sadness, and no amount of mixing would smooth it out.
Why Your Nose Knows Best
Don't just set a timer and walk away — your nose is actually one of the best tools for judging doneness. When these mini cheesecakes are perfectly baked, your kitchen will smell like vanilla and butter with just a hint of caramel. If you start to smell something eggy or sour, you've gone too far. This might sound like kitchen voodoo, but trust your senses. Professional bakers use all five senses when cooking, not just their eyes and timers. A friend tried skipping this tip once — let's just say her smoke detector got more of a workout than her oven.
The 5-Minute Rest That Changes Everything
After you brûlée the sugar, wait exactly five minutes before serving. This isn't just about avoiding burned tongues (though that's important too). During this rest, the melted sugar creates a paper-thin layer that shatters like glass when you break through it, but it also pulls just a tiny bit of moisture from the cheesecake below, creating this incredible contrast between crisp and creamy. Serve them immediately and the sugar is too hard, almost sharp. Wait too long and it starts to dissolve, losing that satisfying crack. Five minutes is the sweet spot — set a timer and resist the urge to dig in early.
The Paper Liner Secret
Those paper liners aren't just for easy removal — they're actually crucial for even cooking. They create a slight barrier between the hot metal pan and your delicate cheesecake, preventing the bottoms from overbaking while the centers set. But here's the key: don't use the cheap, thin liners from the dollar store. They'll stick and tear, leaving you with mangled mini cheesecakes that look like they've been through a war. Invest in good quality parchment liners or lightly grease regular ones. Your presentation (and sanity) is worth the extra dollar.
The Torch Technique That Prevents Disasters
If you're new to torching, practice on a piece of parchment paper first. Hold the torch about 2 inches away and keep it moving in small circles, never staying in one spot for more than a second. The sugar will melt, then bubble, then turn golden. As soon as you see wisps of smoke, move on. That smoke means you're seconds away from bitter, burnt sugar that'll ruin all your hard work. And please, please remove any flammable items from your workspace — I once set a recipe card on fire mid-dinner party. Not my finest moment, though it did make for an unforgettable dessert presentation.
Creative Twists and Variations
This recipe is a playground. Here are some of my favorite ways to switch things up:
Salted Caramel Heaven
Add an extra half-teaspoon of flaky sea salt to your caramel topping and watch grown adults weep with joy. The salt amplifies the caramel flavor and creates this addictive sweet-salty balance that makes it impossible to stop at one. This version pairs beautifully with a dark roast coffee or a glass of bourbon. I brought these to a book club once and had to physically block people from taking thirds.
Chocolate Lover's Dream
Replace 1/4 cup of the cream cheese with melted dark chocolate (cooled but still liquid) and add a tablespoon of cocoa powder to the crust mixture. The result is rich, fudgy mini cheesecakes that taste like chocolate crème brûlée had a baby with chocolate mousse. Top with chocolate shavings for extra drama. Warning: these disappear faster than you can say "diet starts tomorrow."
Citrus Burst Surprise
Add the zest of one orange and a teaspoon of orange liqueur to the batter, then top with candied orange peel instead of caramel. This version tastes like sophisticated Creamsicles and is absolutely stunning for summer dinner parties. The bright citrus cuts through the richness and leaves your palate feeling refreshed rather than overwhelmed.
Espresso Obsession
Dissolve 2 teaspoons of instant espresso powder in the heavy cream before adding it to the batter. The coffee flavor intensifies the caramel notes and creates this incredible depth that coffee lovers will recognize but can't quite identify. It's like your favorite coffee shop dessert got a fancy makeover. These are dangerous with after-dinner drinks.
Coconut Paradise
Replace half the graham cracker crumbs with toasted coconut flakes and add a teaspoon of coconut extract to the batter. Top with a coconut caramel (made by adding coconut milk to your caramel) and toasted coconut flakes. This version transports you straight to a tropical beach, even if you're eating them in your kitchen during a snowstorm.
Spice Market Adventure
Add a quarter-teaspoon each of cardamom and cinnamon to the crust, and a pinch of saffron to the heavy cream (warm it first to bloom the saffron). The result is exotic and mysterious, with layers of flavor that unfold as you eat. These pair beautifully with chai tea or a sweet dessert wine. They're my go-to for impressing food critics and adventurous eaters.
Storing and Bringing It Back to Life
Fridge Storage
These mini cheesecakes are incredibly well-behaved in the refrigerator. Store them in an airtight container (I use a large plastic container with a tight-fitting lid) for up to 5 days. Place a sheet of parchment paper between layers if you're stacking them. The key is keeping them away from strong-smelling foods — cheesecake acts like a sponge and will absorb the flavors of last night's garlic chicken if you're not careful. Don't store them with the caramel topping applied — add that just before serving for the best texture.
Freezer Friendly
These freeze beautifully, making them perfect for emergency dessert situations (which, let's be honest, happen more often than we'd like to admit). Freeze them un-topped on a baking sheet until solid, then transfer to a freezer bag with parchment between layers. They'll keep for up to 2 months frozen. Thaw overnight in the refrigerator, then bring to room temperature for 30 minutes before adding toppings. The texture might be slightly denser than fresh, but they're still incredible. I've been known to keep a batch in the freezer "just in case" — and by "just in case," I mean "because it's Tuesday."
Best Reheating Method
Here's the thing — you don't actually reheat these. They're meant to be served cold or at room temperature. But if they've been in the fridge and you want to take the chill off, let them sit at room temperature for 15-20 minutes. If you must warm them (though I don't recommend it), a 5-second microwave burst will take the edge off without melting the structure. Just remember — warm cheesecake releases its fats differently and can taste greasy. These are best enjoyed with that cool, creamy texture that makes them so addictive.