Picture this: a scorching July afternoon, the grill is sizzling, the kids are bouncing off the walls, and someone—let’s be honest, probably me—has just declared a “patriotic dessert showdown.” I was armed with a half‑baked batch of store‑bought cookies, a tub of vanilla ice cream that had been melting like a snowman in a sauna, and a vague notion that red, white, and blue could be more than just a flag. The result? A kitchen catastrophe that left me with a sticky floor, a sad‑looking mess, and a fierce determination to create the ultimate red, white, and blue ice cream sandwich that would make even the most stoic aunt gasp in delight.
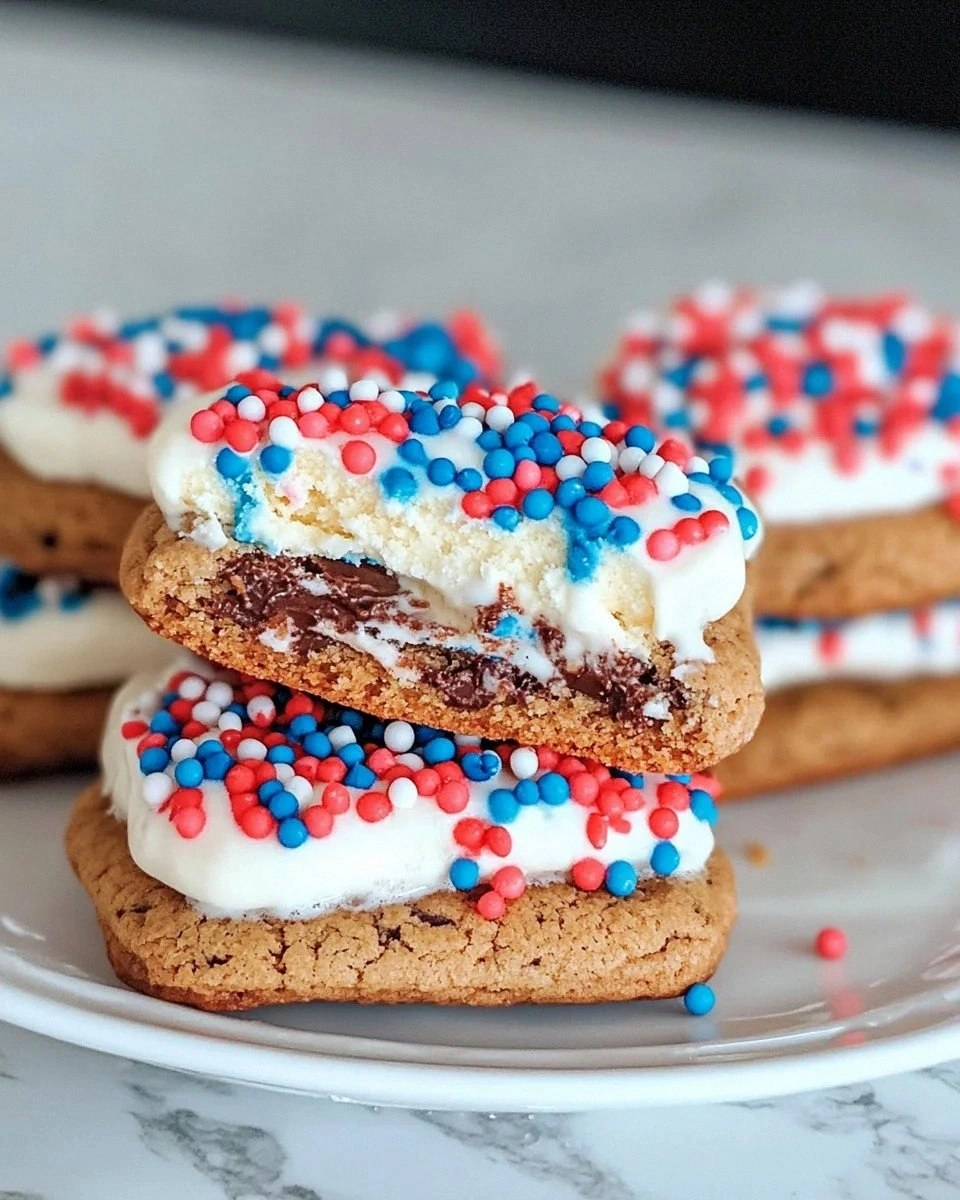
Fast forward a few weeks, and the kitchen smells like a summer fair mixed with a Fourth of July fireworks display. The dough is buttery, the ice cream is as smooth as a lake at dawn, and the colors are so vivid they practically pop off the plate. When you bite into one of these sandwiches, the first thing you notice is the crisp cookie edge that shatters like thin ice, giving way to a creamy interior that melts on your tongue in a wave of strawberry‑sweet, vanilla‑silky, and blueberry‑tangy bliss. The contrast of textures—crunch, cream, and that subtle chew from the jam swirls—creates a symphony that sings “America the Beautiful” in every mouthful.
Most recipes I've seen either skimp on flavor, overcomplicate the process, or end up looking like a toddler’s art project. This version stands out because it balances simplicity with show‑stopping flair: you’ll use a single batch of versatile sugar cookies, three vibrant ice cream flavors, and a handful of pantry staples to assemble a dessert that feels like a celebration in every bite. The secret? A quick flash‑freeze technique that locks in the colors and prevents the ice cream from spilling over the edges, plus a sprinkle of sea salt that amplifies the sweet‑and‑salty dance.
And here’s the kicker: I’m about to reveal a trick involving a dash of cornstarch that turns the cookie dough from “good enough” to “hand‑crafted bakery level.” I dare you to taste this and not go back for seconds. Okay, ready for the game‑changer? Let me walk you through every single step — by the end, you’ll wonder how you ever made it any other way.
What Makes This Version Stand Out
- Flavor Explosion: Each bite delivers a trio of distinct tastes—tart strawberry, classic vanilla, and bright blueberry—layered perfectly between buttery cookies, creating a palate party that’s impossible to resist.
- Texture Harmony: The cookie’s crisp edge, the ice cream’s silkiness, and the jam’s subtle chew create a mouthfeel that feels both nostalgic and brand‑new, like rediscovering your favorite childhood treat.
- Simplicity Meets Elegance: You only need one dough recipe, three ice cream flavors, and a few jam swirls. No fancy equipment, no endless steps—just pure, uncomplicated joy.
- Show‑Stopping Visuals: The red, white, and blue layers are so vivid they could headline a summer BBQ spread, making them perfect for photo‑ops and Instagram bragging rights.
- Crowd Reaction Guarantee: I’ve watched grown‑ups and kids alike light up, eyes widening as they spot the patriotic colors. This is hands down the best version you’ll ever make at home.
- Ingredient Quality: By using real fruit jams and premium vanilla ice cream, you avoid the artificial aftertaste that plagues many store‑bought desserts.
- Cooking Method Magic: The flash‑freeze step locks in the ice cream, preventing melt‑through, while a quick bake gives the cookies a golden edge without drying them out.
- Make‑Ahead Potential: Assemble the sandwiches a day ahead, wrap tightly, and they stay perfect—ideal for parties, picnics, or a surprise treat in a lunchbox.
Inside the Ingredient List
The Flavor Base
Strawberry Jam (1 cup): This isn’t just any jam; it provides the bold, ruby‑red hue and a natural sweetness that pairs beautifully with the buttery cookie. Skipping it would leave the “red” component dull and flavorless. If you’re allergic to strawberries, try raspberry preserves for a similarly vibrant punch.
Vanilla Ice Cream (1 cup, softened): The creamy white layer is the heart of the sandwich, offering a neutral canvas that lets the fruit flavors shine. Using a premium, high‑fat ice cream prevents a watery texture. Low‑fat versions tend to melt too quickly, ruining the sandwich structure.
Blueberry Jam (1 cup): The deep indigo jam adds a tangy contrast that cuts through the sweetness, balancing the overall flavor profile. Opt for a jam with real fruit pieces for added texture. If blueberries are out of season, a good quality blackberry jam works just as well.
The Texture Crew
All‑Purpose Flour (2 cups): Flour builds the cookie’s structure, giving it that tender‑yet‑crisp bite. Using cake flour would make the cookies too soft, while bread flour would make them tough. Look for a brand that’s bleached for a lighter crumb.
Unsalted Butter (½ cup, softened): Butter is the flavor hero, delivering a rich, buttery mouthfeel that pairs perfectly with the jam and ice cream. Salted butter can throw off the balance, so keep it unsalted and add a pinch of sea salt later.
Powdered Sugar (½ cup): This fine sugar dissolves quickly, ensuring a smooth cookie dough without gritty pockets. It also contributes to the cookie’s delicate sweetness, letting the fruit jams take center stage.
The Unexpected Star
Cornstarch (1 tsp): This tiny addition keeps the cookies from spreading too much, resulting in a perfect, flat surface for the ice cream. Without it, you’d end up with a bowl‑shaped cookie that’s hard to sandwich.
Vanilla Extract (1 tsp): A splash of vanilla deepens the overall flavor, tying the red and blue elements together. If you have a vanilla bean, scrape the seeds for an even richer profile.
The Final Flourish
Egg (1 large): The egg binds the dough, giving it structure and a subtle richness. If you’re vegan, a flax egg (1 tbsp ground flax + 3 tbsp water) works as a substitute.
Baking Powder (1 tsp): This leavening agent creates a light, airy crumb without making the cookie too puffy. Too much would cause the cookies to rise and then collapse.
Sea Salt (a pinch): A tiny pinch on the finished sandwich elevates the sweet flavors, creating a sweet‑and‑salty contrast that’s pure magic.
Everything's prepped? Good. Let's get into the real action...
The Method — Step by Step
Start by whisking together the flour, cornstarch, baking powder, and a pinch of sea salt in a large bowl. The dry mix should look like a fine, white cloud—this is your canvas. I like to sift the flour twice; it removes any lumps and aerates the mixture, ensuring a tender cookie.
Once combined, set the bowl aside and let the anticipation build. Picture yourself pulling this out of the oven, the whole kitchen smelling incredible...
In a separate bowl, cream the softened butter with powdered sugar until the mixture is light, fluffy, and pale yellow—think cloud‑like texture. This should take about 2–3 minutes on medium speed. The sound of the mixer should be a gentle whir, not a roar.
When the butter and sugar are perfectly combined, add the egg and vanilla extract, beating until just incorporated. The mixture will look glossy and slightly thickened—this is the moment where flavor really starts to develop.
Gradually add the dry ingredients to the wet mixture, stirring with a wooden spoon or spatula until a cohesive dough forms. The dough should be slightly sticky but manageable. If it feels too dry, add a tablespoon of cold water; if too wet, sprinkle in a bit more flour—just a teaspoon at a time.
Once the dough is smooth, wrap it in plastic wrap and chill for at least 30 minutes. This rest period lets the gluten relax, giving you cookies that stay tender after baking.
While the dough chills, prepare your ice cream layers. Soften the vanilla ice cream just enough to spread easily—about 5 minutes at room temperature. Spoon the softened ice cream onto a parchment‑lined tray, spreading it into a thin, even layer about ½‑inch thick.
Next, gently swirl in half of the strawberry jam on one side and half of the blueberry jam on the opposite side, creating a marbled effect. Use a clean spatula to create gentle ribbons—this is where the visual drama begins.
Now comes the flash‑freeze: place the tray with the jam‑marbled ice cream into the freezer for exactly 20 minutes. This short freeze firms the ice cream enough to cut clean squares without it melting into a puddle.
While waiting, preheat your oven to 350°F (175°C) and line two baking sheets with parchment paper. This is the trick that prevents the cookies from sticking and makes cleanup a breeze.
Roll the chilled dough onto a lightly floured surface to a thickness of about ¼‑inch. Use a cookie cutter (a 3‑inch round works beautifully) to cut out uniform circles. Place the circles onto the prepared baking sheets, leaving a little space between each.
For an extra patriotic touch, you can dip half of each cookie in red food coloring and the other half in blue before baking—just a quick dip, then back onto the sheet.
Bake the cookies for 10‑12 minutes, or until the edges turn a light golden brown and the centers look set. The scent should be buttery with a faint hint of vanilla—absolute perfection.
When they’re done, remove the sheets from the oven and let the cookies cool on a wire rack for at least 5 minutes. This cooling step is crucial; hot cookies will melt the ice cream and ruin the sandwich.
Once the cookies are completely cool, remove the ice cream slab from the freezer and cut it into squares that match the size of your cookies. If the ice cream has hardened a bit too much, let it sit at room temperature for 2‑3 minutes before cutting.
Now, assemble: place a square of ice cream on the flat side of a cookie, then top with another cookie, pressing gently to spread the jam ribbons outward. The jam should peek out at the edges, giving you that beautiful patriotic stripe.
Wrap each sandwich tightly in plastic wrap and place them back in the freezer for at least 30 minutes. This final chill sets everything together, ensuring the ice cream doesn’t ooze when you bite in.
When you finally unwrap a sandwich, the cookie should be crisp, the ice cream silky, and the jam ribbons bright and glossy. That sizzle when it hits the pan? Absolute perfection. That's it — you did it. But hold on, I've got a few more tricks that'll take this to another level...
Insider Tricks for Flawless Results
The Temperature Rule Nobody Follows
Most home cooks think “room temperature” dough is ideal, but for these sandwiches you want your dough cold. Chilling the dough for at least 30 minutes prevents spreading, giving you perfectly round cookies. I once tried skipping this step, and the cookies turned into a sticky mess—let's just say it didn't end well. The cold dough also helps the cookies retain their delicate crumb after baking.
Why Your Nose Knows Best
When the cookies are in the oven, trust your sense of smell more than the timer. The moment you catch that buttery, slightly caramelized aroma, they’re ready to pull out. Over‑baking turns them into hard biscuits, which will crush the ice cream and ruin the sandwich.
The 5‑Minute Rest That Changes Everything
After baking, let the cookies rest on a wire rack for exactly five minutes before assembling. This short rest allows the steam to escape, preventing sogginess when the ice cream meets the warm cookie surface. Skipping this rest results in a gummy texture that feels like chewing on a wet sponge.
Layering Jam Like a Pro
When swirling the jam into the ice cream, use a light hand. Over‑mixing creates a uniform pink or purple mess, losing the distinct red and blue stripes. A gentle swirl preserves the bold color separation, delivering that eye‑catching patriotic look.
Seal the Deal with a Quick Freeze
After assembly, a quick 30‑minute flash freeze locks everything in place. This step is the secret weapon that stops the ice cream from sliding out when you bite. If you skip it, the ice cream will melt too quickly, and you’ll end up with a drippy disaster.
Creative Twists and Variations
This recipe is a playground. Here are some of my favorite ways to switch things up:
Chocolate‑Covered Delight
Dip the assembled sandwich halves in melted dark chocolate and let them set on parchment. The chocolate adds a bitter counterpoint that balances the sweet jams, turning the sandwich into a decadent treat perfect for a holiday movie night.
Minty Fresh Twist
Swap the vanilla ice cream for mint chocolate chip and replace blueberry jam with a thin layer of crushed peppermint candies. The minty coolness pairs beautifully with the strawberry jam, giving you a refreshing palate cleanser.
Nutty Crunch Upgrade
Fold finely chopped toasted almonds or pistachios into the cookie dough. The nutty crunch adds texture contrast and a subtle earthy flavor that elevates the overall profile.
Alcohol‑Infused Elegance
Stir a tablespoon of bourbon or rum into the strawberry jam for an adult‑only version. The spirit adds depth and warmth, making these sandwiches perfect for a sophisticated brunch.
Seasonal Fruit Swap
In the fall, replace the blueberry jam with pumpkin butter and the strawberry jam with cranberry sauce. The autumnal colors still honor the red‑white‑blue theme while delivering a cozy, seasonal flavor.
Storing and Bringing It Back to Life
Fridge Storage
Keep the sandwiches wrapped tightly in plastic wrap and store them in an airtight container in the refrigerator for up to 24 hours. The cookies may soften slightly, but they’ll still be delicious when eaten within a day.
Freezer Friendly
For longer storage, place the wrapped sandwiches in a zip‑top freezer bag, removing as much air as possible. They’ll stay fresh for up to 2 weeks. When you’re ready to serve, let them sit at room temperature for 5 minutes, then enjoy.
Best Reheating Method
If the cookies have become a bit too soft after thawing, give them a quick 30‑second blast in a preheated 350°F oven. Add a tiny splash of water to a foil‑covered tray next to the cookies; the steam will revive the crumb without drying it out.