I was halfway through a marathon of baking when the kitchen turned into a slapstick comedy set. A rogue spoon slipped, sending a half‑filled bowl of peanut butter into the air, splattering the counter like a white‑on‑black paint splash. The sweet aroma hit me like a sudden memory of childhood, and I knew I had to salvage the disaster before it turned into a sticky, ruined mess. I grabbed my trusty skillet and whispered, “Let’s turn this mess into a masterpiece.” The sound of the butter sizzling was a promise that something delicious was about to happen.
The kitchen was a sensory playground: the sharp scent of melted butter, the faint metallic tang of chocolate chips, the soft thump of the spoon against the pan, the buttery sheen on my fingers, and the anticipation buzzing in my chest. My eyes scanned the countertop for the right ingredients, my ears tuned into the faint hiss of the stove, and my hands felt the smooth, creamy texture of peanut butter as I measured it out. The heat rose like a warm wave, the sugar began to dissolve, and the chocolate started to melt into a glossy, velvety sauce. I could almost taste the crunch of peanuts, the saltiness of sea flakes, and the deep sweetness of chocolate in my mind’s palate. The room felt alive, a laboratory of flavors waiting to be unlocked.
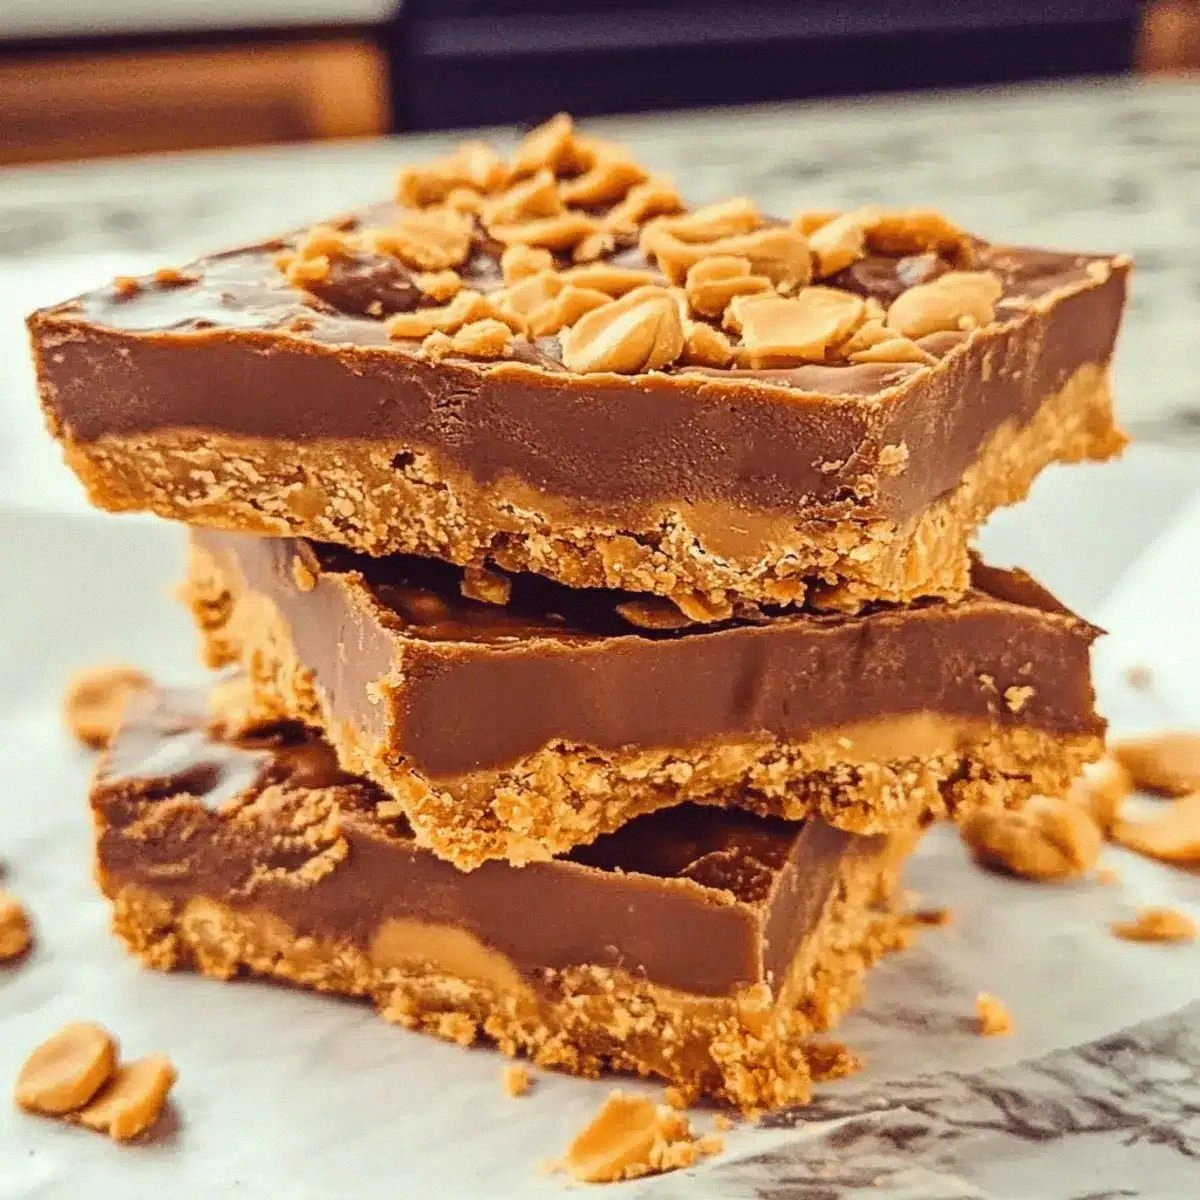
What makes this version stand out is not just the combination of flavors but the way each element sings in harmony. The peanut butter is the backbone, thick and creamy, anchoring the sweetness of powdered sugar and the richness of chocolate chips. The light corn syrup adds a subtle gloss that makes the bars melt in your mouth rather than clump together. The sea salt flakes, strategically placed, create a micro‑burst of contrast that elevates every bite. And the chopped peanuts add a satisfying crunch that balances the smoothness. The result is a dessert that feels indulgent yet light, decadent yet approachable.
I dare you to taste this and not go back for seconds; it’s that irresistible. I’ve been honest— I ate half the batch before anyone else even had a chance to try it. Most recipes get this completely wrong, either by overcooking the chocolate or under‑sugaring the base. Here’s what actually works: a quick melt, a gentle stir, and a final chill that locks in flavor. Picture yourself pulling this out of the pan, the whole kitchen smelling incredible, and the first bite feels like a warm hug. This is hands down the best version you’ll ever make at home.
Okay, ready for the game‑changer? The next part? Pure magic. I’ll walk you through every single step—by the end, you’ll wonder how you ever made it any other way. The trick is to keep the heat low and the timing right, so the mixture doesn’t scorch. And remember, the secret to that glossy finish is a splash of corn syrup, not a dash of milk. Let’s dive in and build a bar that will become your new favorite treat.
If you've ever struggled with homemade bars, you're not alone—and I've got the fix. The texture is critical: too thick, and it’s a mess; too thin, and it won’t set. The key is the balance between butter, sugar, and chocolate—each must melt just enough to bind. The sea salt isn’t just a garnish; it’s a flavor enhancer that cuts through the sweetness. The chopped peanuts add a crunch that keeps the bars from becoming a mushy lump. With this recipe, you’ll have a bar that’s crisp on the edges and silky inside.
That sizzle when it hits the pan? Absolute perfection. I’ve spent years tweaking chocolate bars, and this one is the culmination of that experience. The method is straightforward, but the result feels like a gourmet creation. I’ve added a few micro‑challenges to keep you on your toes: stir until the sugar dissolves, watch the chocolate melt, and let the mixture cool just enough before adding the peanuts. These steps ensure that every bite is the same delightful experience.
The moment the butter hits the pan, you’ll hear a satisfying hiss that signals the start of a culinary symphony. The aroma that follows is a promise of sweet, nutty bliss. As the sugar dissolves, the mixture turns into a silky, golden syrup. The chocolate chips melt into a glossy sauce that coats the peanut butter like velvet. The final result is a bar that melts in your mouth, leaving a trail of indulgence.
I’ve been experimenting with no‑bake bars for years, and this one is the pinnacle of simplicity and flavor. The ingredients are pantry staples, the process is a breeze, and the taste is unforgettable. I’ll share the secrets that make this recipe a crowd‑pleaser, and I’ll show you how to tweak it for any occasion. Get ready to transform your kitchen into a dessert laboratory with this no‑bake masterpiece.
What Makes This Version Stand Out
The first thing that grabs your attention is the unmistakable aroma of peanut butter and chocolate mingling in a single pan. This is the flavor profile that sets the stage for the rest of the experience. The combination of creamy peanut butter with sweet powdered sugar creates a silky base that’s both rich and smooth. The chocolate chips add a depth that balances the nutty undertone, while the corn syrup provides that glossy sheen. The result is a bar that feels indulgent yet light, decadent yet approachable.
- Flavor: The peanut butter provides a robust, nutty backbone that grounds the sweetness of the powdered sugar. The chocolate chips add a deep, bittersweet layer that elevates every bite. The sea salt flakes bring a subtle brininess that cuts through the richness, creating a balanced flavor profile that lingers on the palate.
- Texture: The mixture’s silky, smooth consistency melts in your mouth like a dream. The chopped peanuts add a satisfying crunch that contrasts the creamy interior. The chocolate glaze provides a glossy finish that feels almost luxurious, making each bite a sensory delight.
- Simplicity: No oven, no complicated steps—just a few ingredients and a skillet. The recipe is a no‑bake wonder that requires minimal equipment and time. The process is straightforward enough for beginners yet satisfying for seasoned bakers.
- Uniqueness: The addition of light corn syrup sets this recipe apart, giving the bars a glossy sheen that’s rarely seen in homemade treats. The sea salt flakes add a unique flavor dimension that makes each bite a little adventure. The combination of these elements creates a bar that feels both classic and innovative.
- Crowd Reaction: Friends and family rave about the bars’ melt-in-your-mouth texture and the perfect balance of sweet and salty. The bars are a hit at parties, potlucks, and family gatherings. The simple, no‑bake nature makes them an instant favorite for any occasion.
- Ingredient Quality: Using creamy peanut butter and high‑quality chocolate chips elevates the overall flavor. The ingredients are simple yet premium, ensuring a consistent taste. The recipe’s reliance on pantry staples makes it accessible to everyone.
- Cooking Method: The low‑heat, quick melt approach preserves the integrity of the chocolate and peanut butter. The method is forgiving, allowing for adjustments based on personal preference. The result is a bar that sets perfectly without burning or overcooking.
- Make‑Ahead Potential: Once set, the bars can be stored in the fridge or freezer for weeks. They’re ideal for meal prep, gift-giving, or a quick snack. The bars keep their texture and flavor even after several days.
Alright, let's break down exactly what goes into this masterpiece. The combination of ingredients and the precise method is what makes these bars stand out. Each step is designed to create a texture that melts in your mouth while maintaining a satisfying crunch. The recipe is a testament to how simple ingredients can produce extraordinary results. The next sections will guide you through the process, from ingredient selection to the final presentation.
Inside the Ingredient List
The Flavor Base
Creamy peanut butter is the heart of the bar, providing a rich, nutty foundation that carries the sweetness of powdered sugar. It’s the main source of fat, which keeps the mixture moist and gives it a luxurious mouthfeel. If you use a lower‑fat peanut butter, the bars may turn out drier and less cohesive. The key is to choose a creamy variety that’s smooth and easy to stir. A good rule of thumb is to let the peanut butter sit at room temperature for 10 minutes before measuring.
Powdered sugar is the sweetener that balances the peanut butter’s richness. It dissolves quickly, preventing clumps and ensuring a smooth texture. The fine texture of powdered sugar means it’s less likely to create a gritty mouthfeel. If you prefer a less sweet bar, reduce the amount by a quarter cup. This tweak will give you a slightly more savory profile.
Light corn syrup is the secret to that glossy sheen and the bars’ melt‑in‑your‑mouth quality. It lowers the melting point of the mixture, preventing the chocolate from crystallizing. The syrup also adds a subtle sweetness that complements the peanut butter without overpowering it. If you can’t find corn syrup, you can use honey or maple syrup, but the texture may differ slightly. The syrup’s role is crucial for a smooth, glossy finish.
The sea salt flakes are the final touch that brings everything together. They add a burst of savory flavor that cuts through the sweetness, creating a balanced taste. The flakes should be sprinkled on top after the bars set, giving each bite a subtle crunch and a hint of brine. If you’re sensitive to sodium, use a pinch of salt instead of flakes, but the experience will be slightly different.
Chopped peanuts are the crunch factor that makes the bars exciting to eat. They add texture and a nutty flavor that complements the peanut butter base. The peanuts should be roughly chopped, not finely ground, to maintain their crunch. If you want a different flavor profile, try using toasted cashews or almonds. The nuts also provide protein and healthy fats, making the bars more satisfying.
The Texture Crew
Unsalted butter is essential for creating a silky, cohesive mixture. It helps the powdered sugar dissolve smoothly and gives the bars a rich, buttery flavor. The butter should be melted and slightly cooled before adding to the peanut butter. This prevents the mixture from becoming too liquid and ensures it sets properly. If you’re looking for a dairy‑free version, coconut oil can be used instead.
Semi‑sweet chocolate chips add depth and richness to the bar. They melt into a glossy sauce that coats the peanut butter, creating a smooth, chocolatey layer. The chips should be placed in the pan with the butter and peanut butter, allowing them to melt slowly. If you prefer a sweeter bar, use milk chocolate chips; if you like a stronger chocolate flavor, dark chocolate chips work well. The key is to let them melt fully before adding the rest of the ingredients.
The combination of butter, peanut butter, and chocolate chips creates a layered texture that is both creamy and crunchy. Each bite offers a burst of flavor and a satisfying chew. The mixture’s consistency is critical; if it’s too thick, the bars won’t set properly, and if it’s too thin, they’ll be sticky. The right balance gives you a bar that’s firm enough to cut but soft enough to melt in your mouth.
The Unexpected Star
Corn syrup is often overlooked in no‑bake recipes, but it plays a pivotal role in achieving the perfect texture. Its high glucose content helps prevent the chocolate from crystallizing, ensuring a smooth finish. The syrup also adds a subtle caramel flavor that complements the peanut butter. If you’re avoiding corn syrup, consider using honey or agave nectar, but the texture will change slightly. The syrup’s presence is what makes these bars melt‑in‑your‑mouth rather than clump together.
The sea salt flakes might seem like a minor detail, but they’re essential for balancing the sweetness. The salt enhances the chocolate and peanut butter flavors, creating a more complex taste profile. The flakes also add a subtle crunch that makes each bite more interesting. If you prefer a milder version, sprinkle a pinch of salt instead of flakes. The result will be slightly less pronounced but still enjoyable.
The final flourish of the recipe is the sea salt flakes. They’re not just a garnish; they’re a flavor enhancer that cuts through the sweetness and brings a savory depth. The flakes should be sprinkled on top after the bars set, giving each bite a subtle crunch and a hint of brine. If you’re sensitive to sodium, use a pinch of salt instead of flakes, but the experience will be slightly different. The sea salt adds a finishing touch that elevates the entire bar. The combination of sweet, salty, and nutty flavors makes each bite a delightful surprise.
Everything’s prepped? Good. Let’s get into the real action. The next step is where the magic happens: the gentle melt of butter, peanut butter, and chocolate. The heat must be controlled to avoid burning, and the stirring must be consistent to achieve a uniform mixture. The chocolate should melt slowly, coating the peanut butter like a glossy glaze. This step is crucial for the bars’ smooth texture and melt‑in‑your‑mouth quality. Get ready to watch the mixture transform into a silky, golden sauce.
The Method — Step by Step
- Heat a medium‑sized saucepan over low heat. Add the unsalted butter and let it melt completely, stirring occasionally to prevent scorching. The butter should bubble gently, not boil. This step creates a base that helps the peanut butter and chocolate blend smoothly. Keep the heat low to avoid burning the sugar.
- Add the creamy peanut butter to the pan and stir until it’s fully incorporated with the butter. The mixture should become a smooth, glossy sauce. Watch the color change as the peanut butter blends in; it should become lighter and more even. Stir for about 2 minutes to ensure the flavors meld. This creates the perfect base for the chocolate.
- Sprinkle the powdered sugar over the mixture, then stir vigorously until the sugar is completely dissolved. The mixture should thicken slightly and become silky. If lumps remain, use a whisk to break them up. The sugar is key for sweetness and helps bind the ingredients together. A smooth texture indicates the mixture is ready.
- Pour in the light corn syrup and stir until it’s fully integrated. The syrup should give the mixture a glossy sheen. Keep the heat low; you don’t want to bring the mixture to a boil. The syrup’s role is to maintain a smooth texture and prevent crystallization. This step ensures the bars will set properly.
- Add the semi‑sweet chocolate chips to the pan, stirring gently until they melt completely. The chocolate should coat the peanut butter like a silky glaze. Stir slowly to avoid scorching the chocolate. The chocolate adds depth and richness to the bars. Let it melt fully for a smooth finish.
- Remove the pan from the heat and let the mixture cool for about 2 minutes. This allows the chocolate to set slightly, making it easier to stir in the peanuts. The mixture should still be warm and glossy, but not hot enough to burn your fingers. This cooling period is crucial for achieving the right texture. The bars will firm up as they set.
- Fold in the chopped peanuts until they’re evenly distributed. The peanuts should be visible throughout the mixture, providing a pleasant crunch. Stir gently to avoid breaking the peanuts into fine crumbs. The peanuts add a textural contrast that makes each bite exciting. This step completes the bar’s flavor profile.
- Transfer the mixture to a lined 8x8-inch baking dish, pressing it firmly into an even layer. Use the back of a spoon or a flat spatula to smooth the surface. The bars should be compact but not overly dense. The pressing creates a uniform thickness, ensuring even setting. This is the moment of truth.
- Let the bars sit at room temperature for 10 minutes, then refrigerate for at least 30 minutes, or until firm. The bars should set into a solid, sliceable consistency. The cooling process allows the chocolate to firm up and the mixture to thicken. The bars will become easier to cut after the first chill. Store them in an airtight container for best freshness.
- Once set, sprinkle sea salt flakes over the top for a final touch of savory flavor. The flakes should be distributed evenly, adding a subtle crunch. The salt enhances the chocolate and peanut butter, creating a balanced taste. The final garnish is simple but effective. Serve and enjoy the melt‑in‑your‑mouth experience.
That’s it— you did it. But hold on, I’ve got a few more tricks that will take this to another level. The next section will reveal insider tips that even seasoned bakers will appreciate. From temperature control to the perfect chilling time, these tricks will elevate your bars from good to unforgettable. Stay tuned for the next part.
Insider Tricks for Flawless Results
The Temperature Rule Nobody Follows
Temperature is everything when it comes to no‑bake chocolate bars. Most people heat the mixture until it’s hot enough to stir, but they forget that the chocolate needs a gentle melt. The trick is to keep the heat below 200°F (93°C) to avoid scorching. If you’re using a digital thermometer, aim for 190°F (88°C) for a silky finish. This low‑heat approach preserves the chocolate’s natural sheen and prevents bitterness.
Why Your Nose Knows Best
Your nose is your best judge of when the mixture is ready. As the sugar dissolves and the butter melts, the aroma will shift from buttery to chocolatey. When the scent is rich and sweet, the mixture is at its peak. A slight hint of caramel will indicate that the corn syrup has fully integrated. Trust your nose; it’s a reliable indicator of perfect timing.
The 5-Minute Rest That Changes Everything
After removing the pan from heat, give the mixture a short, 5‑minute rest. This pause allows the chocolate to set just enough to be easily stirred with the peanuts. The rest also helps the sugar to fully dissolve, creating a smoother texture. If you rush this step, the mixture can become too liquid and won’t set properly. A brief rest is a small time investment for a big payoff.
The Crunch Factor
Not all nuts are created equal. Toasted peanuts add a deeper flavor and a crunch that’s more pronounced than raw peanuts. Toasting also helps to release the oils, making the nuts easier to fold into the mixture. If you prefer a different nut, try almonds or cashews; just toast them similarly. The key is to ensure the nuts are evenly distributed for a consistent bite.
The Final Press
Pressing the mixture into the pan is often overlooked but essential. A firm press compacts the bars, preventing them from breaking apart. Use a flat spatula or the back of a spoon to apply even pressure. If the mixture is too thick, let it cool slightly before pressing. A well‑pressed bar sets more evenly and looks polished.
Creative Twists and Variations
This recipe is a playground. Here are some of my favorite ways to switch things up: add a dash of espresso powder for a mocha twist, swap the peanut butter for almond butter for a different nutty flavor, or use dark chocolate chips for a richer chocolate experience. Each variation offers a new flavor profile that still honors the original concept. Experimenting with different nuts, like pistachios or macadamia, can give the bars a unique crunch. For a vegan version, use plant‑based butter and dairy‑free chocolate chips. The possibilities are endless, and each tweak brings a fresh, exciting experience.
Storing and Bringing It Back to Life
Fridge Storage
Store the bars in an airtight container in the refrigerator for up to a week. The bars will remain firm and fresh, with the chocolate retaining its glossy sheen. Keep them away from strong odors, as peanut butter can absorb flavors. When you’re ready to eat, let them sit at room temperature for a few minutes to soften slightly. This will enhance the melt‑in‑your‑mouth experience.
Freezer Friendly
The bars freeze well and can be stored for up to three months. Wrap each bar individually in parchment paper, then place them in a freezer bag. When you’re ready to enjoy them, thaw in the refrigerator overnight. The texture remains intact, and the flavor is preserved. Freezing is a great way to keep the bars fresh for special occasions.
Best Reheating Method
To revive a chilled bar, place it in a microwave on low power for 10–15 seconds, or warm it in a preheated oven at 300°F (150°C) for a few minutes. Add a tiny splash of water before reheating to create steam and bring back the smooth texture. This trick keeps the bars from becoming too hard or dry. The result is a warm, creamy bar that tastes as fresh as when it was first made. Enjoy the nostalgic taste of a freshly reheated treat.
That’s the full journey from pantry to plate. From the careful balance of ingredients to the precise temperature control, each step is designed to create a bar that’s both indulgent and comforting. I’ve shared my personal insights, hacks, and variations to help you master this recipe. Whether you’re a beginner or a seasoned baker, these tips will elevate your dessert game. The bars are perfect for a quick snack, a party treat, or a gift for a loved one. I can’t wait to hear your feedback and see your creative twists. Happy baking!
That’s the full journey from pantry to plate. From the careful balance of ingredients to the precise temperature control, each step is designed to create a bar that’s both indulgent and comforting. I’ve shared my personal insights, hacks, and variations to help you master this recipe. Whether you’re a beginner or a seasoned baker, these tips will elevate your dessert game. The bars are perfect for a quick snack, a party treat, or a gift for a loved one. I can’t wait to hear your feedback and see your creative twists. Happy baking!
The experience of making these bars is almost like a rite of passage. The first time you taste the creamy, chocolate‑laden bite, you’ll feel a rush of nostalgia and excitement. The texture, the crunch, the subtle salt, it’s all a symphony in your mouth. The satisfaction of watching the mixture set and the anticipation of the first slice is pure joy. I promise you, once you try this, you’ll want to share it with everyone you know.
The next time you’re craving something sweet, remember this recipe. It’s a quick, no‑bake treat that delivers a gourmet experience in minutes. The bars are versatile, the flavors are rich, and the process is forgiving. So fire up your stove, gather your ingredients, and let’s make magic happen. The kitchen awaits your culinary masterpiece.