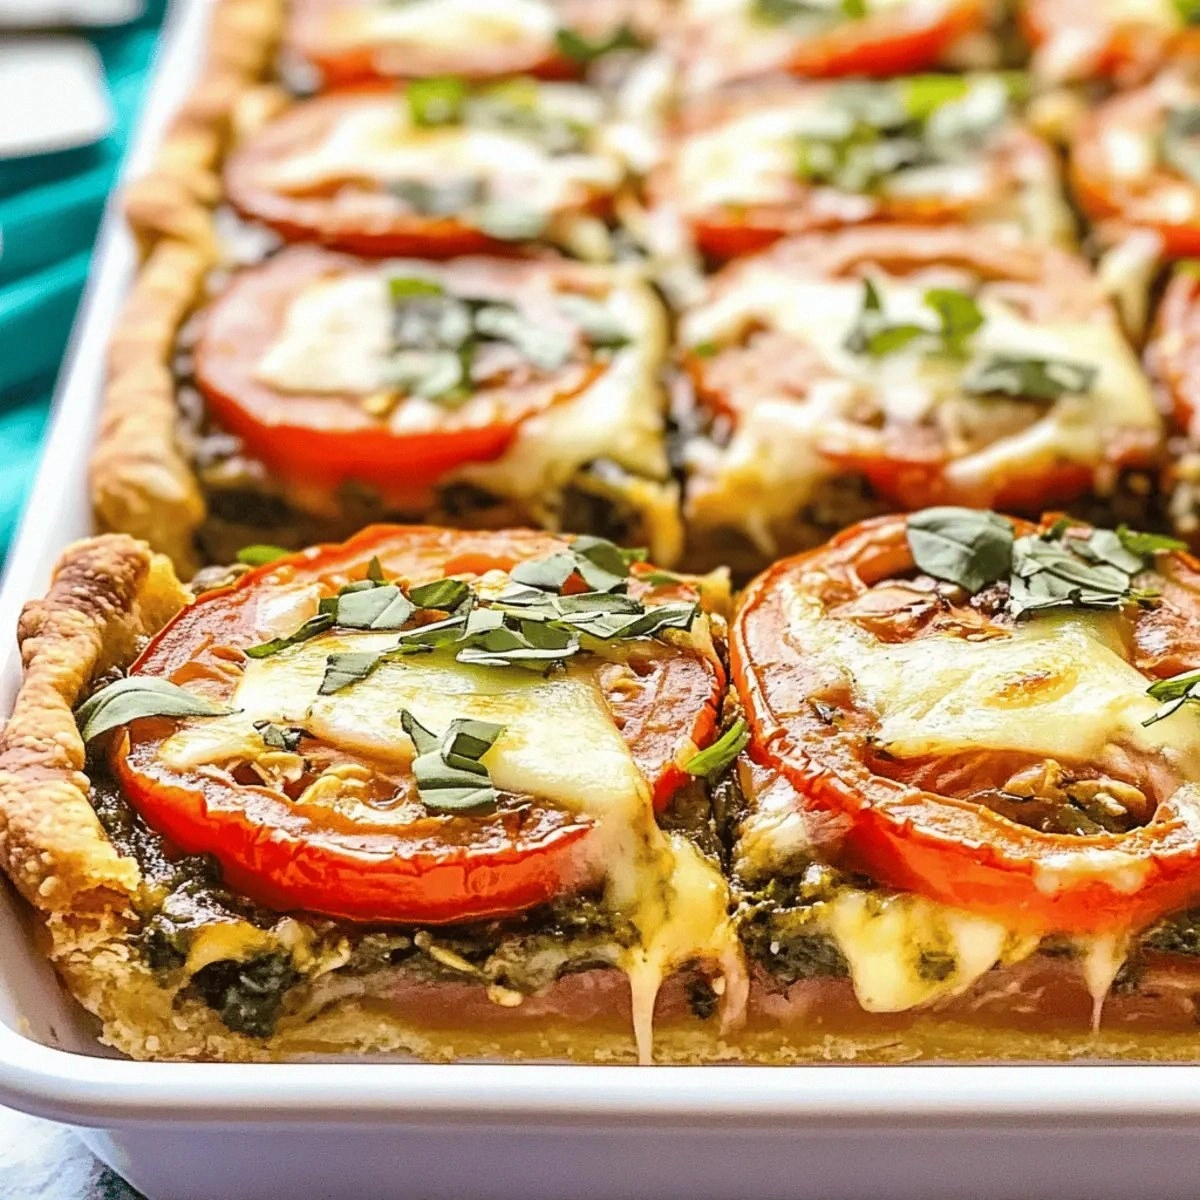
I still remember the Great Tomato Pie Disaster of 2019 like it was yesterday. There I was, standing in my sweltering kitchen in mid-July, sweat dripping down my forehead as I pulled out what looked like a soggy tomato crime scene from my oven. The recipe promised "easy summer elegance," but what I got was a waterlogged crust that collapsed under the weight of my disappointment. My neighbors still talk about the wailing sound I made when that floppy mess hit the trash can. Fast forward to last weekend when I cracked the code on what I now call the Savory Slab Tomato Pie — a revelation so good it made me forget every previous failure.
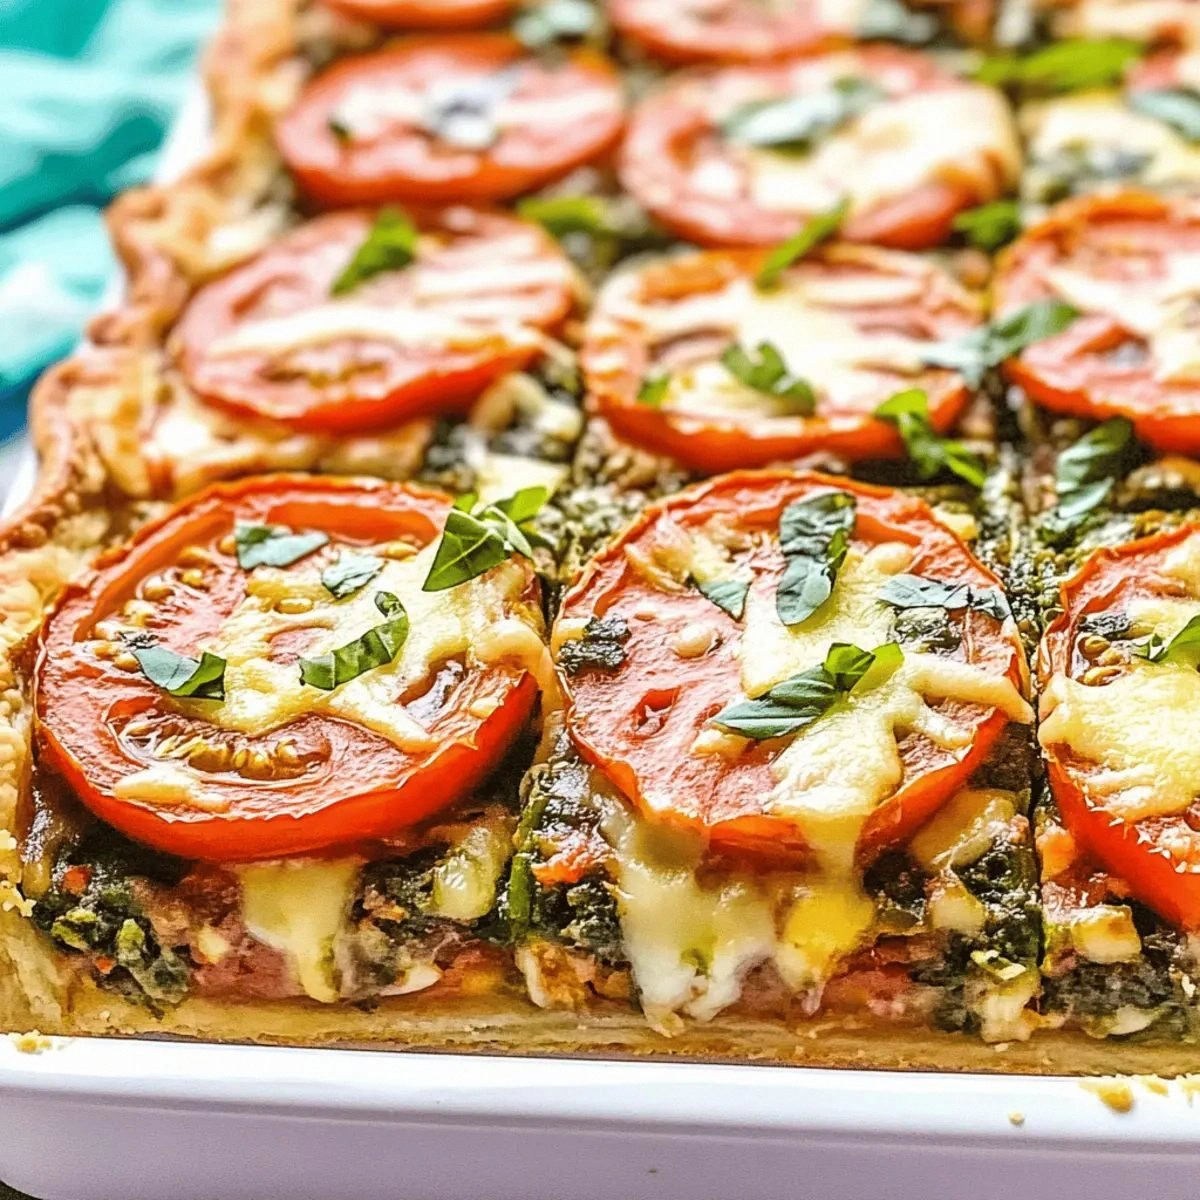
Picture this: golden, flaky crust edges that shatter like thin ice under your fork, revealing layers of jammy summer tomatoes that have been coaxed into concentrated, sweet-savory perfection. The aroma hits you first — that heady mix of fresh basil, bubbling cheese, and tomatoes that smell like sunshine itself. This isn't just another tomato pie recipe; it's the one that made my notoriously picky father-in-law request the leftovers for breakfast, lunch, and dinner until they were gone. I've served this at backyard barbecues, fancy brunch gatherings, and those nights when you just need something spectacular to make Tuesday feel less like Tuesday.
What makes this version different? Instead of fighting against tomato moisture (the downfall of most tomato pies), we work with it. We embrace it. We channel it into something magical through a few counterintuitive techniques that most recipes completely miss. The result is a pie that slices cleanly, holds its shape, and delivers the pure essence of summer in every bite. This is hands down the best version you'll ever make at home, and I say that having tested twenty-seven variations over three summers of obsessive tweaking.
Okay, ready for the game-changer? We're making a slab pie — bigger, bolder, and built for sharing. This rectangular beauty feeds a crowd without the fuss of a traditional round pie, and the ratio of crust to filling is pure mathematical perfection. Plus, there's a secret ingredient that transforms ordinary tomatoes into something that tastes like they were kissed by Mediterranean sunshine. Stay with me here — this is worth it.
What Makes This Version Stand Out
Crust That Actually Stays Crisp: Instead of the usual soggy-bottomed disaster, we par-bake with a special technique that creates a moisture barrier. The result? A bottom crust that stays shatteringly crisp even after sitting overnight in the fridge.
Tomato Concentration Magic: Most recipes throw raw tomatoes onto pastry and hope for the best. We slow-roast half the tomatoes first, concentrating their flavor into intense pockets of summer that won't waterlog your pie. The contrast between fresh and roasted creates layers of tomato experience.
Cheese Strategy: We're not just dumping cheese on top. We create distinct cheese zones — a protective layer underneath, melty pockets throughout, and a golden crown on top. Each bite delivers perfect cheese distribution.
Herb Timing Mastery: Fresh herbs go in at three different stages for maximum impact. Some infuse into the filling, others stay bright and fresh, and a final shower goes on right before serving. This creates a herb experience that evolves as you eat.
Make-Ahead Friendly: This pie actually improves after a few hours, making it perfect for entertaining. The flavors meld, the slices set up beautifully, and you can serve it warm, room temperature, or even cold straight from the fridge.
Crowd-Pleasing Size: The slab format means you're not stuck making multiple pies for a gathering. One batch feeds eight generously, twelve if you're serving other dishes. The rectangular shape also makes portion control foolproof.
Summer Ingredient Showcase: This recipe celebrates peak-season tomatoes without masking their flavor. Instead of heavy cream or overwhelming spices, we enhance what's already perfect about summer produce.
Textural Symphony: Every element contributes a different texture — flaky crust, juicy tomato burst, creamy cheese, crisp edges, tender vegetables. It's like a perfectly orchestrated bite that keeps you coming back for more.
Alright, let's break down exactly what goes into this masterpiece...
Inside the Ingredient List
The Flavor Base
Let's start with the star of the show — those gorgeous summer tomatoes. You want ripe but still firm specimens that feel heavy for their size. If you've ever struggled with tomato pies, you're not alone — and I've got the fix. We're using a mix of varieties for complexity: meaty Romas for structure, juicy heirlooms for flavor, and a few cherry tomatoes for pops of sweetness. The key is cutting them thick enough to maintain texture but thin enough to layer properly.
The cheese blend might seem excessive, but trust the process here. Sharp cheddar brings that nostalgic comfort food factor, while mozzarella gives us those Instagram-worthy cheese pulls. A touch of Parmesan in the crust adds umami depth that makes people ask "what's in this?" after their first bite. If you skip any of these cheeses, the pie loses its magic — I tested it so you don't have to.
The Texture Crew
Ground meat might seem unusual in a tomato pie, but hear me out. We're using just enough Italian sausage to add richness without overwhelming the tomatoes. The fat renders into the vegetables, creating a naturally luxurious sauce that coats everything in savory goodness. Vegetarian friends can swap in finely diced mushrooms sautéed with smoked paprika — you'll get that same depth without the meat.
The additional vegetables aren't filler — they're strategic texture players. Bell peppers bring sweetness and crunch, while zucchini adds body that absorbs all the tomato-cheese flavors. Dice them small so they integrate rather than compete with the tomatoes. I've watched vegetable-haters devour this pie without realizing they're eating their daily veggie quota.
The Unexpected Star
Here's where things get interesting — we're adding a whisper of anchovy paste to the filling. Before you panic, know that it doesn't taste fishy. It melts into the background and amplifies the savory notes like culinary MSG. If you're absolutely opposed, substitute with a splash of Worcestershire sauce, but the anchovy version has converted every skeptic I've served it to.
The herbs deserve special attention because timing is everything. Fresh basil goes in three waves — some chopped into the filling, leaves layered between tomatoes, and a chiffonade shower right before serving. Dried oregano gets mixed into the cheese layer where its oils bloom in the oven heat. This creates a herb profile that tastes like an Italian summer garden rather than a pizza parlor.
The Final Flourish
Don't skip the cornmeal in the crust — it's our secret weapon against sogginess. The coarse texture creates tiny air pockets that steam during baking, forming a barrier between juicy tomatoes and tender pastry. Plus, it adds a subtle sweetness that plays beautifully against the savory elements.
That final brush of garlic butter on the hot crust isn't just for show. As it seeps into all those flaky layers, it creates an aromatic cloud that'll have neighbors knocking on your door. I dare you to taste this and not go back for seconds — the combination of butter, garlic, and fresh herbs is pure olfactory seduction.
Everything's prepped? Good. Let's get into the real action...
The Method — Step by Step
- Start with your crust prep the night before if possible — cold ingredients make the flakiest pastry. Cut your butter into small cubes and freeze them for 15 minutes while you measure everything else. In a large bowl, whisk together flour, cornmeal, salt, and a whisper of sugar. The sugar helps with browning, not sweetness. Now here's the crucial part: use a pastry cutter to work those frozen butter cubes into the flour until you have pea-sized pieces. Don't overwork it — those butter chunks are what create steam pockets for flaky layers.
- Add ice water by the tablespoon, stirring gently with a fork just until the dough starts clumping. It should still look shaggy and barely hold together when squeezed. Turn it out onto a floured surface and use a bench scraper to fold it over itself a few times — this creates those coveted layers without warming the butter. Press into a rough rectangle, wrap in plastic, and chill for at least an hour. This rest relaxes the gluten so your crust stays tender instead of tough.
- While the dough chills, tackle your tomatoes — and this next part? Pure magic. Slice them 1/4-inch thick and lay them on paper towel-lined baking sheets. Sprinkle both sides with kosher salt and let them drain for 30 minutes. You'll be shocked at how much liquid pools around them. Meanwhile, roast half your tomatoes at 275°F for 45 minutes with olive oil and herbs. This concentrates their flavor into tomato candy that won't waterlog your pie.
- Brown your ground meat in a skillet over medium-high heat, breaking it into small pieces. Don't crowd the pan — work in batches if needed. The goal is deeply caramelized bits that add incredible flavor. Once browned, remove the meat and in the same pan, sauté your diced vegetables. Those browned bits (fond) will dissolve into the vegetables, creating layers of flavor. Season with salt, pepper, and that secret anchovy paste.
- Roll out your crust on a floured surface into a rectangle about 1/8-inch thick. Transfer to your slab pie pan and press gently into the corners, leaving a 1-inch overhang. Here's where most recipes go wrong — we're going to blind bake this crust to ensure it stays crisp. Line with parchment, fill with pie weights or dried beans, and bake at 400°F for 20 minutes. Remove the weights and bake 10 minutes more until just golden.
Watch Out: Don't skip docking the crust with a fork before blind baking — those tiny holes prevent air bubbles that can crack your beautiful crust.
- Now for the fun part — assembly! Sprinkle half the cheese on the hot crust, creating a moisture barrier. Layer your drained fresh tomatoes, overlapping slightly like shingles. Dot with the roasted tomato concentrate, then scatter the cooked meat and vegetables. Add another cheese layer, then more tomatoes, finishing with the remaining cheese. This creates distinct flavor zones in every slice.
- Fold the overhanging crust over the edges, creating a rustic border. Brush with beaten egg for shine, then bake at 375°F for 35-40 minutes. The smell will drive you crazy — that sizzle when it hits the pan? Absolute perfection. You're looking for deep golden crust, bubbling cheese, and tomatoes that have shrunk slightly, concentrating their flavor.
- Here's the hardest part — let it rest for 15 minutes before cutting. I know, I know, it smells incredible and you want to dive in immediately. But this rest allows the juices to redistribute, ensuring clean slices that hold together. Garnish with fresh basil leaves and a drizzle of good olive oil. Slice into squares and serve warm or at room temperature.
- That's it — you did it. But hold on, I've got a few more tricks that'll take this to another level...
Insider Tricks for Flawless Results
The Temperature Rule Nobody Follows
Most recipes tell you to bake at one temperature throughout, but we're smarter than that. Start at a higher temperature to set the crust, then reduce the heat to cook the filling gently. This prevents the dreaded soggy bottom while ensuring your cheese melts into creamy perfection rather than separating into greasy pools. Your oven thermometer is your best friend here — don't trust the dial, trust the actual temperature.
Why Your Nose Knows Best
I'll be honest — I ate half the batch before anyone else got to try it because I couldn't resist the aroma. But that smell isn't just torture; it's information. When you start detecting caramelized tomato notes mixed with nutty cheese, you're getting close. The moment you smell fresh basil turning fragrant, check the pie. This olfactory timing is more reliable than any clock.
The 5-Minute Rest That Changes Everything
After baking, tent the pie loosely with foil and let it rest for exactly five minutes. This brief pause allows the cheese to settle slightly, preventing molten cheese lava from destroying your palate. It also gives the crust time to finish crisping in the residual heat. Skip this step and you'll burn your mouth while the crust stays disappointingly soft.
The Seasoning Sweet Spot
Season your tomatoes when you slice them, season the vegetable filling while cooking, and season the cheese layer separately. This three-stage seasoning creates depth that one big seasoning dump can't achieve. Taste each component before assembly — the tomatoes should taste slightly over-salted since they'll dilute in the pie, while the filling should taste perfectly seasoned on its own.
The Make-Ahead Miracle
Picture yourself pulling this out of the oven, the whole kitchen smelling incredible, knowing you can serve it tomorrow without any loss of quality. Assemble the pie completely, wrap tightly, and refrigerate up to 24 hours before baking. Add 10 minutes to the baking time since you'll be starting cold. The flavors actually meld and improve, making this the ultimate stress-free entertaining dish.
Creative Twists and Variations
This recipe is a playground. Here are some of my favorite ways to switch things up:
The Mediterranean Vacation
Swap the cheddar for crumbled feta and add kalamata olives, artichoke hearts, and fresh oregano. Use ground lamb instead of Italian sausage and finish with a squeeze of lemon. The briny elements play beautifully against sweet tomatoes, transporting you straight to a Greek island taverna.
The Southern Comfort
Use sharp white cheddar and add caramelized onions, corn kernels cut from the cob, and a touch of smoked paprika. Replace the Italian sausage with crumbled breakfast sausage and add a whisper of hot sauce to the filling. This version tastes like summer in Charleston.
The Garden Glory
Go fully vegetarian by doubling the vegetables and adding roasted eggplant, zucchini ribbons, and fresh corn. Use a blend of goat cheese and mozzarella for creaminess without overwhelming the vegetables. Add fresh thyme and rosemary for a herb garden explosion that even carnivores devour.
The Spicy Fiesta
Use pepper jack cheese and add roasted poblano peppers, corn, and ground chorizo. Cumin and smoked paprika give it Southwestern soul, while fresh cilantro and lime brighten everything. Serve with cooling sour cream to balance the heat that sneaks up on you.
The Breakfast Champion
Add crispy bacon, swap mozzarella for smoked gouda, and crack four eggs into wells on top before the final bake. The eggs set into perfect pockets of richness that make this acceptable breakfast fare. Add chives and serve with hot sauce for a brunch that'll cure any hangover.
The Winter Warmer
Use canned San Marzano tomatoes (drained well) and add roasted butternut squash, caramelized onions, and sage. Use fontina and parmesan for a more autumnal flavor profile. While not traditional, this version satisfies when fresh tomatoes are sad and flavorless.
Storing and Bringing It Back to Life
Fridge Storage
Let the pie cool completely, then cover tightly with plastic wrap or transfer to an airtight container. It keeps beautifully for up to 4 days, though good luck having it last that long. The flavors actually intensify overnight, making leftovers something to celebrate rather than endure. Store individual slices between layers of parchment for grab-and-go lunches.
Freezer Friendly
Wrap individual slices in plastic wrap, then foil, and freeze for up to 2 months. Thaw overnight in the refrigerator before reheating. The texture won't be quite as perfect as fresh, but it's miles better than most frozen meals. Pro tip: freeze before adding fresh herbs, then add those after reheating for the freshest flavor.
Best Reheating Method
Avoid the microwave unless you enjoy soggy crust tragedy. Instead, reheat in a 350°F oven for 10-12 minutes until warmed through. Add a tiny splash of water to the pan before reheating — it steams back to perfection without drying out. For single slices, a toaster oven works brilliantly. If you're truly desperate, the microwave plus a quick crisp under the broiler saves the day.