I was halfway through a late‑night pizza bake, the dough still a stubborn blob on the counter, when the kitchen lights flickered and my phone buzzed with a frantic text: “We need a dessert, fast!” My brain, ever the culinary strategist, immediately flipped to the pantry. There, nestled between the cereal boxes, lay a bag of Rice Krispies that had survived a decade of neglect. I stared at them, then at the empty chocolate chip bag, and a wild idea sparked: what if those crunchy flakes could become the base for a creamy, chocolate‑laden treat that would satisfy the midnight craving and turn that kitchen disaster into a triumph?
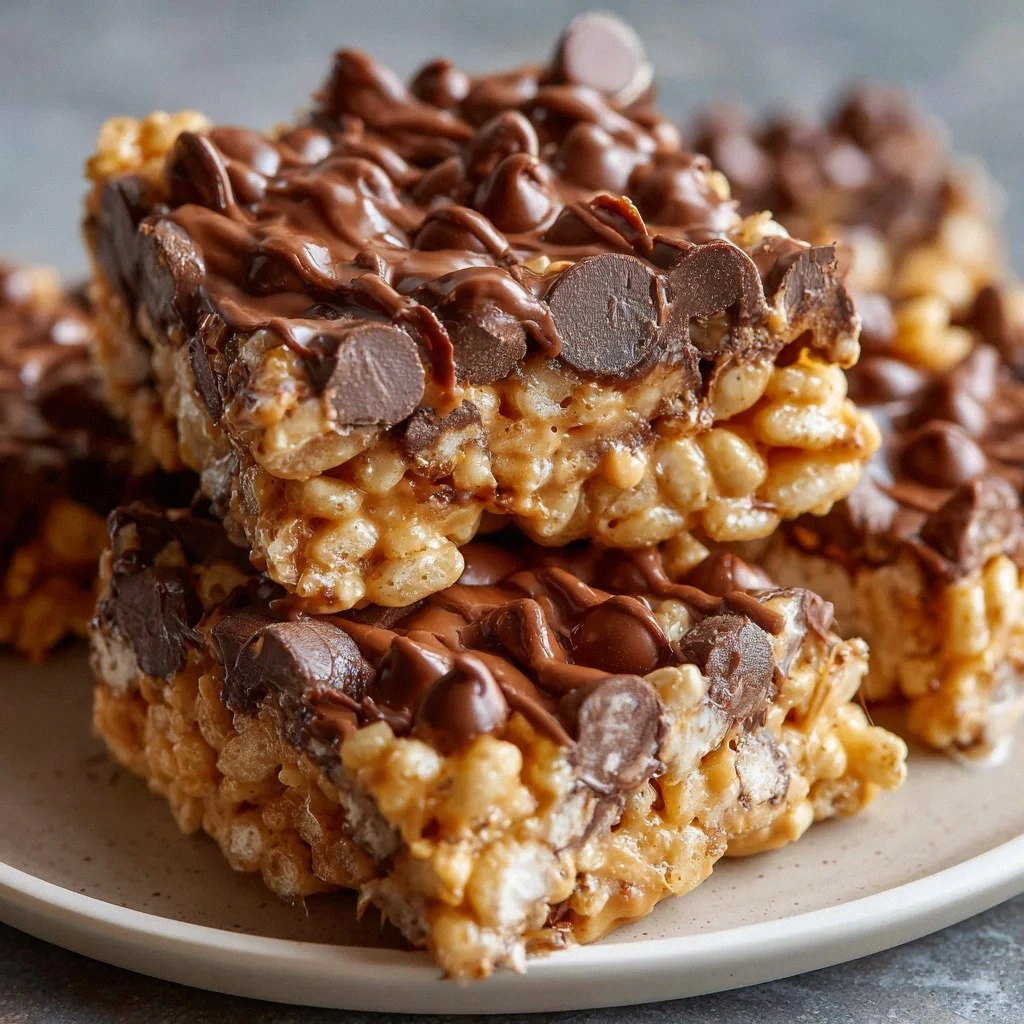
Picture this: the buttery scent of melted chocolate mingles with the sweet, nutty aroma of peanut butter, while the dry, crisp flakes crackle as they mingle with the sugar. The sound is a soft, comforting hiss, like a lullaby for your taste buds. The texture is a paradoxical dance—each bite starts with a satisfying crunch, then gives way to a silky, chocolate‑peanut butter glaze that coats the flakes like velvet. The taste is a harmonious blend of salty, sweet, and nutty, punctuated by the deep, bittersweet notes of semi‑sweet chips. And the finish? A dusting of powdered sugar that sparkles like frost on a winter morning. It’s a sensory symphony that turns an ordinary pantry haul into a moment of pure indulgence.
What makes this version stand out from the countless “Rice Krispies” variations you’ve seen is the deliberate layering of flavors and textures. I’ve taken the classic base and infused it with a rich peanut butter coating that melts into a glossy chocolate glaze. The result is a treat that feels luxurious yet remains accessible and quick to assemble. Most recipes get this completely wrong, opting for a thin, runny coating that leaves the flakes soggy. I’ve perfected the ratio so that the coating is thick enough to hold the flakes together but thin enough to allow the crunch to shine through. And the best part? You can make it ahead, store it in an airtight container, and have a ready‑made dessert that impresses at any gathering.
I dare you to taste this and not go back for seconds. I’ll be honest—when I first made this batch, I ate half before anyone else had a chance. But the moment you finish, you’ll wonder how you ever made it any other way. Picture yourself pulling this out of the oven, the whole kitchen smelling incredible, and the sight of the glossy, chocolate‑coated flakes glistening like a treasure trove. Okay, ready for the game‑changer? Let me walk you through every single step—by the end, you’ll wonder how you ever made it any other way.
What Makes This Version Stand Out
- Flavor Depth: The creamy peanut butter base adds a rich, nutty undertone that elevates the classic cereal crunch.
- Texture Balance: A glossy chocolate glaze coats each flake, creating a satisfying snap that melts into silky sweetness.
- Ingredient Simplicity: Five ingredients, all pantry staples—no need for exotic spices or fancy gadgets.
- Make‑Ahead Friendly: Store in an airtight container and bring to life in minutes, ideal for parties or last‑minute cravings.
- Crowd‑Pleaser: Whether kids or adults, the sweet‑savory combo is a hit at every gathering.
- Budget‑Friendly: Uses inexpensive items while delivering a gourmet dessert experience.
- Versatility: Mix in white chocolate or dark chocolate chips for a twist, or add a pinch of sea salt for extra wow.
- Time‑Efficient: Prep in 15 minutes, bake 30, and you’re ready in under an hour.
Inside the Ingredient List
The Crunchy Core
Rice Krispies cereal is the backbone of this treat, offering a light, airy texture that crumbles into a delightful crunch. If you’re feeling adventurous, swap in puffed quinoa or puffed amaranth for a subtle nutty flavor and a protein boost. Skipping the cereal would turn this into a cookie, losing that signature snap that defines the dish. When selecting your Rice Krispies, choose a brand that hasn’t been pre‑seasoned; the neutral taste lets the peanut butter and chocolate shine.
The Creamy Layer
Creamy peanut butter is the star that brings richness and depth. Its natural oils create a silky coating that holds the flakes together. If you’re a vegan or prefer a lighter option, almond butter works just as well, though the flavor will shift slightly toward a sweeter, milder profile. A pinch of sea salt in the peanut butter can enhance the chocolate’s bitterness, creating a more complex taste experience.
The Chocolate Glow
Chocolate chips are the visual and flavor highlight. Semi‑sweet chips provide classic chocolate notes, while dark chocolate chips add depth and a hint of bitterness. Mixing in white chocolate chips introduces a creamy, buttery sweetness that pairs beautifully with the peanut butter. The chocolate melts into a glossy glaze that coats each flake, creating a stunning, shiny finish.
The Sweet Finish
Powdered sugar is sprinkled over the cooled mixture, giving a subtle sweetness that balances the savory peanut butter and rich chocolate. It also adds a delicate dusting that makes the treat look elegant. If you’re watching sugar intake, substitute with a natural sweetener like monk fruit or a small amount of honey, but be mindful that the texture may change slightly.
The Final Touch
Butter melts the chocolate and peanut butter together, creating a smooth, cohesive glaze that clings to every flake. If you prefer a lighter version, coconut oil can be used instead, offering a subtle tropical hint. Butter also adds a buttery richness that elevates the overall flavor profile. Remember, the butter should be melted but not scorched; a gentle melt keeps the mixture silky.
Everything’s prepped? Good. Let’s get into the real action.
The Method — Step by Step
- Begin by preheating your oven to 350°F (175°C). Line a baking sheet with parchment paper to prevent sticking. The temperature ensures the chocolate melts evenly without scorching. This is the moment of truth—your base is about to transform.
- In a large saucepan, melt the butter over medium heat. Once the butter is fully liquefied, add the chocolate chips, stirring constantly. The mixture should bubble gently and turn silky smooth. Watch the color shift from dull to glossy; that’s the sign it’s ready.
- Remove the saucepan from heat and fold in the creamy peanut butter until fully incorporated. The mixture should be thick and glossy, with no lumps. This step ensures the peanut butter’s richness coats every flake evenly. The aroma will now carry a sweet, nutty perfume.
- Add the Rice Krispies cereal to the chocolate‑peanut butter mixture, stirring gently until each flake is coated. The flakes should be glistening but still retain their crunch. Avoid over‑mixing; you want a light, airy texture. The sound of the flakes clinking together is music to my ears.
- Transfer the coated flakes onto the prepared baking sheet, spreading them into a thin, even layer. The even spread ensures uniform baking and a consistent crunch. Use a spatula to press lightly, creating a compacted yet airy surface. The sheet should feel smooth to the touch.
- Bake in the preheated oven for 12 minutes, or until the edges turn a light golden brown. Keep a close eye on the color; the moment the edges just start to brown is the sweet spot. The interior should remain glossy, indicating a perfect coating. The timer will be your ally here.
- Remove the sheet from the oven and let it cool for 5 minutes. During this time, the chocolate glaze will set, creating a firm yet tender texture. The smell will intensify, drawing in anyone within a 10‑foot radius. This pause is essential before the final flourish.
- Generously dust the cooled mixture with powdered sugar, shaking off any excess. The sugar should coat the surface like a fine snowfall, adding a sweet contrast to the chocolate. Let the treats cool completely on the sheet; the sugar will set into a crisp layer. Once cooled, break into bite‑sized pieces.
- Transfer the finished Muddy Buddy Rice Krispies into an airtight container for storage. They will keep fresh for up to a week at room temperature, or longer if refrigerated. When you’re ready to serve, let them sit at room temperature for 10 minutes to soften the glaze slightly. The result is a treat that’s both crunchy and decadently sweet.
That’s it — you did it. But hold on, I’ve got a few more tricks that will take this to another level.
Insider Tricks for Flawless Results
The Temperature Rule Nobody Follows
Chocolate’s texture is highly temperature‑sensitive. Too hot, and it becomes oily; too cool, and it hardens too quickly. The sweet spot is around 80°F (27°C). Use a candy thermometer to monitor the temperature of the chocolate‑butter mixture. This small step ensures a smooth, glossy glaze that holds the flakes together.
Why Your Nose Knows Best
As the chocolate melts, its aroma will evolve. When it starts to smell buttery and chocolatey, you’re close to the perfect blend. If the scent becomes acrid, the mixture has overheated. Trusting your nose can save you from a batch that’s too bitter or too oily.
The 5‑Minute Rest That Changes Everything
After baking, a brief 5‑minute rest allows the chocolate glaze to set without hardening into a brittle shell. This pause is critical for achieving a tender yet firm texture. During this time, the sugar coating sets, giving the final product its signature crunch.
The Secret of Even Coating
Stir the chocolate mixture gently until it’s uniform, but avoid vigorous mixing. Over‑agitation can introduce air bubbles, leading to uneven coating. A gentle fold ensures each flake is enveloped in a smooth glaze, creating a consistent bite each time.
The Power of a Light Dusting
Dusting powdered sugar while the mixture is still slightly warm ensures an even coverage. If you wait too long, the sugar may clump or not adhere properly. A light, even sprinkle adds the final sweet sparkle to the treat.
The Final Touch: A Pinch of Salt
Adding a pinch of sea salt before dusting sugar can enhance the chocolate’s depth and balance the sweetness. The salt acts as a flavor enhancer, making each bite more complex. I’ve found that a small pinch can elevate the entire dish.
Creative Twists and Variations
This recipe is a playground. Here are some of my favorite ways to switch things up:
Nutty Explosion
Swap peanut butter for almond butter and add chopped toasted almonds. The nutty flavor intensifies, and the almonds add a delightful crunch. This variation is perfect for those who love a more sophisticated nut profile.
Caramel Crunch
Replace powdered sugar with caramel sauce drizzle. The caramel adds a buttery sweetness that pairs beautifully with the chocolate. Let the caramel cool slightly before drizzling to avoid melting the coating.
Citrus Zest
Add a tablespoon of lemon zest to the chocolate mixture. The citrus brightens the flavor and cuts through the richness. This twist is ideal for spring or summer gatherings.
Spiced Delight
Stir in a pinch of cinnamon or cayenne pepper before baking. The spices add warmth or heat, creating a new dimension of flavor. This variation is great for holiday parties.
Dark Chocolate Lover
Use dark chocolate chips exclusively and add a splash of espresso powder. The espresso deepens the chocolate flavor, making it richer and more complex. This version is a favorite for coffee connoisseurs.
Storing and Bringing It Back to Life
Fridge Storage
Place the cooled treats in an airtight container and store in the refrigerator for up to two weeks. The cold environment keeps the chocolate firm and the sugar crisp. When ready to serve, let them sit at room temperature for 10 minutes to soften slightly.
Freezer Friendly
For longer storage, freeze the treats in a single layer on a parchment-lined tray before transferring to a freezer bag. They can be stored for up to three months. Thaw at room temperature for 30 minutes before serving.
Best Reheating Method
If the treats have become too hard, gently warm them in the microwave at 30‑second intervals, stirring between bursts. Add a tiny splash of water before reheating to steam back to perfection. This method restores the chocolate’s glossy finish without over‑melting.