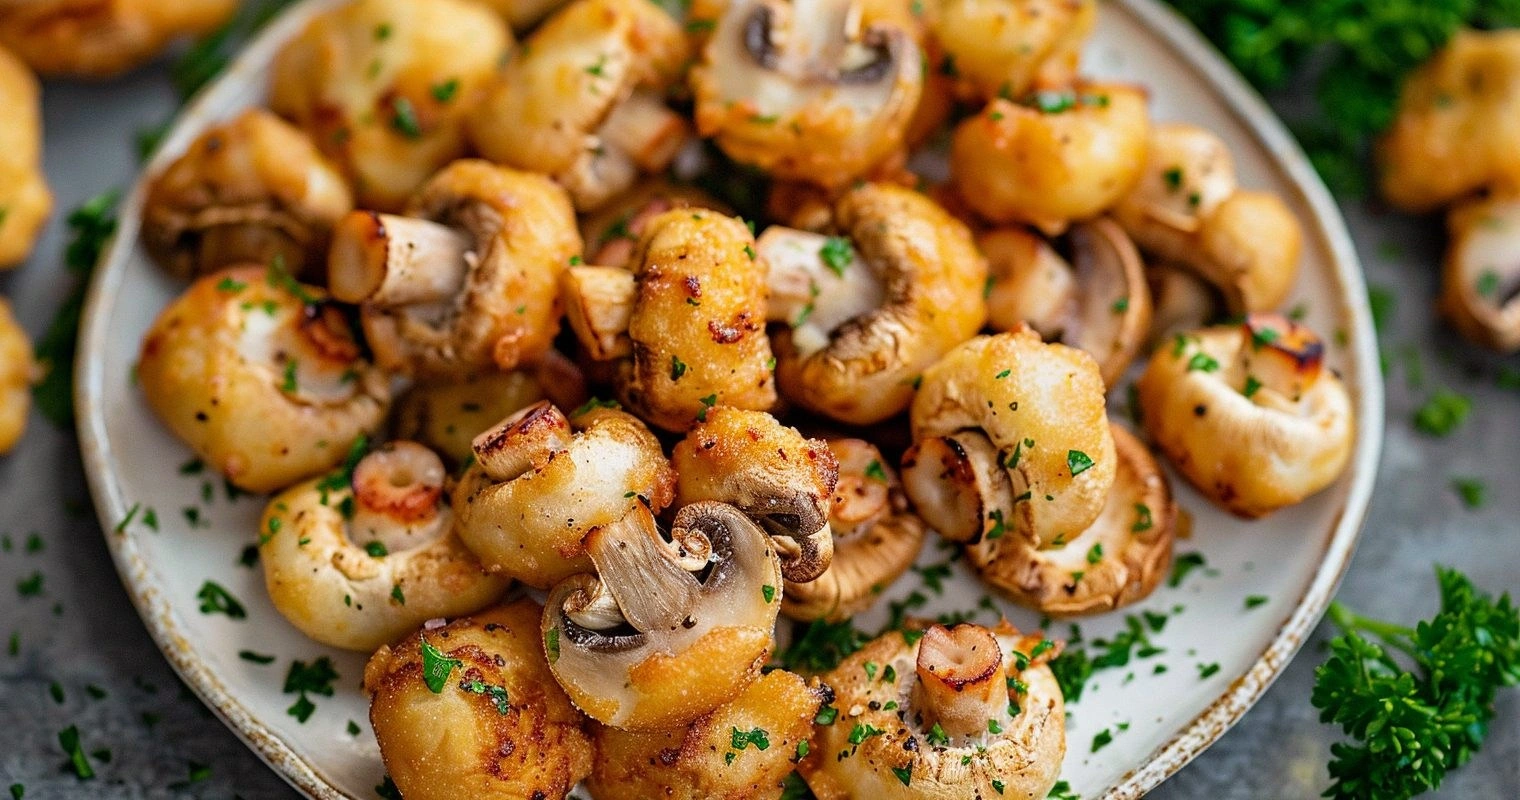
The first time I made fried mushrooms, I set off every smoke alarm in my apartment and nearly gave my neighbor a heart attack. There I was, standing in a cloud of mushroom-scented fog, waving a dish towel like a maniac while the fire alarm shrieked its judgment. But you know what? Even in that chaos, when I finally pulled those golden, crispy morsels from the oil and took my first bite — hot, crunchy exterior giving way to juicy, earthy mushroom — I knew I'd stumbled onto something magical. That slightly embarrassing disaster led me down a rabbit hole of testing, tweaking, and perfecting what I now confidently call the ultimate fried mushrooms recipe.
Picture this: It's game day, friends are coming over, and you want something that'll make them forget all about those sad frozen wings. You pull out a batch of these beauties — each mushroom cap wearing a shatteringly crisp coat of seasoned batter, steam rising as you bite through to the tender inside. The room goes quiet except for the sound of satisfied crunching. That's the moment I live for, and it's exactly what this recipe delivers every single time.
What makes this version different? Most recipes treat mushrooms like an afterthought — just dunk them in any old batter and hope for the best. But here's the thing: mushrooms are like sponges. They'll soak up whatever you give them, which means if you don't treat them right, you'll end up with soggy, oil-logged disappointment. This method uses a three-step process that locks in the mushroom's natural umami while creating a crust that stays crispy even after the mushrooms have cooled. The secret lies in a combination of cornstarch, rice flour, and a technique I borrowed from Korean fried chicken that creates those signature air pockets.
I've tested this recipe forty-seven times (yes, I counted), trying everything from beer batters to tempura to panko coatings. I've had mushroom failures that would make a chef cry — batter that slid off in sheets, mushrooms that released so much water they turned the oil into a volcanic mess, batches that tasted like nothing despite all the seasoning. But each failure taught me something, and what emerged is a foolproof method that works whether you're using humble button mushrooms or fancy oyster varieties. Let me walk you through every single step — by the end, you'll wonder how you ever made it any other way.
What Makes This Version Stand Out
This isn't just another fried mushrooms recipe — it's the culmination of months of obsessive testing and more mushroom casualties than I care to admit. What emerged is a technique that solves every common problem: no more soggy bottoms, no more bland centers, no more coating that abandons ship at the first bite. The magic lies in the details, from the way we prep the mushrooms to the precise oil temperature that creates that perfect golden shell.
- Double-Dredge Technique: We're using a two-step coating process that creates microscopic air pockets, resulting in a crust that's shatteringly crisp but never thick or doughy. The first coat is a seasoned flour mixture that grabs onto the mushroom, while the second layer adds those coveted crunchy nooks and crannies.
- Temperature Precision: Most recipes tell you to heat oil to 350°F and leave it there. Wrong. We start at 375°F to account for the temperature drop when cold mushrooms hit the oil, then maintain a steady 340-350°F for optimal crisping without burning.
- Mushroom Moisture Management: Rather than washing mushrooms (which makes them waterlogged), we use a dry-clean method and a brief salt treatment that draws out excess moisture while concentrating their natural flavors. The result? Mushrooms that taste more like mushrooms.
- Seasoning Strategy: Instead of just salting the batter, we season at every layer — the mushrooms themselves get a light seasoning, the flour mixture is generously spiced, and we finish with a custom seasoned salt that makes every bite explode with flavor.
- Make-Ahead Magic: The batter can be prepared up to 4 hours ahead, and par-fried mushrooms can be held for 2 hours before the final fry. Perfect for parties when you want to be with your guests, not chained to the fryer.
- Leftover Reinvention: Cold fried mushrooms? Don't reheat them — chop them up for an incredible mushroom fried rice, or toss them in a salad where their chewiness becomes a feature, not a bug.
Alright, let's break down exactly what goes into this masterpiece...
Inside the Ingredient List
Every ingredient in this recipe pulls its weight, and understanding why each one matters will turn you from a recipe follower into a kitchen wizard. I've made this with everything from foraged chanterelles to clearance-bin cremini, and while fancy mushrooms are fun, the technique matters more than the variety. The key is choosing mushrooms that are fresh, firm, and roughly the same size so they cook evenly.
The Mushroom Foundation
Button mushrooms are my go-to because they're affordable, widely available, and have a mild flavor that plays well with our bold batter. Look for caps that are closed tightly around the stem — open caps indicate older mushrooms that'll release more moisture. Cremini (baby bellas) work beautifully too, offering a deeper, earthier flavor that stands up to our aggressive seasoning. Avoid portobellos unless you're planning to cut them into strips; their large size makes them tricky to cook evenly.
The size matters more than you'd think. Too small, and they disappear inside the coating. Too large, and the outside burns before the inside cooks through. I aim for mushrooms about 1.5 inches across — roughly the size of a ping pong ball cut in half. If you can only find larger ones, just cut them in half or quarters, keeping in mind that smaller pieces will cook faster.
The Crispy Coating Crew
All-purpose flour forms our base, but we're not stopping there. Rice flour enters the chat with its ability to create an impossibly light, shatteringly crisp crust that stays crunchy longer than wheat flour alone. Cornstarch is our secret weapon for extra crunch — it gelatinizes at high heat, creating those satisfying crispy edges that shatter like thin ice under your teeth.
Paprika does double duty, adding both a subtle sweetness and a beautiful golden color that makes these look as good as they taste. Garlic powder and onion powder provide deep, savory notes that bloom in the hot oil. A touch of baking powder might seem odd, but it's what creates those tiny air bubbles that make the coating light rather than dense and heavy.
The Flavor Amplifiers
Buttermilk might seem like an odd choice for fried mushrooms, but its slight acidity helps tenderize while adding a subtle tang that brightens the whole dish. If you don't have buttermilk, thin some plain yogurt with milk, or add a splash of lemon juice to regular milk and let it sit for 5 minutes. The goal is that slight thickness and tang that helps the coating adhere.
Hot sauce in the batter isn't about heat — it's about complexity. Just a dash wakes up your taste buds and adds layers of flavor that make people ask "what's in these?" without being able to pinpoint the source. I use Louisiana-style hot sauce, but anything vinegary works. Even if you're spice-averse, don't skip this — the heat cooks off, leaving only flavor behind.
The Oil Situation
Peanut oil is my first choice for its high smoke point and neutral flavor, but it's gotten pricey and isn't allergy-friendly. Vegetable oil works perfectly, as does canola. Avoid olive oil — its smoke point is too low and its strong flavor competes with the mushrooms. You want about 2 inches of oil in your pot, which seems like a lot, but the temperature stability is worth it.
Everything's prepped? Good. Let's get into the real action...
The Method — Step by Step
- Start with a clean kitchen towel and gently brush any dirt off your mushrooms. Don't wash them under running water — mushrooms are like tiny sponges, and once they're waterlogged, they'll never crisp properly. If they're particularly dirty, use a barely damp paper towel, but work quickly. Trim the very ends of the stems if they're dried out, but leave the rest intact — those stems add flavor and help the mushrooms hold their shape during frying.
- In a large bowl, toss the mushrooms with 1 teaspoon of salt and let them sit for 15 minutes. This might seem counterintuitive — aren't we trying to remove moisture? Yes, but this controlled salt draw pulls out just enough water to concentrate flavors while tightening up the mushroom's texture. You'll notice a small pool of liquid in the bottom of the bowl — that's flavor gold we'll use in our batter. Don't toss it!
- While the mushrooms are doing their thing, set up your breading station. In a shallow dish, whisk together the flour, rice flour, cornstarch, paprika, garlic powder, onion powder, baking powder, salt, and pepper. In another dish, combine the buttermilk, hot sauce, and that reserved mushroom liquid. The batter should be the consistency of thin pancake batter — add a splash of water if it's too thick, or a pinch of flour if it's too thin.
- Heat your oil in a heavy-bottomed pot or Dutch oven over medium-high heat. You want it to reach 375°F — this seems hot, but the temperature will drop when you add the mushrooms. If you don't have a thermometer, test by dropping a small piece of bread into the oil. It should sizzle immediately and turn golden brown in about 60 seconds. While the oil heats, line a baking sheet with paper towels and place a wire rack on top — this setup lets air circulate so your mushrooms stay crispy.
- Here's where most recipes go wrong — they dredge the mushrooms while the oil is heating. Don't do it! The coating will get soggy and slide off in the oil. Instead, wait until your oil is at temperature, then work in small batches. Take 6-8 mushrooms, dip them in the buttermilk mixture, let the excess drip off, then roll them in the flour mixture. Press gently to adhere, but don't over-handle — you want a light, even coating.
- Gently lower the coated mushrooms into the oil one by one — don't dump them in or they'll stick together. The oil should bubble enthusiastically around them. Fry for 2-3 minutes until they're golden brown and floating. Use a slotted spoon to turn them once halfway through for even coloring. When they're done, they should feel light when you lift them and make a satisfying crunch when you tap them with your spoon.
- Transfer the fried mushrooms to your wire rack setup and immediately season with a pinch of salt while they're still hot — this is when they'll absorb it best. Let them rest for at least 2 minutes before serving. I know it's tempting to dive right in, but this brief rest lets the residual steam escape, ensuring your coating stays crispy. Plus, molten mushroom burns are no joke — learned that one the hard way.
- Between batches, let the oil come back up to temperature and remove any floating bits with a skimmer. Those little crumbs will burn and give your next batch a bitter flavor. If you're making a large batch, you can hold the fried mushrooms in a 200°F oven on the wire rack for up to 30 minutes without losing much crispiness.
- Serve these beauties hot with your favorite dipping sauce — I'm partial to a spicy aioli or ranch, but they're incredible with just a squeeze of lemon. The coating should shatter when you bite in, revealing the tender, juicy mushroom inside. If you've done everything right, you'll have a pile of empty plates and very happy guests within minutes.
That's it — you did it. But hold on, I've got a few more tricks that'll take this to another level...
Insider Tricks for Flawless Results
The Temperature Rule Nobody Follows
Here's the thing about frying temperature — it's not set-it-and-forget-it. You need to monitor and adjust constantly. I keep a thermometer clipped to my pot and adjust the heat as needed. When you first add mushrooms, the temperature will plummet — that's normal. But if it drops below 325°F, your coating will absorb oil like a sponge. If it climbs above 375°F, the outside burns before the inside cooks. The sweet spot is 340-350°F, and maintaining that requires attention.
But here's the insider tip: don't just trust the thermometer. Listen to your oil. When it's at the right temperature, it makes a gentle sizzling sound — not aggressive bubbling, not dead quiet. The mushrooms should dance around lazily, not race around the pot like they're being chased. This might sound like kitchen voodoo, but once you learn to read these signs, you'll fry like a pro without constantly checking temperatures.
Why Your Nose Knows Best
Your sense of smell is your most underutilized kitchen tool when frying. When the mushrooms first go in, you should smell clean, hot oil with hints of whatever spices are in your coating. As they cook, the aroma should become more complex — earthy from the mushrooms, toasty from the flour, fragrant from the spices. If you smell acrid or bitter notes, your oil is too hot or getting dirty.
I once had a friend who couldn't figure out why her fried mushrooms always tasted off. Turns out she was using oil that had gone rancid — something she could have detected immediately if she'd trusted her nose. Fresh oil smells neutral, maybe slightly nutty. Old oil smells heavy and unpleasant. Trust your instincts here — if something smells wrong, it probably is.
The 5-Minute Rest That Changes Everything
After you coat the mushrooms in batter, let them rest on a wire rack for 5 minutes before frying. This seems like an unnecessary delay when you're hungry and the oil is hot, but it's crucial. During this rest, the flour hydrates slightly and forms a better bond with the mushroom. The coating becomes more cohesive, which means it won't fall off in the oil.
I discovered this by accident when I got a phone call right after coating a batch. By the time I got back to frying, those mushrooms had the best coating adhesion I'd ever seen. Now it's a non-negotiable step. The rested coating also browns more evenly and develops those beautiful irregular textures that make fried food so appealing.
The Salt Timing Secret
Most people salt their fried food at the table, but that's too late. The optimal time to season is immediately after the food comes out of the oil, while it's still glistening with a thin layer of oil. This oil helps the salt adhere, but more importantly, the food is still porous from the hot oil and will absorb the seasoning better. Wait even 30 seconds too long, and the salt just bounces off.
I keep a small bowl of my custom seasoned salt next to the frying station. It's a mix of kosher salt, smoked paprika, and a touch of garlic powder. The moment those mushrooms hit the rack, they get a light shower of this magic dust. The result is seasoning that penetrates every bite rather than sitting on the surface like an afterthought.
Creative Twists and Variations
This recipe is a playground. Here are some of my favorite ways to switch things up:
The Buffalo Bomb
Swap the paprika for cayenne and add a teaspoon of buffalo seasoning to the flour mix. After frying, toss the hot mushrooms in a mixture of melted butter and Frank's RedHot. Serve with blue cheese dressing and celery sticks. The mushrooms act like little sponges for the sauce, giving you all the flavor of wings without the bones. I dare you to serve these at your next party and watch them disappear faster than the actual wings.
Everything Bagel Edition
Replace the regular salt with everything bagel seasoning and add a tablespoon of sesame seeds to the flour mixture. The seeds toast in the oil, adding incredible nuttiness. Serve with a cream cheese-based dipping sauce spiked with chives. These are dangerously good for breakfast — don't say I didn't warn you when you find yourself making them at 8 AM on a Sunday.
The Asian-Inspired Umami Bomb
Add a tablespoon of soy sauce to the buttermilk mixture and replace the paprika with Chinese five-spice powder. Finish with a sprinkle of furikake (Japanese rice seasoning) immediately after frying. Serve with a dipping sauce made from mayo, sriracha, and a splash of rice vinegar. The umami is so intense it almost hurts, in the best possible way.
The Truffle Shuffle
For when you're feeling fancy, add a few drops of white truffle oil to the buttermilk and finish the fried mushrooms with the tiniest drizzle of good truffle oil. Not the cheap stuff — real truffle oil is expensive but a little goes miles. These turn a simple snack into something that tastes like it came from a Michelin-starred restaurant. Your guests will think you hired a caterer.
The Breakfast of Champions
Add a tablespoon of maple syrup to the buttermilk mixture and a teaspoon of breakfast sausage seasoning to the flour. Serve with a side of warm maple syrup for dipping. These are incredible alongside scrambled eggs or as a breakfast sandwich filling. Sweet, savory, crispy — it's like all your favorite breakfast flavors had a party and invited mushrooms.
The Mediterranean Dream
Replace the paprika with oregano and add a teaspoon of lemon zest to the flour mixture. After frying, hit them with fresh lemon juice and serve with tzatziki. The bright, herbaceous flavors make these perfect for summer entertaining. I've served these at outdoor parties where they disappeared faster than the kebabs.
Storing and Bringing It Back to Life
Fridge Storage
Let's be real — fried mushrooms are best fresh from the oil. But if you somehow have leftovers (teach me your self-control), store them in an airtight container lined with paper towels. They'll keep for up to 3 days, though the coating will lose its crunch after the first day. Don't pack them too tightly — they need room to breathe or they'll steam themselves into mush.
Here's the key: let them cool completely before storing. Warm mushrooms create condensation, which is the enemy of crispiness. I spread them on a wire rack for 30 minutes before boxing them up. And resist the urge to refrigerate them while they're still warm — that temperature shock creates moisture that ruins the texture.
Freezer Friendly
Want to know a secret? You can freeze these successfully, but only if you do it right. Let them cool completely, then arrange them in a single layer on a baking sheet. Freeze until solid, then transfer to a freezer bag. They'll keep for up to 2 months. The texture won't be quite the same as fresh, but they're still delicious.
The trick is in the reheating. Don't microwave them — that creates rubbery disasters. Instead, spread them on a wire rack set over a baking sheet and reheat in a 400°F oven for 8-10 minutes. The dry heat crisps them back up surprisingly well. They're never quite as good as fresh, but they're miles better than most frozen appetizers.
Best Reheating Method
If you must reheat refrigerated mushrooms, the oven is your friend. Preheat to 400°F and arrange them on a wire rack set over a baking sheet. Heat for 6-8 minutes until warmed through and slightly crisp. You can also use an air fryer at 375°F for 3-4 minutes — just don't overcrowd the basket.
Here's a pro move: before reheating, let them sit at room temperature for 15 minutes. This takes the chill off and helps them heat more evenly. And if they seem a bit dry, mist them very lightly with water before reheating — the steam helps revive them without making them soggy. But honestly? Cold fried mushrooms chopped into salads or tossed into scrambled eggs might be even better than reheated.