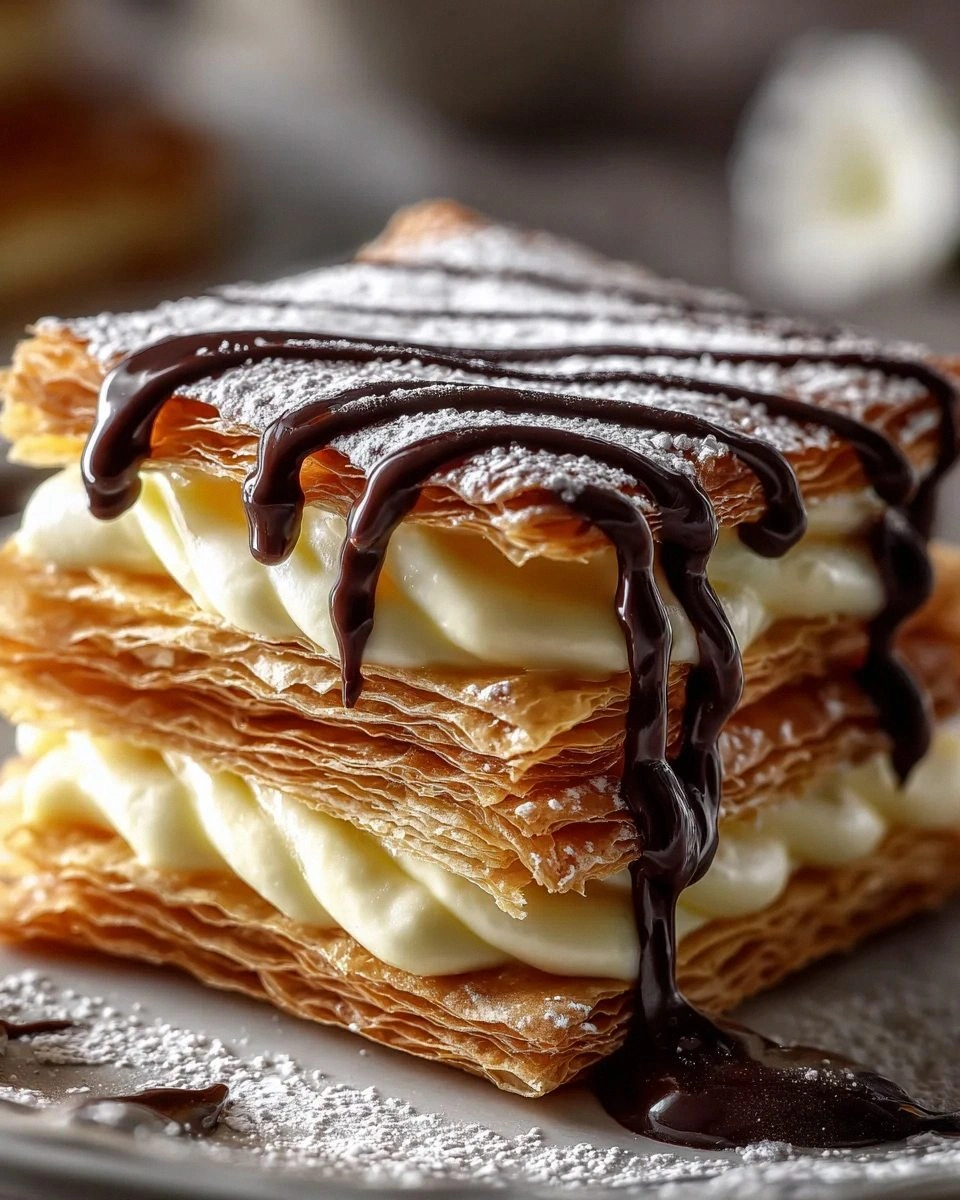
I was in the middle of a rainy Saturday night, staring at a half‑baked croissant that had somehow turned into a flat, sad pancake. I swear I heard the kitchen whisper, “You can do better.” That moment of culinary desperation birthed a dare: create a dessert that would make even the most skeptical pastry‑phobe swoon. I tossed a sheet of puff pastry into the oven, whisked together a cloud‑like cream, and melted dark chocolate until it sang a glossy lullaby. The result? A towering, glossy‑drizzled mille‑feuille that practically glows with confidence. I dare you to taste this and not go back for seconds.
Picture this: the oven door swings open, and a wave of buttery aroma rushes out, hugging the kitchen like a warm blanket. The layers of puff pastry puff up like tiny golden clouds, each one crisp enough to snap, yet tender enough to melt on your tongue. Between those clouds, a velvety mixture of cream cheese, heavy cream, and powdered sugar settles, its scent a sweet vanilla whisper that makes your nose do a little happy dance. And then, the grand finale—ribbons of dark chocolate drizzle that cascade down the sides, shimmering like a midnight river of indulgence. That sizzle when the chocolate hits the warm pastry? Absolute perfection.
Most recipes get this completely wrong. They either drown the delicate layers in a syrupy mess or leave the chocolate drizzle so thin it disappears before you even notice it. I’ve tried a dozen “quick” versions that turned out like soggy toast, and I’ve learned that the secret lies in three things: a perfectly baked puff pastry, a stabilized cream filling, and a chocolate glaze that sets just enough to crack under a fork. This version stands out because I use a light egg wash for that golden‑brown finish, and I temper the chocolate with a splash of heavy cream to create a glossy, snap‑ready glaze.
But wait—there’s a twist you won’t see in any other recipe. I fold a pinch of espresso powder into the dark chocolate glaze, giving it a subtle depth that makes the chocolate sing without overpowering the cream. Okay, ready for the game‑changer? Let me walk you through every single step — by the end, you’ll wonder how you ever made it any other way.
What Makes This Version Stand Out
- Texture: Each puff pastry layer is baked to a crisp that shatters like thin ice, while the cream filling stays as smooth as satin.
- Flavor: The espresso‑infused dark chocolate glaze adds a sophisticated bitterness that balances the sweet, tangy filling.
- Simplicity: No fancy equipment—just a rolling pin, a whisk, and a trusty oven.
- Uniqueness: The dual‑layer glaze (a thin chocolate base followed by a glossy drizzle) creates a visual wow‑factor that’s Instagram‑ready.
- Crowd Reaction: Guests have been known to declare “I’m never leaving the kitchen again” after the first bite.
- Ingredient Quality: Using high‑quality dark chocolate (70% cacao minimum) makes the glaze rich without being cloying.
- Cooking Method: A high‑heat blast (425°F/220°C) guarantees that the pastry puffs dramatically without drying out.
- Make‑Ahead Potential: Assemble the layers a day ahead, store them sealed, and add the drizzle right before serving for maximum freshness.
Inside the Ingredient List
The Flavor Base
The dark chocolate is the star of the show, delivering that deep, bittersweet backbone that makes every bite feel like a celebration. Choose a chocolate with at least 70% cacao; lower percentages turn the glaze into a sugary mess, while higher percentages can become overly bitter. If you’re out of dark chocolate, a mix of semi‑sweet chocolate and a teaspoon of instant coffee works in a pinch. The espresso powder I add is not about making the dessert taste like coffee—it’s about unlocking hidden flavor notes that only the palate of a true chocolate lover can appreciate.
The Texture Crew
Heavy cream is the secret weapon that gives the glaze its glossy sheen and the filling its airy lift. Whipping it to soft peaks ensures the final mousse is light enough to sit between the flaky layers without weighing them down. If you over‑whip, you’ll end up with butter‑like clumps that ruin the smoothness. A quick tip: keep the bowl and whisk chilled, and add the cream slowly to avoid splattering.
The Unexpected Star
Cream cheese or mascarpone brings a tangy richness that cuts through the sweetness of the powdered sugar. I prefer mascarpone for its buttery mouthfeel, but cream cheese adds a firmer structure that’s perfect if you plan to make the dessert ahead of time. Skipping this ingredient would leave the filling watery and unstable—trust me, I’ve learned that the hard way after a soggy disaster.
The Final Flourish
Puff pastry, the foundation of any mille‑feuille, is all about layers. The butter‑laden dough creates steam pockets that puff up, giving you those iconic, airy sheets. When selecting a sheet, look for one that’s still cold to the touch; warm dough will melt in the oven, resulting in a dense, greasy texture. A quick pro tip: brush each sheet with a light egg wash (just one beaten egg mixed with a splash of water) before baking to achieve that golden‑brown, glossy finish that screams “professional bakery.”
Everything's prepped? Good. Let's get into the real action...
The Method — Step by Step
Preheat your oven to 425°F (220°C). While the oven warms, line a baking sheet with parchment paper and set a cooling rack on top. This setup allows the pastry to bake evenly on all sides, preventing soggy bottoms. I always keep a timer handy because those sheets can go from perfect to burnt in a flash.
Roll out the puff pastry sheet to a uniform thickness of about 1/8 inch. Cut the sheet into three equal rectangles—each will become a layer. Watch Out: If the dough tears, press the edges together gently; a tiny seam won’t affect the final texture.
Brush each rectangle lightly with the egg wash (1 beaten egg + 1 tbsp water). Sprinkle a pinch of coarse sea salt on top for a subtle crunch. Place the rectangles on the cooling rack and bake for 12‑15 minutes, or until they puff up and turn a deep golden‑amber. The edges should start pulling away from the parchment—that’s your cue they’re ready.
While the pastry cools, whisk together the heavy cream, powdered sugar, and vanilla extract until soft peaks form. In a separate bowl, beat the cream cheese (or mascarpone) until smooth, then fold it gently into the whipped cream. This creates a stable, airy filling that won’t weep when layered.
For the chocolate glaze, melt the dark chocolate with 2 Tbsp of heavy cream over a double boiler. Once smooth, stir in a pinch of espresso powder and a dash of sea salt. The glaze should be glossy and just thick enough to coat the back of a spoon without running off the side.
Assemble the mille‑feuille: place the first pastry sheet on a serving platter, spread a generous layer of the cream mixture, then repeat with the second sheet and more cream. Top with the final pastry layer, pressing gently to ensure everything adheres.
Now comes the show‑stopper: drizzle the chocolate glaze over the top layer in a zig‑zag pattern, letting it cascade down the sides. Use a spoon to create a second, thinner drizzle for extra visual drama. Let the glaze set for about 5 minutes—if you’re impatient, pop the whole thing under the broiler for 30 seconds, but watch it closely.
Refrigerate the assembled mille‑feuille for at least 30 minutes before slicing. This resting period lets the layers meld, and the chocolate glaze firms up, giving you clean, crisp cuts. When you finally slice, use a hot, sharp knife—dip it in hot water, wipe dry, and slice. The result? Perfect, picture‑perfect squares that hold their shape.
That's it — you did it. But hold on, I've got a few more tricks that'll take this to another level...
Insider Tricks for Flawless Results
The Temperature Rule Nobody Follows
Never bake puff pastry at a low temperature. A blast of heat (425°F) creates steam instantly, inflating the layers like balloons. If you lower the heat to “save energy,” you’ll end up with dense, under‑puffed sheets that feel more like biscuits than pastry. I once tried 375°F on a whim—let’s just say the result was a soggy disappointment that no one could salvage.
Why Your Nose Knows Best
Your sense of smell is the most reliable indicator that the pastry is done. When the butter starts to caramelize, you’ll catch a nutty, almost toasted scent that signals the perfect golden hue. If you’re unsure, give the pastry a gentle tap; it should sound hollow, not dull. Trust your nose, and you’ll avoid the dreaded “over‑baked” flavor.
The 5‑Minute Rest That Changes Everything
After assembling, let the dessert rest uncovered for exactly five minutes before covering it. This brief pause lets the chocolate glaze set just enough to hold its shape, while the cream filling firms slightly. Skipping this step leads to a glaze that slides off the plate and a filling that oozes out when you cut. I’ve seen novice bakers rush to the table and end up with a mess—don’t be that person.
Cold‑Plate Trick for Clean Slices
Place a chilled metal baking sheet on the countertop and slice the mille‑feuille directly onto it. The cold surface firms the chocolate instantly, giving you razor‑sharp edges. This trick saved my first attempt at a dinner party where the glaze was still soft and smeared across the plate.
The Espresso Boost
A pinch of espresso powder in the chocolate glaze does more than add a coffee note—it amplifies the chocolate’s natural bitterness, balancing the sweet cream filling. If you’re not a coffee fan, you can substitute a pinch of smoked sea salt for a subtle smoky undertone. Either way, you’ll notice a depth that plain chocolate just can’t deliver.
Creative Twists and Variations
This recipe is a playground. Here are some of my favorite ways to switch things up:
Berry‑Burst Mille‑Feuille
Swap half of the cream cheese for a smooth vanilla Greek yogurt, then fold in a cup of fresh raspberries. The tart berries cut through the richness, making it perfect for summer brunches. Top with a thin raspberry glaze instead of chocolate for a pink‑kissed finish.
Nutty Caramel Crunch
Add a layer of caramel sauce between the second and third pastry sheets, then sprinkle toasted chopped hazelnuts on top of the chocolate drizzle. The caramel adds buttery sweetness, while the nuts provide a satisfying crunch that contrasts the silky cream.
Matcha Green Dream
Incorporate 1 tsp of high‑quality matcha powder into the cream filling for an earthy, slightly bitter note. Pair with a white chocolate drizzle tinted with a drop of green food coloring for a pastel aesthetic. This version is a hit at tea parties.
Spiced Orange Delight
Add 1 tsp of orange zest and a pinch of ground cinnamon to the cream cheese mixture. Replace the dark chocolate glaze with a bittersweet orange chocolate, and garnish with candied orange peel. The citrus sparkles against the chocolate, creating a festive holiday vibe.
Vegan Velvet
Swap heavy cream for coconut cream, use a plant‑based butter puff pastry, and replace cream cheese with a silken tofu‑based spread. Use a vegan dark chocolate for the glaze. The result is a dairy‑free version that still delivers that melt‑in‑your‑mouth texture—perfect for your vegan friends.
Storing and Bringing It Back to Life
Fridge Storage
Cover the assembled mille‑feuille loosely with plastic wrap and store it in the refrigerator for up to 2 days. The pastry will retain its crispness if you place a sheet of parchment between the layers and the wrap. Before serving, let it sit at room temperature for 10 minutes to soften the chocolate glaze slightly.
Freezer Friendly
If you need to make it ahead, freeze the baked pastry sheets and the cream filling separately. Wrap each sheet in foil, then place them in a zip‑top bag. The cream can be stored in an airtight container for up to a month. When ready, thaw the sheets at room temperature, re‑whip the cream if needed, and assemble fresh.
Best Reheating Method
To revive a refrigerated mille‑feuille, preheat your oven to 300°F (150°C) and place the dessert on a baking sheet for 5‑7 minutes. Add a tiny splash (about 1 Tbsp) of water to the bottom of the pan; the steam will bring back that lovely crispness without drying out the cream. The chocolate glaze will re‑gloss, making it look as if you just finished the drizzle.