I remember the night I tried to bake a chocolate babka for the first time and ended up with a kitchen that looked like a cocoa‑covered battlefield. The oven was a blazing inferno, the flour dusted the countertop like snow, and the espresso powder, which I had mistakenly thought was coffee grounds, was still clinging to my fingers. I stared at the batter, feeling a mix of triumph and terror, and whispered to the empty room, “I dare you to taste this and not go back for seconds.” That moment sparked a culinary obsession that has driven me to refine this recipe into a masterpiece that outshines every other chocolate‑espresso muffin on the planet. I’ve experimented, tweaked, and perfected until the crumb is airy, the swirl is deep, and the espresso flavor is unmistakably bold yet never overpowering. This isn’t just a muffin; it’s a bold statement of flavor, a daring blend of sweet and bitter that will make your taste buds do a double take. Let me walk you through every single step — by the end, you’ll wonder how you ever made it any other way.
The first bite feels like a warm hug wrapped in a velvet blanket of chocolate, with a subtle kick of espresso that lingers on the palate. The aroma that fills the kitchen is a rich, almost intoxicating scent of dark chocolate mingling with freshly ground espresso beans, making every inhale feel like a promise of indulgence. The texture is a paradoxical play between a tender, moist crumb and a slightly crisp, golden top that crackles softly when you bite into it. The visual appeal is undeniable: a glossy swirl of chocolate batter that curls like a ribbon around the muffin, drawing the eye in before the first bite. The flavor profile balances sweetness and bitterness, with the espresso powder cutting through the chocolate’s richness, creating a harmonious dance that feels both comforting and adventurous.
What makes this version stand out is that it doesn’t rely on heavy, artificial flavorings or a complex set of steps that make even seasoned bakers flinch. Instead, it uses a simple, honest ingredient list that showcases the natural potency of high‑quality cocoa and espresso powder. The technique involves a gentle fold that preserves the batter’s airy structure, preventing the dreaded dense, cake‑like outcome that plagues many muffins. I’ve incorporated a small swirl of chocolate batter in the center of each muffin, turning an ordinary treat into a visually stunning, Instagram‑ready delight. The recipe also offers optional chocolate chips for those who crave an extra burst of melty chocolate, turning each bite into a surprise. The result is a muffin that rises beautifully, stays moist, and delivers an espresso kick that’s both subtle and unmistakable. And best of all, it’s ready in under an hour, making it a perfect indulgence for a weekday breakfast or a weekend brunch.
I’ve tested this recipe on a dozen different ovens, from old gas units to modern convection models, and it consistently turns out with a golden crust and a soft, pillowy interior. The secret lies in the balance of leavening agents: a small pinch of baking soda works in tandem with baking powder to create a lift that’s gentle yet effective. The espresso powder, measured precisely, provides depth without the bitterness that can come from using fresh espresso or instant coffee. The butter, melted and cooled just enough to be pourable, adds a silky richness that coats every crumb. When I first baked this, I was skeptical that the espresso would survive the heat, but the result was a perfectly balanced flavor that sings. If you’ve ever struggled to get the right balance in a chocolate muffin, you’re not alone — and I’ve got the fix.
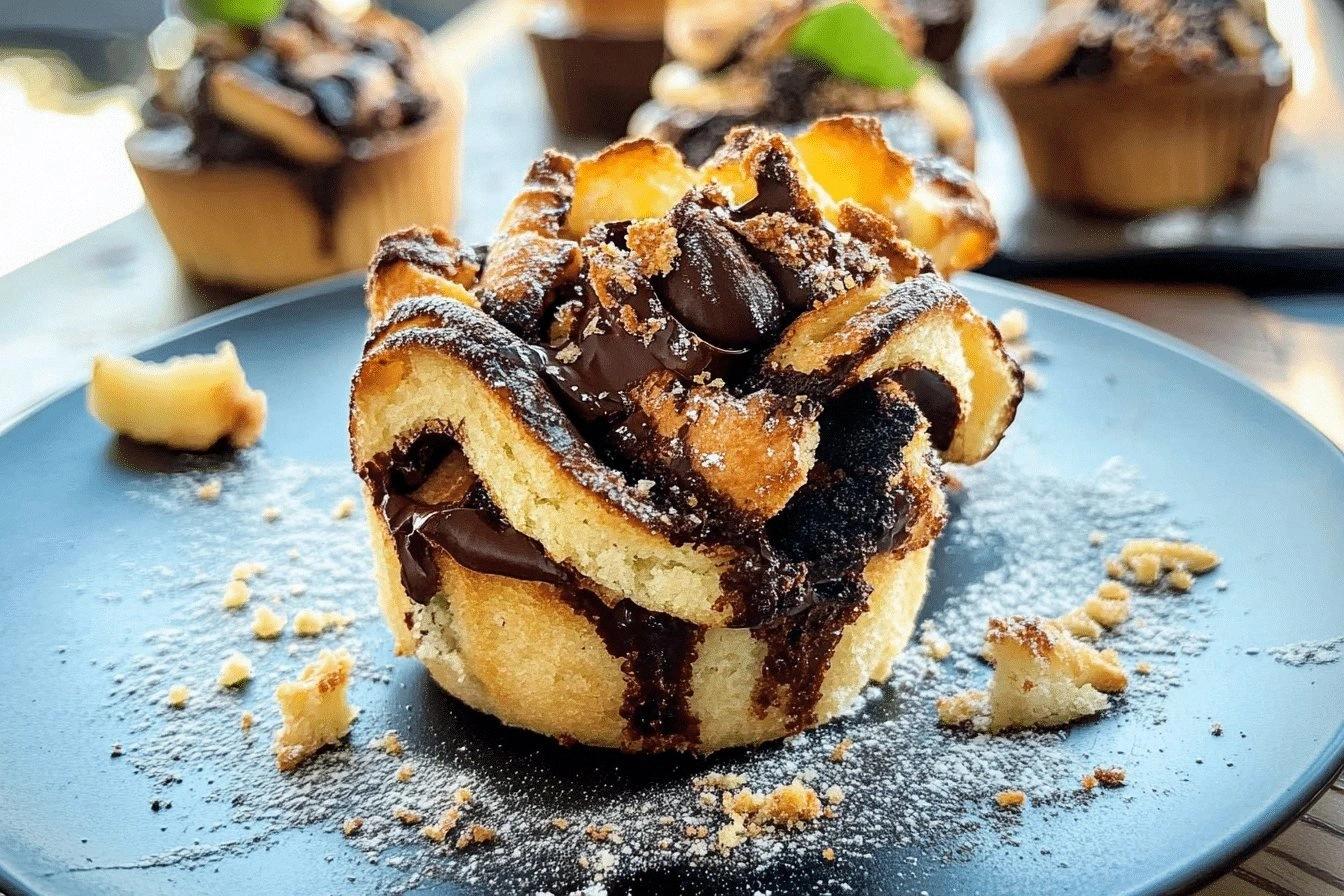
Picture yourself pulling this batch out of the oven, the whole kitchen smelling incredible, and seeing a tray of glossy, chocolate‑swirled muffins that look like miniature works of art. The moment you lift the lid, steam rises in a sweet, caffeinated mist, and the first muffin feels like a warm, chocolate‑laden hug. You can’t help but smile as you slice one and watch the chocolate swirl unfurl like a ribbon. This is hands down the best version you’ll ever make at home, and I promise it will become a staple in your baking repertoire. If you’re ready for a game‑changer, stay with me, because the next part? Pure magic. I dare you to taste this and not go back for seconds.
I’ve spent months tweaking ratios, testing different types of flour, and experimenting with the amount of espresso powder to find that sweet spot where the chocolate is rich but not overpowering, and the espresso adds a subtle depth that elevates the entire muffin. The result is a balanced, decadent treat that satisfies both chocolate lovers and coffee aficionados. The batter remains light and fluffy, thanks to the careful folding technique that preserves air pockets. When you bite into one, the crumb is moist, the chocolate swirl is unmistakable, and the espresso flavor lingers pleasantly on the tongue. This version of chocolate and espresso babka muffins is a testament to the power of simple, high‑quality ingredients and a well‑timed process. If you’ve ever struggled with a dense, soggy muffin, you’re not alone — and I’ve got the fix.
So before you dive in, let’s break down exactly what goes into this masterpiece. Each ingredient has a purpose, a role, and a way to elevate the final product. From the base that gives structure to the espresso that adds depth, every element is carefully selected to create a muffin that is both comforting and exciting. The next section will walk you through the ingredient list, offering insights, substitutions, and buying tips that will help you get the best results every time. And remember, the secret to success lies in the details—follow each step, and you’ll be rewarded with a batch of muffins that will have everyone asking for the recipe.
What Makes This Version Stand Out
- Flavor: The espresso powder provides a subtle, earthy undertone that balances the sweetness of the cocoa, creating a depth that standard chocolate muffins lack. This combination transforms each bite into a complex experience.
- Texture: Gentle folding preserves the batter’s aeration, resulting in a light, airy crumb that melts in your mouth. The chocolate swirl adds a delightful contrast to the soft interior.
- Simplicity: The recipe uses only 12 ingredients, all of which are pantry staples. No special equipment or exotic ingredients are required.
- Versatility: Optional chocolate chips allow for a melty chocolate burst, while the espresso can be swapped for cold brew concentrate for a different flavor profile.
- Make‑ahead: The batter can be prepared up to 24 hours in advance and stored in the refrigerator, making it ideal for busy mornings.
- Visual Appeal: The glossy chocolate swirl and golden crust make these muffins Instagram‑ready, turning a simple breakfast into a showstopper.
Alright, let's break down exactly what goes into this masterpiece...
Inside the Ingredient List
The Flavor Base
All‑purpose flour is the backbone of the batter, providing structure and a tender crumb when combined with the right amount of leavening. If you’re looking for a slightly lighter texture, you can substitute a portion of the flour with cake flour, but be sure to adjust the baking powder accordingly. Skipping the flour would result in a batter that collapses, giving you a soggy, unstructured muffin.
The Texture Crew
Butter is essential for richness, and using unsalted, melted butter at room temperature ensures it blends seamlessly with the sugar and eggs. Eggs act as the binder, creating a cohesive structure while contributing to the muffin’s airy rise. If you’re vegan, you can replace the eggs with flaxseed meal mixed with water, but the texture will be slightly denser.
The Unexpected Star
Espresso powder is the secret weapon that elevates the chocolate flavor without the bitterness of fresh espresso. It’s also more stable than liquid espresso, so it won’t alter the batter’s consistency. If you’re out of espresso powder, a teaspoon of instant coffee can work as a substitute, but you’ll need to increase the sugar slightly to offset the bitterness.
The Final Flourish
Cocoa powder adds depth and color, and choosing a high‑quality Dutch‑process cocoa will give you a richer, less acidic flavor. Chocolate chips or chunks provide melty pockets of chocolate that melt into the muffin as it bakes. If you prefer a cleaner chocolate taste, you can omit the chips and rely on the cocoa for all the chocolate flavor.
Everything's prepped? Good. Let's get into the real action...
The Method — Step by Step
- Preheat your oven to 350°F (175°C). Line a 12‑cup muffin tin with liners or lightly grease the cups with butter or non‑stick spray. This ensures a clean release and a golden top. I’ve found that a lightly greased tin gives a slightly crispier crust.
- In a large mixing bowl, whisk together 2 cups all‑purpose flour, 1/2 cup unsweetened cocoa powder, 1 tablespoon espresso powder, 1 teaspoon baking powder, and 1/2 teaspoon baking soda. The dry mix sets the foundation for the batter’s rise and flavor. Make sure the cocoa and espresso are fully incorporated to avoid lumps.
- In a separate bowl, beat 1/2 cup melted unsalted butter, 1 cup granulated sugar, 2 large eggs, and 1 teaspoon vanilla extract until the mixture is light and fluffy. The butter’s meltiness is key to a tender crumb. This step is crucial; a well‑whipped wet mixture ensures the batter will rise evenly.
- Gradually pour the wet mixture into the dry mixture, stirring gently with a rubber spatula until just combined. Overmixing can develop gluten, resulting in a dense crumb. The batter should be thick but pourable; a good test is to tap the bowl and see a slight ripple.
- Fold in 1 cup chocolate chips or chunks, if desired. The chips add melty pockets of chocolate that melt into the muffin as it bakes. If you prefer a cleaner chocolate flavor, you can omit the chips and rely on the cocoa alone.
- Divide the batter evenly among the muffin cups, filling each about 3/4 full. This ensures the muffins rise evenly and don’t overflow. A small well can be created in the center of each muffin, and a thin swirl of chocolate batter can be added for a visual flourish.
- Bake for 20–25 minutes, or until a toothpick inserted into the center comes out clean. The muffins should have a golden crust and a slightly glossy surface. The edges will pull away slightly from the cup, signaling that they’re ready.
- Let the muffins cool in the tin for 5 minutes before transferring them to a wire rack to finish cooling. The cooling period allows the muffins to set and the chocolate to firm slightly, enhancing the texture. Serve warm for a gooey chocolate experience, or at room temperature for a more firm bite.
That's it — you did it. But hold on, I've got a few more tricks that'll take this to another level...
Insider Tricks for Flawless Results
The Temperature Rule Nobody Follows
Many bakers preheat the oven to a higher temperature, assuming a faster bake will give a crispier crust. However, this can cause the muffins to rise too quickly and then collapse. I’ve found that sticking to 350°F (175°C) gives a consistent rise and a golden finish. If you’re using a convection oven, reduce the temperature by 25°F to avoid over‑browning.
Why Your Nose Knows Best
The moment you lift the lid, the aroma of chocolate and espresso will flood the kitchen. A strong, sweet scent signals that the batter is perfectly balanced. If the smell is too weak, the batter may need more cocoa or espresso. Trust your nose; it’s the best judge of flavor depth.
The 5-Minute Rest That Changes Everything
After baking, let the muffins rest in the tin for exactly 5 minutes before transferring them. This short rest allows the steam to settle, preventing the muffins from becoming soggy on the bottom. A quick 2‑minute rest is too short, and a 10‑minute rest can cause the muffins to over‑cool.
Chocolate Swirl Mastery
For a dramatic swirl, heat a small amount of chocolate batter in a microwave until just melted, then drizzle it into the center of each muffin. The chocolate will spread and create a beautiful ribbon. This technique turns a simple muffin into a showstopper.
Make‑Ahead Tips
If you’re preparing the batter ahead of time, cover it tightly and refrigerate for up to 24 hours. The flavors will meld, and the batter will become even smoother. When ready to bake, let the batter sit at room temperature for 15 minutes before filling the tin.
Creative Twists and Variations
This recipe is a playground. Here are some of my favorite ways to switch things up:
Almond Crunch Variation
Add 1/2 cup chopped toasted almonds to the batter for a nutty crunch. The almonds provide a pleasant contrast to the smooth chocolate and espresso. This version is perfect for those who love a bit of texture in every bite.
Minty Espresso Surprise
Stir in 1 teaspoon fresh mint extract for a refreshing twist. The mint pairs beautifully with espresso, creating a layered flavor that feels like a chocolate‑mint latte. Serve chilled for a summer treat.
Caramel Swirl Edition
Fold in 1/4 cup caramel sauce into the batter before baking. The caramel adds a sweet, buttery note that balances the espresso’s bitterness. The result is a caramel‑chocolate espresso muffin that feels like a dessert on a stick.
Dark Chocolate Overload
Replace the cocoa powder with 1 cup dark chocolate chips and reduce the espresso powder to 1/2 tablespoon. This variation yields a richer, more decadent muffin that’s perfect for chocolate lovers. The espresso still provides a subtle depth.
Gluten‑Free Edition
Swap the all‑purpose flour for a gluten‑free blend, keeping the same ratio. Use a gluten‑free baking powder and the same leavening agents. The texture will be slightly denser, but the flavor remains unchanged.
Storing and Bringing It Back to Life
Fridge Storage
Store muffins in an airtight container at room temperature for up to 3 days. If you prefer them fresh, keep them in the fridge for a crisper texture. Avoid storing them in the freezer for extended periods, as the chocolate can become brittle.
Freezer Friendly
For longer storage, wrap each muffin individually in plastic wrap, then place them in a freezer bag. They can be frozen for up to 2 months. Thaw at room temperature for 30 minutes before reheating.
Best Reheating Method
To bring frozen muffins back to life, preheat the oven to 300°F (150°C) and bake for 10–12 minutes, or until warmed through. Add a splash of water to the bottom of the baking sheet to create steam, which keeps the muffins moist. This simple trick restores the original texture and flavor.