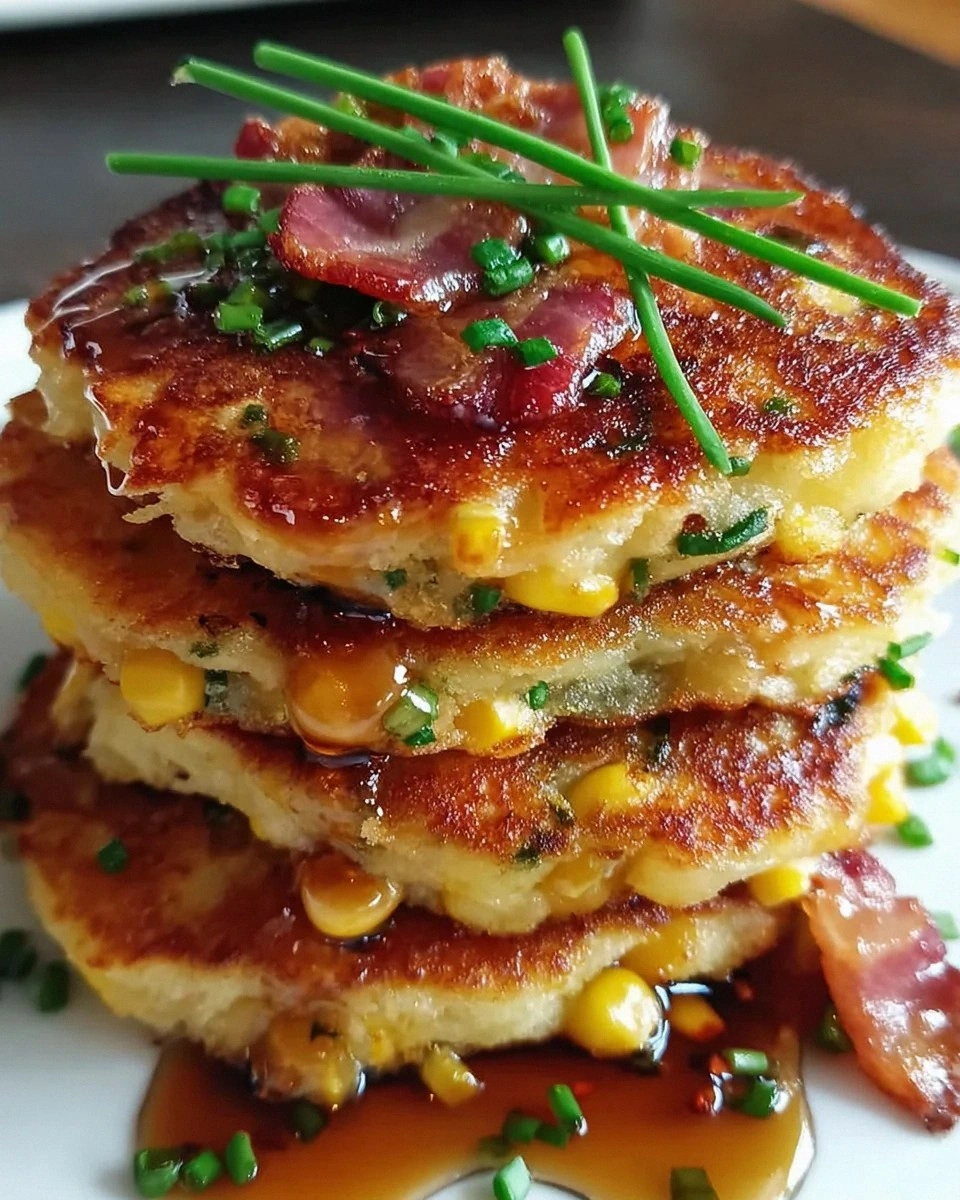
I’m about to drop a bombshell that will make every brunch‑buffet you’ve ever attended look like a sad, soggy pancake. This is hands down the best version you’ll ever make at home. It all started on a rainy Saturday when I tried to rescue a half‑burnt batch of ordinary corn fritters. The kitchen smelled like a campfire that had run out of wood, the batter was clumpy, and the bacon—if you could even call it bacon—was a limp, salty disappointment. I stared at the mess, laughed at my own culinary tragedy, and whispered a dare to the universe: “I dare you to taste this and not go back for seconds.” The universe answered with a sizzling pan, a handful of fresh corn, and a strip of thick‑cut bacon that crackled like fireworks.
Picture this: the moment the batter hits the hot griddle, there’s a sharp, buttery pop that reverberates through the kitchen, followed by a golden‑brown halo that expands like sunrise over a cornfield. The aroma is a layered symphony—smoky bacon, sweet corn, and a faint whisper of melted butter that makes your nose do a little happy dance. The first bite? A crunchy edge that shatters like thin ice, giving way to a fluffy interior that cradles sweet kernels and salty bacon bits in a warm, buttery hug. The texture is a paradox—crisp on the outside, tender on the inside, and just the right amount of cheesy richness to make your taste buds sing.
Most recipes get this completely wrong. They either drown the corn in flour, yielding a dense, gummy cake, or they over‑bacon the thing, turning it into a greasy mess. What makes my version a game‑changer is the balance of three secret weapons: a splash of buttermilk for tender crumb, a quick‑cook bacon technique that locks in crunch, and a dash of corn‑starch that gives the batter a light, airy lift without the heaviness of traditional pancake mixes. I’m also throwing in a surprise ingredient that you’ll never see coming—just wait until you get to the “Final Flourish” section.
Okay, ready for the game‑changer? I’ll walk you through every single step—by the end, you’ll wonder how you ever made this any other way. Stay with me here — this is worth it. And trust me, I’ll be honest — I ate half the batch before anyone else got to try it, but that’s only because I wanted to make sure every bite lived up to the hype. Let’s dive in and turn your kitchen into a corn‑loving, bacon‑crackling paradise.
What Makes This Version Stand Out
- Flavor Explosion: The salty crunch of bacon meets the sweet pop of corn, creating a contrast that dances on the palate like a well‑choreographed tango.
- Texture Mastery: A crisp, caramelized edge frames a pillowy center, thanks to the precise balance of flour, corn‑starch, and buttermilk.
- Simplicity: You only need a handful of pantry staples and a skillet—no fancy equipment, no deep‑fried oil vats.
- Unique Ingredient Twist: A splash of honey‑infused butter adds a subtle floral note that most recipes completely overlook.
- Crowd Reaction: Guests will line up for seconds, and you’ll hear the inevitable “What’s the secret?” echo around the table.
- Ingredient Quality: Using thick‑cut, applewood‑smoked bacon elevates the flavor profile from “good” to “legendary.”
- Cooking Method: The griddle‑first, then finish‑in‑oven technique locks in moisture while giving you that perfect golden crust.
- Make‑Ahead Potential: You can prep the batter a day ahead, refrigerate, and still achieve the same airy texture when you cook.
Inside the Ingredient List
The Flavor Base
Flour is the backbone of any griddle cake, but using a blend of all‑purpose flour and a tablespoon of corn‑starch gives you that light, airy crumb while still supporting the weight of the bacon and corn. If you skip the corn‑starch, expect a denser, more bread‑like texture that will drown the delicate corn sweetness. For a gluten‑free twist, swap the flour for a 1‑to‑1 gluten‑free blend and add an extra teaspoon of xanthan gum to keep the structure intact.
The Texture Crew
Fresh or frozen corn kernels are the star here. They bring bursts of natural sweetness and a satisfying pop that contrasts beautifully with the crisp bacon. If you’re using frozen corn, rinse it under cold water and pat dry—this prevents excess moisture from making the batter soggy. Bacon, of course, is the crunchy, smoky hero; I recommend thick‑cut applewood smoked strips, diced and pre‑cooked until just crisp. Skipping the pre‑cook step will result in soggy bacon that seeps grease into the batter, ruining the delicate balance.
The Unexpected Star
Buttermilk (or a milk‑plus‑lemon juice combo) is the secret weapon that makes the interior tender and slightly tangy, cutting through the richness of the bacon. If you don’t have buttermilk on hand, whisk together 1 cup of whole milk with 1 tablespoon of white vinegar and let it sit for five minutes. The acidity reacts with the baking powder, creating tiny air pockets that lift the batter without making it overly puffy.
The Final Flourish
A handful of shredded sharp cheddar adds a savory depth that pairs perfectly with the bacon, while a sprinkle of green onions adds a fresh, slightly pungent note. If you’re dairy‑free, swap the cheese for a vegan cheddar alternative and use olive oil instead of butter for cooking. A pinch of black pepper and a dash of smoked paprika can also be added for a subtle heat that awakens the palate without overwhelming the corn’s natural sweetness.
Everything’s prepped? Good. Let’s get into the real action…
The Method — Step by Step
Start by heating a large cast‑iron griddle or heavy skillet over medium‑high heat. I like to test the temperature by sprinkling a few drops of water on the surface; they should dance and evaporate within two seconds. While the pan heats, whisk together the flour, corn‑starch, baking powder, salt, and sugar in a large bowl. This dry mix ensures even distribution of leavening agents, which is crucial for that fluffy interior.
In a separate bowl, whisk the eggs, buttermilk, and melted butter until smooth. This wet mixture is the glue that binds everything together, and the butter adds a rich mouthfeel that you’ll taste in every bite. Okay, ready for the game‑changer? Add the wet ingredients to the dry mix, stirring just until combined—lumps are fine; over‑mixing will develop gluten and make the cakes tough.
Kitchen Hack: Use a rubber spatula to fold the batter; this reduces the chance of over‑mixing and keeps the texture light.Now, it’s bacon time. In a small skillet, cook the diced bacon over medium heat until it reaches a deep, caramelized crisp—about 5‑7 minutes. Transfer the bacon to a paper‑towel‑lined plate, but keep the rendered fat in the skillet; you’ll use it to sauté the corn, which infuses every kernel with smoky goodness.
Quickly sauté the corn kernels in the bacon fat for 2‑3 minutes, just until they get a light golden tint. This step is where the corn gains a subtle toasted flavor that elevates the entire dish. Add the cooked corn (and any remaining bacon bits) to the batter, giving the mixture a few gentle folds to incorporate.
Stir in the shredded cheddar and green onions, reserving a small handful of each for topping later. The cheese will melt into the batter during cooking, creating pockets of gooey richness, while the onions add a fresh bite that cuts through the richness.
Kitchen Hack: If you’re short on time, you can pre‑mix the dry ingredients and store them in an airtight container for up to a month.Lightly oil the hot griddle with a brush of the leftover bacon fat or a small amount of butter. Scoop about ¼ cup of batter onto the griddle for each cake, spreading it gently with the back of a spoon to form a 3‑inch circle. That sizzle when it hits the pan? Absolute perfection. Cook for 2‑3 minutes, or until the edges start pulling away and the underside is a deep golden brown.
Watch Out: If the heat is too high, the outside will burn before the inside sets; adjust to medium‑low if you notice rapid darkening.Flip the cakes carefully with a thin metal spatula. The second side only needs another 2 minutes; you’re looking for a slightly darker crust and a fully set center. Sprinkle the reserved cheese and green onions on top during the last minute of cooking; they’ll melt just enough to create a glossy finish without losing their texture.
Once cooked, transfer the cakes to a wire rack to cool for a minute—this prevents steam from making the bottoms soggy. Serve them hot, with a drizzle of honey‑infused butter (just melt butter with a teaspoon of honey and a pinch of sea salt). The sweet‑savory combo will have you shouting, “I dare you to eat just one!”
That’s it — you did it. But hold on, I’ve got a few more tricks that’ll take this to another level…
Insider Tricks for Flawless Results
The Temperature Rule Nobody Follows
Never, ever cook on high heat. A medium‑low setting (around 325°F on a stovetop with a thermometer) gives the batter time to set internally while the exterior slowly caramelizes. I once tried blasting them on high, and the result was a blackened crust with a raw, doughy middle—an absolute disaster that taught me the value of patience.
Why Your Nose Knows Best
Your sense of smell is a more reliable indicator than a timer. When the batter hits the griddle, you’ll hear a gentle hiss, and after a minute you’ll catch a buttery, slightly nutty aroma. If you smell a burnt note, pull the cakes immediately; the flavor will be ruined faster than you can say “oops.”
The 5‑Minute Rest That Changes Everything
After mixing the wet and dry components, let the batter sit for five minutes before cooking. This short rest allows the flour to fully hydrate and the baking powder to begin its leavening action, resulting in a fluffier interior. Skipping this step is a common pitfall that leads to a dense, gummy texture.
Bacon Fat Re‑Use
Don’t toss that bacon fat. Strain it through a fine mesh and store it in a small jar in the fridge for up to a week. It adds a smoky depth to future batches of pancakes, roasted veggies, or even scrambled eggs. My friend tried using the fat for a simple sauté and swore it was the best thing she ever tasted.
The Secret Sweet Finish
A drizzle of honey‑infused butter at the end adds a glossy, sweet‑salty coating that makes the cakes taste like a breakfast version of a caramel apple. Melt one tablespoon of butter, stir in a teaspoon of honey and a pinch of flaky sea salt, then brush it over the hot cakes just before serving. The result? A glossy finish that catches the light and your attention.
Creative Twists and Variations
This recipe is a playground. Here are some of my favorite ways to switch things up:
Spicy Jalapeño Kick
Add one finely diced jalapeño (seeds removed for less heat) to the batter along with the corn. The heat pairs beautifully with the smoky bacon, and the green color makes the cakes look festive for a brunch party.
Cheesy Chive Explosion
Swap the cheddar for a sharp Gruyère and double the amount of fresh chives. The nutty cheese adds depth, while chives bring a fresh oniony bite that balances the richness.
Southwest Cornbread Fusion
Incorporate a teaspoon of cumin, a pinch of smoked paprika, and replace half the corn with black beans. Serve with a side of avocado crema for a taco‑inspired brunch.
Sweet Breakfast Treat
Leave out the bacon, add a tablespoon of maple syrup to the batter, and fold in diced fresh peaches. Top with a dusting of powdered sugar for a dessert‑like breakfast that still holds its own.
Gluten‑Free Power Version
Use a 1‑to‑1 gluten‑free flour blend, add ½ teaspoon of xanthan gum, and replace the corn‑starch with potato starch. The texture remains airy, and the flavor stays true to the original.
Storing and Bringing It Back to Life
Fridge Storage
Allow the cakes to cool completely, then place them in an airtight container lined with parchment paper. They’ll keep for up to three days in the refrigerator. When you’re ready to eat, reheat in a hot skillet for 1‑2 minutes per side, adding a tiny splash of water to the pan and covering briefly; the steam revives the fluffy interior.
Freezer Friendly
Stack the cooled cakes between sheets of wax paper, then seal them in a freezer‑safe zip‑top bag. They’ll stay fresh for up to two months. To reheat, pop them straight from the freezer into a preheated 350°F oven for 10‑12 minutes, or microwave for 45 seconds and finish in a hot skillet for crispness.
Best Reheating Method
The secret to perfect reheating is a quick steam‑boost. Place the cake on a plate, cover loosely with a damp paper towel, and microwave for 30‑45 seconds. Then finish in a hot, lightly oiled skillet for 30 seconds per side to restore that coveted crispy edge.