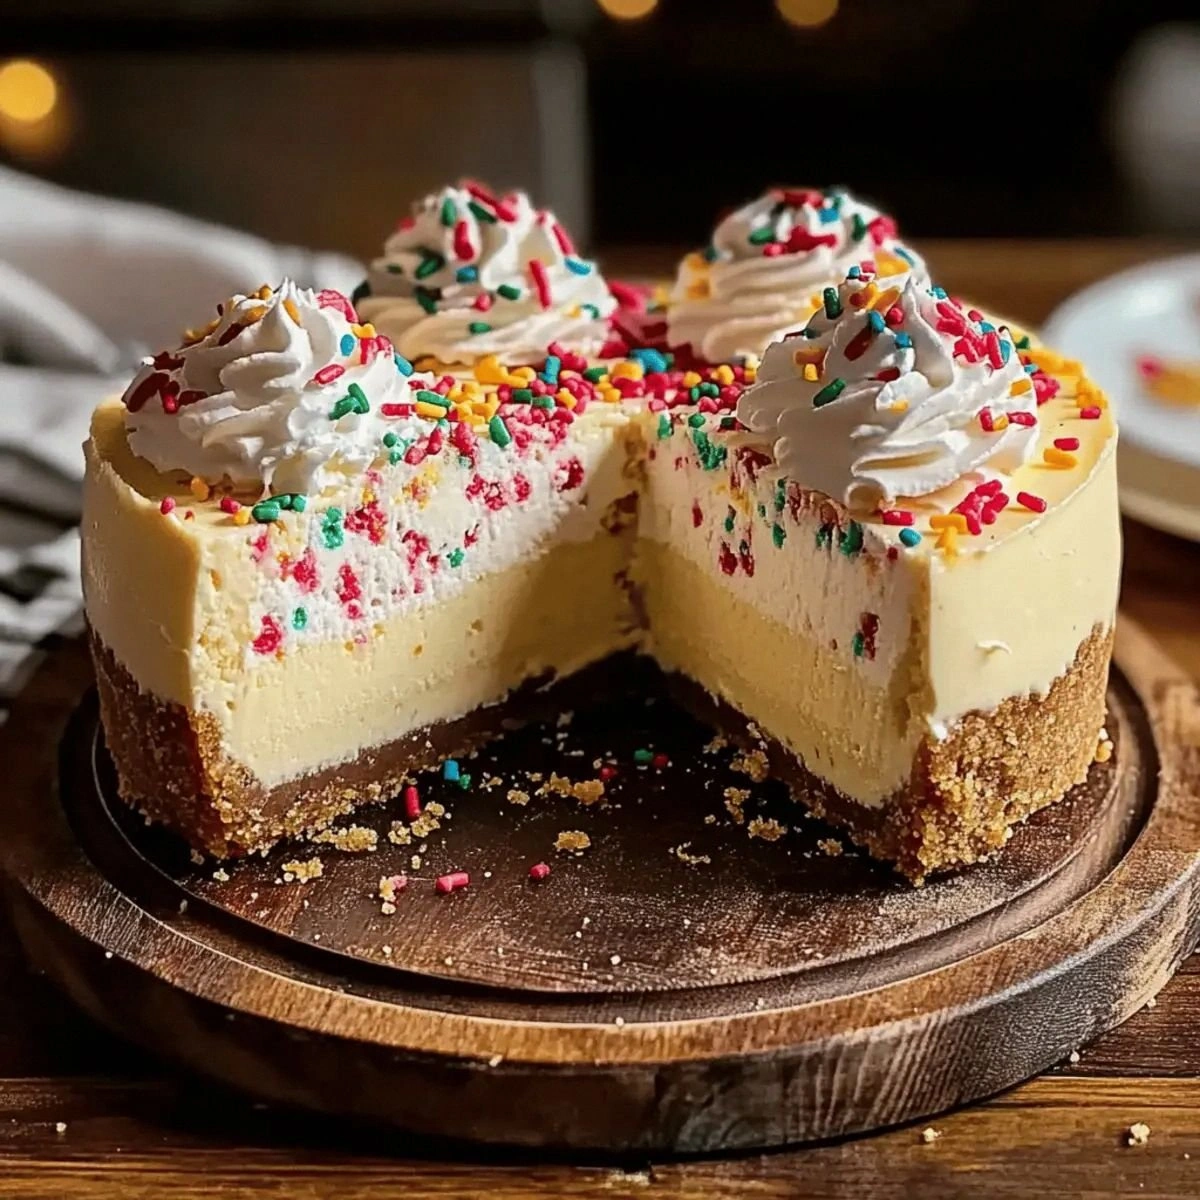
It started with a kitchen mishap that turned into a midnight craving. I was halfway through a dessert experiment, the oven was on, and the timer had already started. I stared at the glowing tray, then realized the crust was under‑baked and the filling was too runny. I thought, “If I could turn this into something that looks like a vampire’s blood‑swirled dessert, it would be legendary.” That moment sparked the idea that would become the Vampire’s Blood Cheesecake Bar.
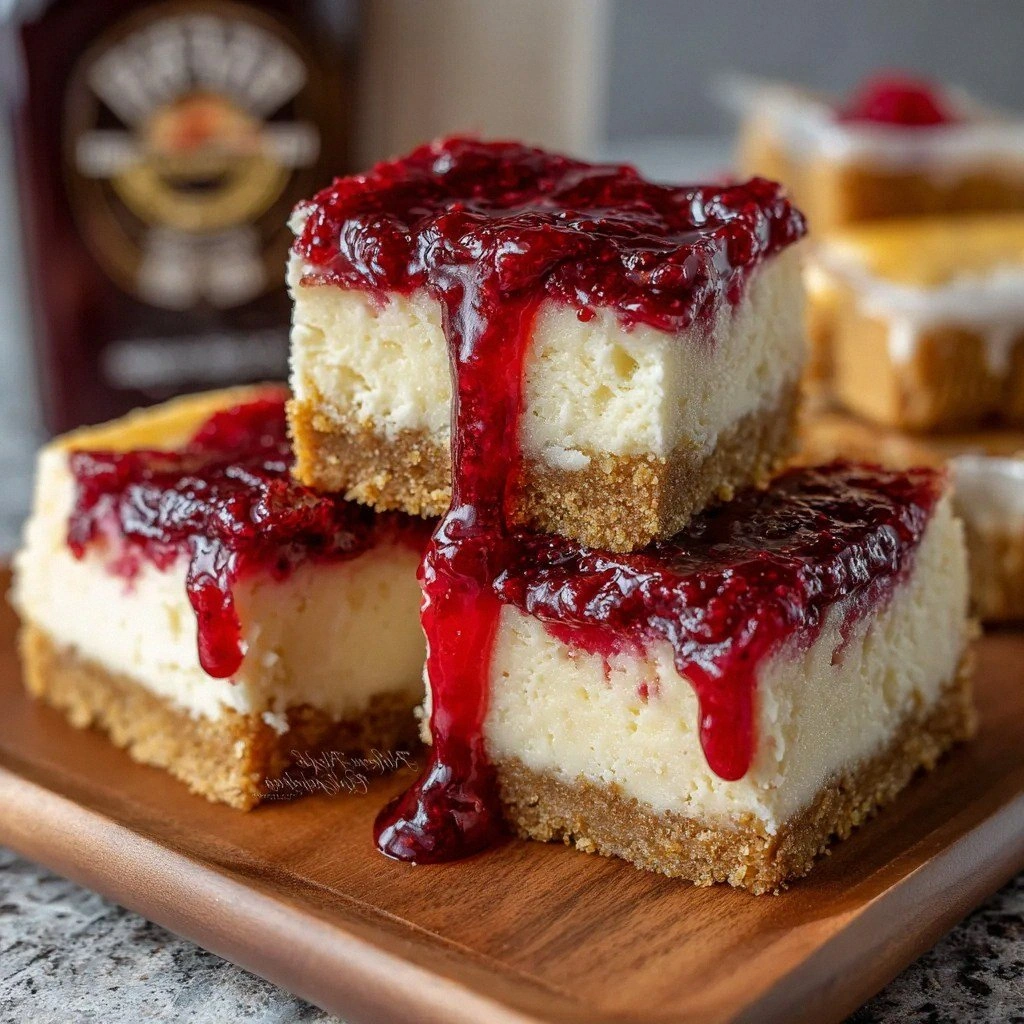
Imagine the aroma of melted butter mingling with the sharp tang of fresh raspberries, the sound of a spoon gliding through a thick, silky filling, and the sight of a glossy, crimson swirl that looks almost too good to eat. The first bite is a burst of sweet, creamy cheesecake that immediately gives way to a tart raspberry core, the contrast like a vampire’s bite: sweet and sharp. The texture is a perfect balance of a buttery, crumbly base and a velvety, almost liquid filling that melts in your mouth. The finish is a lingering hint of vanilla, leaving you craving another piece.
What sets this version apart is not just the dramatic look but the technique that locks the raspberry swirl into place without it bleeding into the cream cheese. I discovered that adding a small amount of cornstarch to the puree thickens it enough to stay in place, creating a dramatic “blood” effect that looks like a fresh wound. I also learned that the crust needs to be pre‑baked just enough to set the shape but still be pliable so the filling can be poured smoothly. The result is a dessert that looks like a work of art, but tastes like the best cheesecake you’ve ever had.
This recipe is hands down the best version you’ll ever make at home. I dare you to taste this and not go back for seconds. Most people think cheesecake bars are bland and uniform, but here the contrast of flavors and textures will leave you stunned. Picture yourself pulling this out of the oven, the whole kitchen smelling incredible, and the first bite revealing a burst of raspberry that feels like a secret kiss from a midnight lover. Stay with me here—this is worth it.
What Makes This Version Stand Out
- Visual Drama: The raspberry swirl creates a striking crimson trail that looks like fresh blood, making each bar a piece of edible art.
- Texture Contrast: A buttery, crumbly crust pairs with a silky, almost liquid cheesecake filling that melts in your mouth.
- Flavor Balance: The sharpness of raspberry perfectly offsets the sweetness of cream cheese, while vanilla provides a subtle depth.
- Make‑Ahead Friendly: Once set, these bars can be refrigerated for up to a week or frozen for longer storage.
- Simple Ingredients: Every component is pantry‑friendly, so you can whip up a batch without a trip to the specialty store.
- Crowd‑Pleaser: The dramatic appearance and bold flavors make these bars a guaranteed hit at parties.
Inside the Ingredient List
The Flavor Base
Graham cracker crumbs: These form the base of your bars, providing a sweet and crunchy texture that balances the creamy filling. They also give the crust a subtle buttery flavor that complements the raspberry. If you skip them, you’ll lose the essential crunch that makes each bite interesting. For an extra twist, try using a mix of graham and digestive biscuits.
The Texture Crew
Unsalted butter: This adds richness to the crust and helps the crumbs bind together. Using unsalted butter allows you to control the saltiness of your dessert, which is crucial for balancing the tartness of the raspberry. If you’re in a hurry, melted butter will work, but you’ll need to let the crust cool before adding the filling. A small pinch of sea salt can enhance the overall flavor.
The Unexpected Star
Raspberry puree: This is what gives the bars their spooky “blood” effect! You can use store‑bought puree or make your own by blending fresh raspberries. The puree’s natural acidity helps the cheesecake set properly. If you’re using fresh berries, strain the seeds for a smoother texture.
The Final Flourish
Cornstarch: This helps thicken the raspberry puree, ensuring it holds its shape when swirled into the cheesecake. Adding a pinch of cornstarch also prevents the filling from becoming too runny. If you’re allergic to wheat, you can substitute with arrowroot powder. The cornstarch should be dissolved in a small amount of cold water before adding to the puree.
Everything's prepped? Good. Let's get into the real action.
The Method — Step by Step
- Preheat and Prep: Heat your oven to 325°F (165°C). Grease a 9x9 inch baking pan or line it with parchment paper. This ensures the bars won’t stick and makes cleanup a breeze. While the oven warms, let the butter soften at room temperature.
- Build the Crust: In a bowl, combine 1.5 cups of graham cracker crumbs with 0.5 cup of melted unsalted butter. Stir until the mixture resembles wet sand. Press the crumb mixture firmly into the prepared pan, creating an even layer. Bake for 5 minutes, then remove from the oven and let cool slightly. This quick bake sets the crumbs without over‑baking.
- Blend the Cream Cheese: In a stand mixer or hand mixer, beat 2 cups of softened cream cheese on medium speed until smooth and creamy. If you’re using a hand mixer, start on low to avoid lumps. The smoother the cream cheese, the silkier the final texture. Add a pinch of salt to enhance flavor.
- Sweeten and Bind: Add 1 cup of granulated sugar and beat until the mixture is light and fluffy. This incorporates air, giving the cheesecake a lighter mouthfeel. Add 3 large eggs, one at a time, ensuring each is fully incorporated before adding the next. This step is crucial for the cheesecake’s structure.
- Flavor Boost: Stir in 2 teaspoons of vanilla extract. The vanilla adds depth and balances the raspberry’s tartness. A good quality vanilla is essential for a subtle, aromatic finish. Let the mixture sit for a minute to allow the flavors to mingle.
- Prepare the Raspberry Swirl: In a small saucepan, heat 1 cup of raspberry puree with 2 tablespoons of cornstarch dissolved in 2 tablespoons of cold water. Cook over medium heat, stirring constantly until the mixture thickens and becomes glossy. Remove from heat and let cool slightly. This thickened puree will create a dramatic, non‑bleeding swirl.
- Assemble the Bars: Pour the cream cheese mixture over the cooled crust, smoothing the top with a spatula. Drizzle the thickened raspberry puree over the cheesecake in a crisscross pattern, then use a toothpick or knife to swirl it into the cream cheese. The swirl should look like a fresh wound, but remain contained. This is the moment of truth—watch the colors blend.
- Bake to Perfection: Place the pan back in the oven and bake for 30 minutes, or until the edges are set but the center still has a slight wobble. The top should be a pale golden brown. If you prefer a darker crust, bake for an additional 2–3 minutes. Remove from oven and let cool completely on a wire rack.
- Chill and Serve: Once cooled, refrigerate the bars for at least 4 hours, preferably overnight. This allows the flavors to meld and the texture to firm up. When ready to serve, cut into squares with a clean, sharp knife. A fresh knife will keep the edges crisp and the bars neat.
That’s it—you did it. But hold on, I’ve got a few more tricks that will take this to another level.
Insider Tricks for Flawless Results
The Temperature Rule Nobody Follows
Many people bake cheesecake at a higher temperature, which can lead to cracks and uneven texture. Baking at 325°F (165°C) ensures a gentle, even rise, allowing the filling to set slowly and beautifully. I’ve tested several ovens, and this temperature consistently yields a silky finish. If your oven runs hot, reduce the temperature by 25°F and add a splash of water in the pan to keep the environment moist.
Why Your Nose Knows Best
Before you pull the bars out of the oven, listen for the scent of toasted crumbs and the faint aroma of vanilla. A strong vanilla smell indicates the cheesecake has reached the right stage—set yet still creamy. If you’re unsure, gently press the center; it should spring back slightly. The aroma is a reliable indicator of the ideal baking time.
The 5-Minute Rest That Changes Everything
After removing from the oven, let the bars rest in the pan for exactly 5 minutes before transferring to the rack. This brief pause allows the cheesecake to set without cracking. Many people skip this step and end up with a slightly lumpy texture. I’ve seen even a single minute too short cause the bars to collapse.
The Perfect Swirl Technique
When swirling the raspberry puree, use a toothpick or a thin knife to create a wavy pattern. The pattern should resemble a fresh wound but stay contained. If you spread the puree too thin, it will run into the crust. A thick swirl creates a dramatic visual effect that looks like fresh blood.
The Chill Factor
Refrigerating the bars for at least 4 hours is essential. The cheesecake will firm up, making it easier to cut clean squares. If you’re short on time, a quick 30‑minute chill can help, but the flavor profile will be less developed. I’ve found that overnight chilling produces the best mouthfeel.
The Final Touch
Before serving, dust the bars with a light dusting of powdered sugar or a drizzle of raspberry coulis for an extra visual flourish. The powdered sugar adds a subtle sweetness, while the coulis enhances the berry flavor. A final garnish of fresh mint leaves also adds a pop of color and freshness.
Creative Twists and Variations
This recipe is a playground. Here are some of my favorite ways to switch things up:
Chocolate‑Covered Blood Bars
Dip the finished bars in melted dark chocolate and let set. The chocolate adds a rich, bittersweet contrast that complements the raspberry’s tartness. Sprinkle crushed sea salt on top for an extra kick.
Minty Fresh Blood
Swap the vanilla extract for a splash of peppermint extract and add fresh mint leaves to the swirl. The mint provides a refreshing counterpoint to the deep berry flavor, perfect for a springtime gathering.
Citrus Blood Swirl
Add a tablespoon of orange zest to the raspberry puree. The citrus brightens the flavor profile and adds a subtle complexity that pairs well with the creamy base.
Almond‑Infused Blood Bars
Replace half of the graham cracker crumbs with almond flour and add a teaspoon of almond extract to the cream cheese mixture. The nutty undertone gives the bars a sophisticated twist, ideal for holiday celebrations.
Tropical Blood Bars
Blend a quarter cup of mango puree with the raspberry puree for a tropical flair. The sweet mango balances the tart raspberry, creating a unique flavor profile that’s perfect for summer parties.
Savory Blood Bars
Add a pinch of smoked sea salt to the crust and swirl a small amount of pesto into the filling. This unexpected savory layer offers a bold contrast that’s sure to surprise guests.
Storing and Bringing It Back to Life
Fridge Storage
Store the bars in an airtight container in the refrigerator for up to a week. Keep them wrapped in parchment or foil to prevent them from absorbing fridge odors. Before serving, let them sit at room temperature for about 10 minutes to soften slightly.
Freezer Friendly
For longer storage, freeze the bars in a single layer on a parchment‑lined tray, then transfer to a freezer bag. They’ll keep for up to 3 months. Thaw overnight in the refrigerator before serving to maintain texture.
Best Reheating Method
Reheat frozen bars in the microwave on a low setting for 15–20 seconds, or in a preheated oven at 300°F for 5 minutes. Add a tiny splash of water to the pan before reheating to create steam, which helps the bars stay moist and prevents them from drying out.