Love this? Pin it for later! 📌
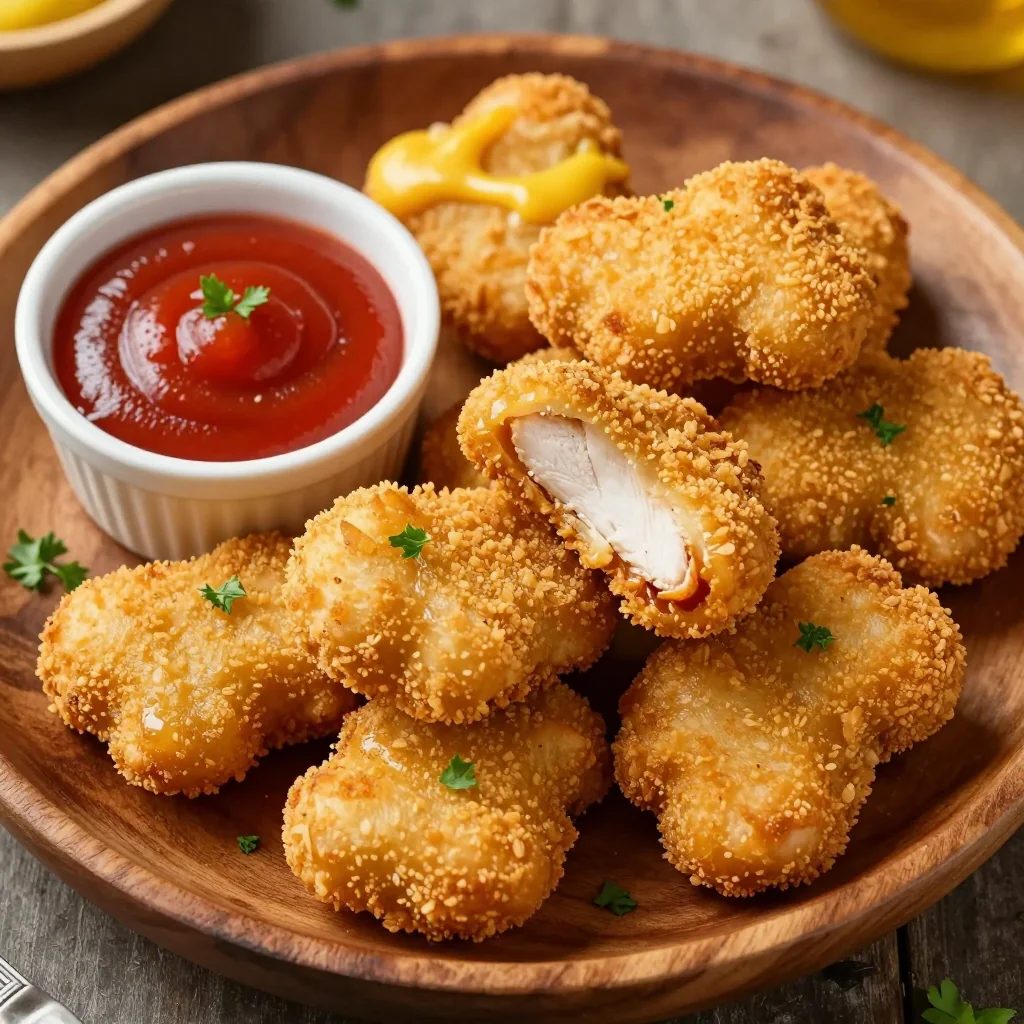
There's something magical about the moment your child takes their first bite of a homemade chicken nugget. The golden crust gives way to tender, juicy chicken, and suddenly you've created a memory that rivals any fast-food experience. After years of experimenting with different coatings and techniques, I've discovered that the secret to the most irresistible kid-friendly chicken nuggets lies right in your pantry: those humble breadcrumbs that have been sitting there all along.
This recipe was born on a rainy Tuesday afternoon when my daughter's playdate was unexpectedly extended into dinnertime. With three hungry kids eyeing me expectantly and a nearly empty fridge, I transformed simple ingredients into something extraordinary. The pantry breadcrumbs, combined with a few strategic seasonings, created a coating so perfectly crispy that even the pickiest eater at the table couldn't resist. Now, these nuggets have become our family's weekend tradition, requested more often than pizza night and treasured more than any restaurant meal.
What makes these nuggets truly special is their versatility. Whether you're dealing with gluten sensitivities, dairy allergies, or simply trying to sneak in some extra nutrition, this recipe adapts beautifully to your family's needs. The coating technique ensures every piece is evenly coated, while the cooking method guarantees that coveted crunch without deep-frying. Trust me when I say these will ruin store-bought nuggets for you forever.
Why This Recipe Works
- Pantry Staples: Uses everyday ingredients you probably have on hand right now, eliminating emergency grocery runs
- Double-Dredge Technique: Creates an extra-crispy coating that stays crunchy even after cooling
- Hidden Veggies: Finely grated vegetables can be mixed into the coating for an undetectable nutrition boost
- Make-Ahead Friendly: Freeze beautifully for up to three months, perfect for busy weeknight dinners
- Kid-Approved Seasoning: Mild flavors that appeal to young palates while still being delicious for adults
- Customizable Shapes: Cut into fun shapes with cookie cutters for themed parties or picky eaters
- Baked or Fried Option: Provides both healthy baking and indulgent frying methods depending on your preference
Ingredients You'll Need
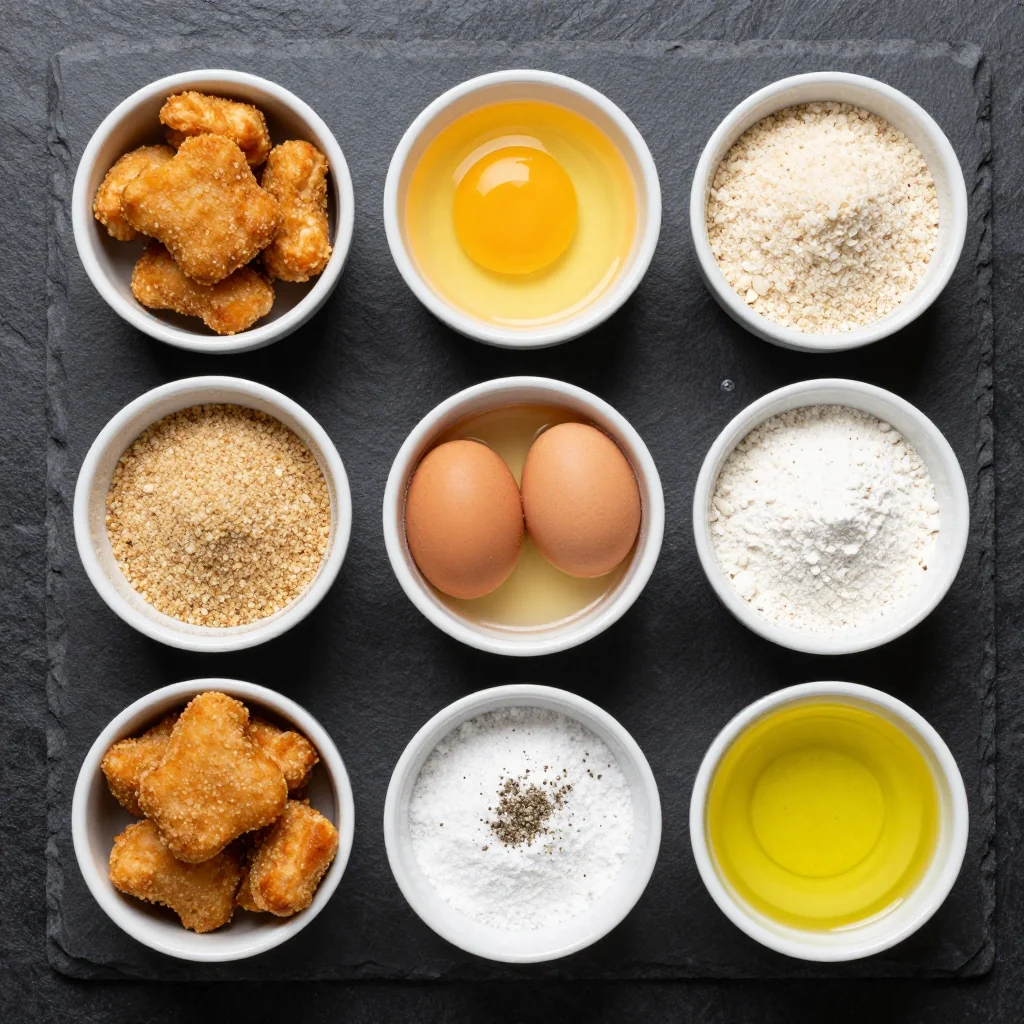
The beauty of this recipe lies in its simplicity, but each ingredient plays a crucial role in creating the perfect chicken nugget. Let's explore what makes these ingredients special and how to choose the best quality versions for maximum flavor.
For the Chicken:
Chicken Breast (1.5 lbs) - The star of our show! Choose organic, free-range chicken if possible for superior flavor and texture. Look for breasts that are plump and pale pink without any gray spots. If your chicken breasts are particularly thick, slice them horizontally to create more even pieces. This ensures every nugget cooks at the same rate and stays tender. For the most economical option, buy whole chicken breasts and cut them yourself rather than purchasing pre-cut tenders.
For the Pantry Breadcrumb Coating:
Plain Breadcrumbs (2 cups) - Regular pantry breadcrumbs work perfectly, but panko breadcrumbs will give you an even crunchier texture. If your breadcrumbs have been sitting in the pantry for a while, give them a quick toast in a dry pan for 2-3 minutes to refresh their flavor and improve their crunch factor. Whole wheat breadcrumbs add a nutty depth and extra fiber that kids won't even notice.
All-Purpose Flour (1 cup) - This creates the first layer that helps the egg wash adhere to the chicken. For gluten-free needs, substitute with rice flour or a 1:1 gluten-free blend. The flour should be fresh and free of any pantry moths - nobody wants extra protein in their nuggets!
Eggs (2 large) - Room temperature eggs create the perfect binding wash. If you have egg allergies in your family, substitute with 1/2 cup of buttermilk or 1/4 cup of aquafaba (chickpea brine) whisked until foamy.
The Flavor Enhancers:
Garlic Powder (1 tsp) - Provides that savory depth that makes these taste like restaurant-quality nuggets. Make sure your spices are fresh - if they're older than a year, they might have lost their punch.
Onion Powder (1 tsp) - Works in harmony with the garlic to create a complex flavor profile that kids love without being overwhelming.
Paprika (1/2 tsp) - Adds a beautiful golden color and subtle sweetness. Regular paprika works great, but smoked paprika can add an interesting twist for more adventurous eaters.
Salt and Black Pepper - Essential for bringing out all the other flavors. Use kosher salt for even distribution and freshly ground black pepper for the best flavor.
For Cooking:
Oil for Frying - If frying, use a neutral oil with a high smoke point like canola, vegetable, or peanut oil. You'll need about 1 inch in your pan. For baking, you'll just need a light spray of cooking oil.
How to Make Kid Friendly Chicken Nuggets using Pantry Breadcrumbs
Prepare Your Chicken
Start by patting your chicken breasts completely dry with paper towels. This crucial step ensures the coating will adhere properly and prevents steam from making your nuggets soggy. Place the chicken on a clean cutting board and slice it against the grain into 1-inch pieces. For younger children, you might want to make them smaller, but remember that they shrink slightly during cooking. If you have time, place the cut chicken pieces in the freezer for 15 minutes - this firms them up and makes them easier to coat evenly.
Create Your Breading Station
Set up three shallow dishes in a row on your counter. In the first, place your flour seasoned with 1/2 teaspoon each of salt and pepper. In the second, whisk together your eggs with 2 tablespoons of water until completely combined. In the third, combine your breadcrumbs with the garlic powder, onion powder, paprika, and 1 teaspoon of salt. Mix these seasonings thoroughly - you want every breadcrumb to be evenly flavored. For an extra crispy coating, add 2 tablespoons of cornstarch to your breadcrumb mixture.
Master the Double-Dredge Technique
This is where the magic happens! Take a piece of chicken and coat it completely in the seasoned flour, pressing gently to ensure full coverage. Shake off any excess flour, then dip it into the egg wash, allowing any excess to drip off. Now, press the chicken into the breadcrumb mixture, turning to coat all sides thoroughly. For an extra-thick coating, return the nugget to the egg wash for a second dip, then back into the breadcrumbs. Place each coated nugget on a wire rack set over a baking sheet. This prevents the bottom from getting soggy while you coat the remaining pieces.
Rest for Maximum Adherence
Once all your nuggets are coated, let them rest on the wire rack for 15-20 minutes. This resting period is crucial - it allows the coating to adhere properly to the chicken, preventing it from falling off during cooking. During this time, the breadcrumbs will absorb some moisture from the egg wash, creating a stronger bond. If you're making these ahead, you can cover the tray with plastic wrap and refrigerate for up to 2 hours before cooking.
Choose Your Cooking Method
For the healthiest option, preheat your oven to 425°F (220°C). Line a baking sheet with foil and place a wire rack on top. Spray the rack generously with cooking oil. Arrange your nuggets in a single layer, ensuring they don't touch. Spray the tops lightly with oil. Bake for 12-15 minutes, flipping halfway through, until golden brown and the internal temperature reaches 165°F (74°C). For the crispiest results, heat 1/2 inch of oil in a heavy-bottomed skillet over medium-high heat. When the oil shimmers, carefully add nuggets in batches, cooking 3-4 minutes per side until golden and cooked through.
Check for Perfect Doneness
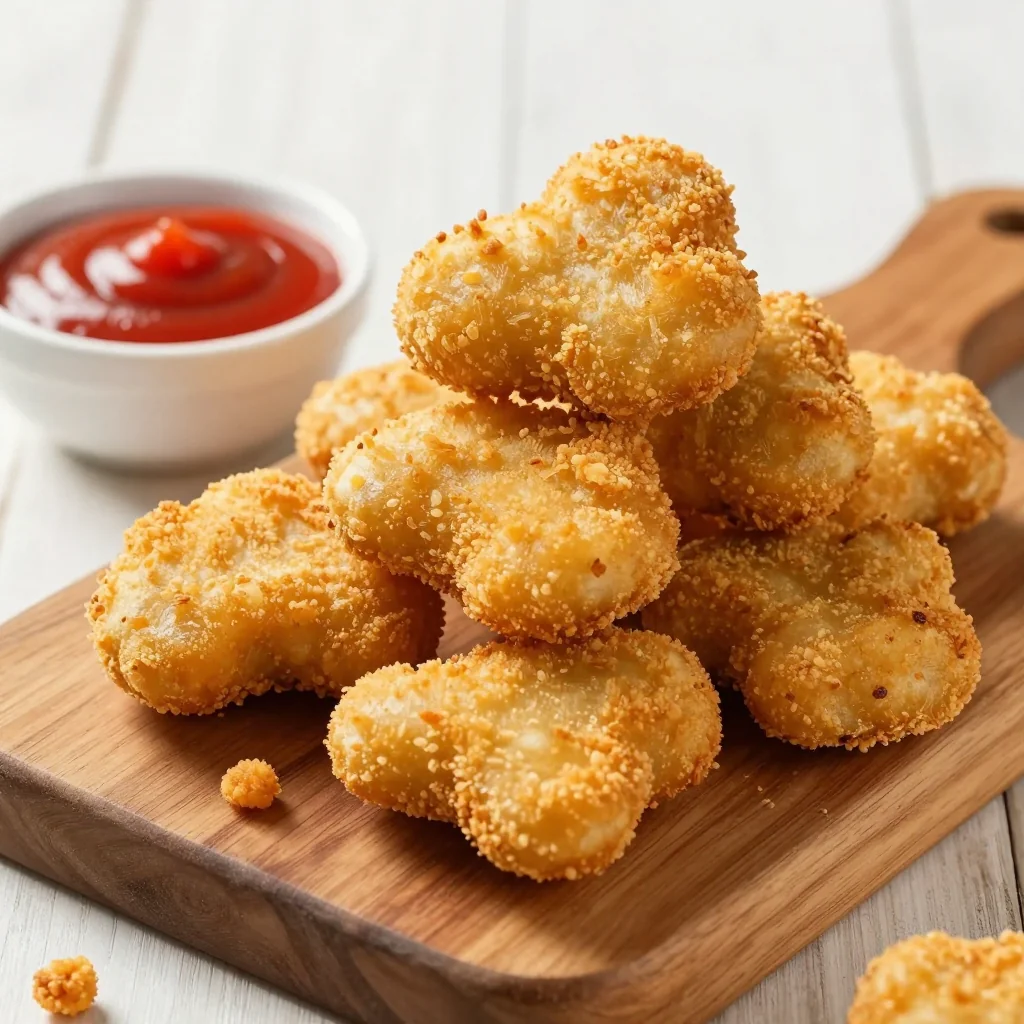
The key to perfect nuggets is ensuring they're cooked through without overdoing the coating. Use an instant-read thermometer inserted into the thickest part of a nugget - it should read 165°F (74°C). If you don't have a thermometer, cut one nugget in half; the chicken should be white throughout with no pink remaining, and the juices should run clear. The coating should be a deep golden brown and make a satisfying crunch when you tap it with a fork.
Drain and Season
Remove your perfectly cooked nuggets from the oven or oil and place them on a clean wire rack set over paper towels. This allows any excess oil to drain away while keeping them crispy. While they're still hot, sprinkle lightly with a pinch of salt - this final seasoning step makes a huge difference in flavor. Let them rest for 2-3 minutes before serving to prevent burned tongues and to allow the coating to set completely.
Serve with Style
These nuggets are best served immediately while the coating is at its crispiest. Arrange them on a platter with small bowls of your favorite dipping sauces - honey mustard, barbecue, ranch, or even ketchup work wonderfully. For a fun presentation, serve them in paper cones or mini baskets lined with parchment paper. If making for a party, keep them warm in a 200°F (93°C) oven on a wire rack set over a baking sheet for up to 30 minutes.
Expert Tips
Temperature Matters
For the crispiest results, make sure your oil temperature stays between 350-375°F (175-190°C). Too low and your nuggets will absorb excess oil and become soggy. Too high and the coating will burn before the chicken cooks through. Use a candy thermometer to monitor oil temperature, and adjust your heat as needed between batches.
Don't Crowd the Pan
Whether baking or frying, give your nuggets plenty of space. Overcrowding lowers the oil temperature significantly or creates steam in the oven, both of which lead to soggy coatings. Work in batches, keeping cooked nuggets warm on a wire rack in a 200°F (93°C) oven while you finish the rest.
Fresh Oil, Fresh Flavor
If frying, don't reuse oil that's been used for strongly flavored foods like fish. The oil can impart unwanted flavors to your delicate chicken nuggets. Fresh oil ensures a clean, neutral taste that lets the seasoned coating shine through.
Make-Ahead Magic
These nuggets freeze beautifully before cooking! After coating, place them on a parchment-lined baking sheet and freeze until solid, about 2 hours. Then transfer to freezer bags with parchment between layers. They'll keep for 3 months and can be cooked directly from frozen - just add 3-5 extra minutes to the cooking time.
Color Equals Flavor
Don't be afraid of golden brown color on your coating - that's where the flavor develops! The Maillard reaction creates hundreds of flavor compounds that make these nuggets irresistible. Aim for a deep golden brown rather than pale yellow for maximum taste.
Customize the Coating
Mix in 1/4 cup of grated Parmesan cheese, Italian seasoning, or even crushed cornflakes with your breadcrumbs for different flavor profiles. For a fun twist, add 1 tablespoon of everything bagel seasoning to the breadcrumb mixture for an extra savory kick that adults will love too.
Variations to Try
Gluten-Free Golden Nuggets
Replace the all-purpose flour with rice flour and use gluten-free breadcrumbs. Add 2 tablespoons of finely ground almonds to the coating for extra flavor and nutrition. The rice flour creates an even lighter, crispier texture than wheat flour.
Dairy-Free Delight
Substitute the egg wash with a mixture of 1/2 cup unsweetened almond milk mixed with 2 tablespoons of cornstarch. This creates the same binding power as eggs while keeping the recipe dairy-free and suitable for those with egg allergies.
Hidden Veggie Version
Mix 1/2 cup of finely grated zucchini or carrot into the breadcrumb mixture. The vegetables add moisture and nutrition while being virtually undetectable to picky eaters. Squeeze the grated vegetables in a clean towel first to remove excess moisture.
Spiced-Up Big Kid Nuggets
Add 1/2 teaspoon of smoked paprika, 1/4 teaspoon of cayenne pepper, and 1 teaspoon of Italian seasoning to the breadcrumb mixture. These have a gentle kick that older kids and adults appreciate without being too spicy for younger palates.
Parmesan Herb Crusted
Mix 1/3 cup of freshly grated Parmesan cheese, 1 teaspoon of dried Italian herbs, and 1/2 teaspoon of lemon zest into your breadcrumb mixture. The cheese creates an extra crispy, flavorful crust that pairs beautifully with marinara sauce.
Sweet Potato Coating
Replace half the breadcrumbs with crushed sweet potato chips for a naturally sweet, colorful coating. This variation is particularly popular with toddlers and adds an extra serving of vegetables to their meal.
Storage Tips
Refrigerating Cooked Nuggets
Store cooked nuggets in an airtight container in the refrigerator for up to 4 days. To maintain crispiness, place a paper towel in the container to absorb excess moisture. For best results, reheat in a 400°F (204°C) oven for 5-7 minutes rather than microwaving, which can make the coating soggy. You can also reheat them in an air fryer at 375°F (190°C) for 3-4 minutes.
Freezing Uncooked Nuggets
After coating, arrange nuggets in a single layer on a parchment-lined baking sheet and freeze until solid, about 2 hours. Transfer to freezer bags with parchment paper between layers to prevent sticking. Label with the date and cooking instructions. These frozen nuggets will maintain their quality for up to 3 months. Cook directly from frozen, adding 3-5 minutes to the cooking time.
Freezing Cooked Nuggets
Let cooked nuggets cool completely on a wire rack. Once cool, flash freeze them on a baking sheet for 1 hour, then transfer to freezer bags. This method prevents them from sticking together and maintains their texture. Frozen cooked nuggets are best consumed within 2 months. Reheat from frozen in a 425°F (220°C) oven for 12-15 minutes, flipping halfway through.
Make-Ahead Lunchbox Portions
Portion cooked nuggets into individual containers with compartments for dipping sauces. These make perfect grab-and-go options for busy mornings. Add a small packet of honey or ketchup, and you'll have happier kids at lunchtime. The nuggets will stay fresh in lunchboxes with ice packs for up to 4 hours.
Frequently Asked Questions
Kid Friendly Chicken Nuggets using Pantry Breadcrumbs
Ingredients
Instructions
- Prepare chicken: Pat chicken dry and cut into 1-inch pieces. If time allows, chill in freezer for 15 minutes to firm up.
- Set up breading station: Arrange three shallow dishes - flour seasoned with 1/2 tsp each salt and pepper, beaten eggs with 2 tbsp water, and breadcrumbs mixed with garlic powder, onion powder, paprika, and remaining salt.
- Coat nuggets: Dredge each chicken piece in flour, dip in egg wash, then press into breadcrumb mixture. For extra thickness, repeat egg and breadcrumb coating.
- Rest for adherence: Place coated nuggets on wire rack and let rest 15-20 minutes for coating to set properly.
- Cook by your preferred method: Bake at 425°F for 12-15 minutes flipping halfway, or fry in 1/2 inch oil at 350-375°F for 3-4 minutes per side until golden and internal temp reaches 165°F.
- Serve immediately: Drain on wire rack, season with salt while hot, and serve with your favorite dipping sauces.
Recipe Notes
For gluten-free version, substitute rice flour for all-purpose flour and use gluten-free breadcrumbs. These nuggets freeze beautifully - freeze uncooked on a baking sheet, then transfer to bags for up to 3 months. Cook directly from frozen, adding 3-5 extra minutes to cooking time.