I still remember the year I swore off stuffing forever. There I stood, elbow-deep in turkey giblets, watching my great-aunt's famous casserole dish emerge from the oven looking like something between wet cement and a savory Jell-O experiment. The cranberries had bled into everything, the bread had dissolved into paste, and the turkey bits looked like they'd given up on life somewhere around hour two. My cousin took one polite bite, then spent the rest of dinner "checking on the dog" — code for spitting it into napkin number seven. That was the moment I decided stuffing needed a serious glow-up, not another dusty family recipe card.
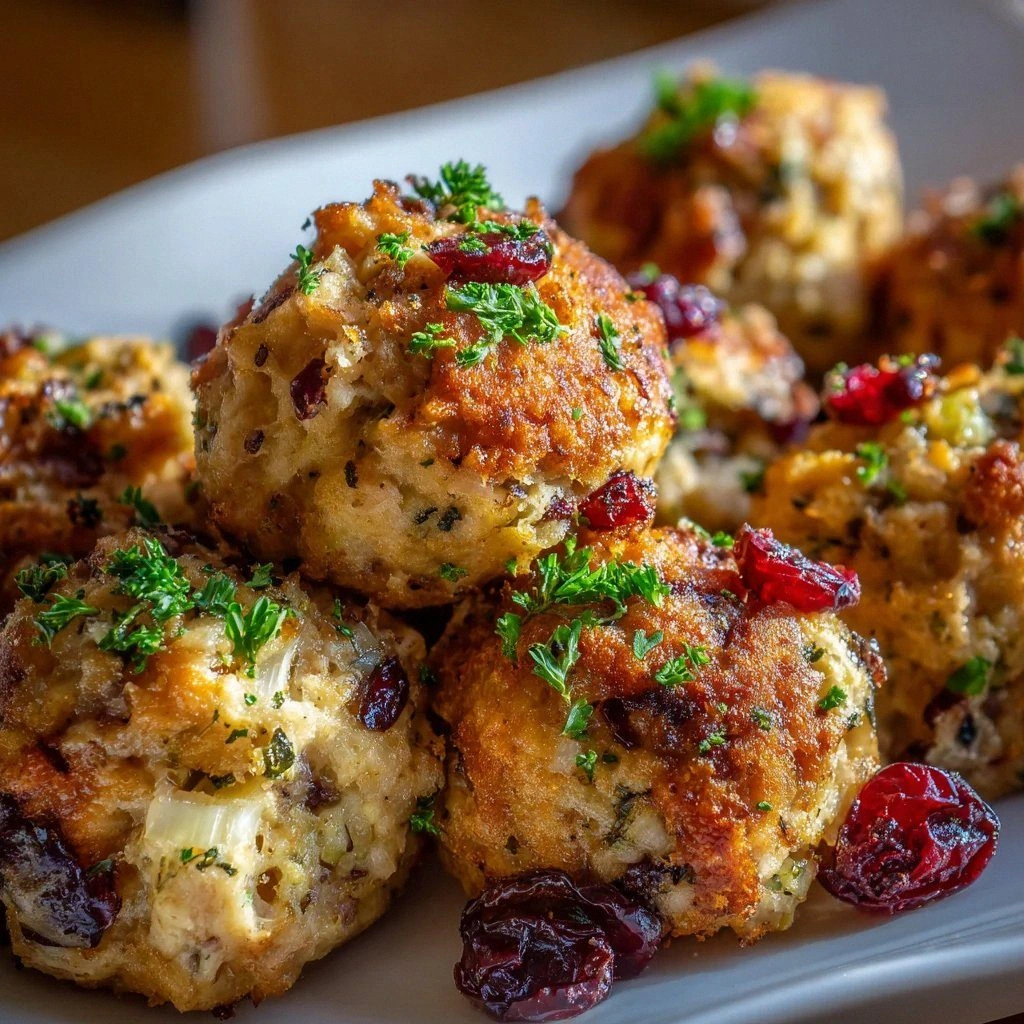
Fast forward three years and hundreds of test batches later, and I'm practically bouncing on my kitchen tiles waiting for you to try what might be the most addictive holiday hybrid I've ever created. Picture this: crispy, golden spheres that crackle like thin ice when you bite through them, revealing a steamy center packed with tender turkey, tart cranberries that pop like flavor fireworks, and herbs so fragrant your neighbors will start showing up with empty Tupperware. These aren't just stuffing balls — they're everything you love about Thanksgiving dinner compressed into bite-sized spheres of pure joy that you can pop straight into your mouth while the turkey rests.
The magic happens when you take the soul-warming comfort of traditional stuffing, add the sweet-tart punch of cranberries that cuts through all that richness like a bright winter morning, and wrap it around shreds of leftover turkey that somehow taste better than the original bird. Then you roll the whole thing into perfect spheres and bake them until the outsides turn into golden, crunchy shells while the insides stay impossibly moist and tender. I dare you to taste one hot from the oven and not immediately reach for a second before you've even swallowed the first — I've seen grown adults burn their tongues and keep going because stopping seemed like the greater tragedy.
What makes this version completely different from every sad, soggy stuffing you've pushed around your plate is the technique that seems almost too simple to work, but trust me — it's pure kitchen alchemy. Instead of packing everything into a pan where it steams into mush, we're giving each ball its own personal space to develop those crispy edges that make grown food bloggers weep with joy. The secret ingredient isn't some fancy truffle oil or obscure spice (though we'll talk about my favorite add-ins later) — it's patience and the right moisture balance that transforms humble leftovers into something that'll have people fighting over the last one like it's the final slice of pumpkin pie. Let me walk you through every single step — by the end, you'll wonder how you ever made it any other way.
What Makes This Version Stand Out
Before we dive into the nitty-gritty, let me tell you why these stuffing balls are about to become your new holiday obsession. I've tested this recipe on the pickiest eaters I know — my book club ladies who claim they "don't do leftovers," my neighbor's kids who think cranberries are "weird grapes," and my father-in-law who seasons everything with suspicion. Every single one of them asked for the recipe, and two requested it as their birthday dinner. That's when you know you've got something special.
- Texture Revolution: While traditional stuffing sits in a pan getting progressively soggier, these balls develop a crispy shell that shatters like crème brûlée while keeping the inside cloud-soft. It's the contrast that makes people close their eyes when they bite in — that satisfying crunch followed by the steamy, herb-packed center.
- Leftover Magic: This recipe was born from desperation and a fridge full of Thanksgiving remnants, but it tastes so intentional that people will think you planned the whole meal around making these. The turkey stays juicy, the cranberries provide bright pops of flavor, and even that slightly dried-out stuffing gets a second life that's better than its first.
- Portion Control (Sort Of): Each ball is a perfect two-bite serving, which means you can arrange them on a platter like fancy appetizers or pile them high in a bowl for casual grazing. Plus, there's something deeply satisfying about eating spheres of food — it's like adult chicken nuggets that you don't have to share with anyone unless you're feeling generous.
- Make-Ahead Champion: You can roll these beauties the night before, keep them chilled, then pop them in the oven when guests arrive. They'll fill your house with the smell of a full holiday feast in under thirty minutes, making you look like some kind of domestic superhero who definitely has their life together.
- Flavor Bomb Guarantee: The combination of sage, thyme, and parsley with those tart cranberries creates this incredible sweet-savory-herby profile that hits every taste bud. It's like someone took all the best parts of Thanksgiving dinner and concentrated them into flavor dynamite.
- Crowd Psychology: There's something about food on sticks or in ball form that makes people lose their minds. Serve these at a party and watch grown adults turn into competitive snackers, strategizing the best way to secure the last few without looking greedy.
Alright, let's break down exactly what goes into this masterpiece — and more importantly, why each ingredient matters more than your opinionated aunt's thoughts on your dating life.
Inside the Ingredient List
The Flavor Base
Let's start with the holy trinity of holiday cooking: butter, onion, and celery. The butter isn't just there for richness — it's your flavor delivery system, carrying all those aromatic compounds straight to your taste buds. When you sauté the onions and celery in that golden fat, something magical happens. The onions release their natural sugars, turning from sharp and aggressive to sweet and mellow, while the celery adds this incredible fresh note that keeps the whole thing from tasting like a heavy brick of holiday excess.
Don't even think about using margarine here — I tried it once in a pinch and the resulting balls tasted like someone had sucked all the joy out of Thanksgiving and rolled it into sad little spheres. The real butter creates this luxurious mouthfeel that makes people close their eyes when they eat these. As for the onion, I prefer yellow ones for their balance of sweetness and savoriness, but if you've only got white or red, they'll work in a pinch. Just adjust your cooking time slightly — red onions need a bit longer to mellow out.
The Texture Crew
Day-old bread is your best friend here, and I mean that literally. Fresh bread has too much moisture and will turn your stuffing balls into dense golf balls that could double as paperweights. You want bread that's slightly dried out — not crouton-hard, but definitely not soft enough to make a decent sandwich. I've used everything from cheap white sandwich bread to fancy sourdough, and honestly, they all work beautifully. The sourdough adds this incredible tang that plays beautifully with the cranberries, while white bread gives you that classic stuffing flavor that tastes like childhood holidays.
The eggs are your binding agents, and they need to be treated with respect. Too few and your balls will crumble like my resolve around a plate of fresh cookies. Too many and they'll taste rubbery and overcooked. I find that two large eggs perfectly bind four cups of bread cubes without making things taste like a weird bread omelet. Beat them well before adding — you want them fully incorporated so you don't get streaks of cooked egg white in your finished product.
The Unexpected Star
Dried cranberries are where this recipe really sings, but here's the thing — not all dried cranberries are created equal. The ones coated in sugar and oil are cloyingly sweet and will make your stuffing balls taste like a fruitcake had an identity crisis. Look for unsweetened or lightly sweetened varieties, or better yet, chop up some fresh cranberries if you can find them. The tartness is what you're after — that mouth-puckering pop that cuts through all the richness like a bright winter morning.
The fresh parsley isn't just there for color, though it does make these balls look like tiny edible Christmas ornaments. It adds this incredible fresh, almost grassy note that makes the whole thing taste vibrant and alive. Dried parsley is useless here — it tastes like green sawdust and contributes nothing but sadness. If you can't find fresh parsley, fresh chives or even green onion tops will give you that fresh allium note that keeps things interesting.
The Final Flourish
Here's where most recipes go wrong — they treat salt and pepper like an afterthought. But seasoning is what separates good stuffing balls from the kind that people sneak into napkins. You need to season at every stage: the vegetables as they sauté, the bread mixture before adding liquid, and again just before forming the balls. Taste as you go — the mixture should taste slightly over-seasoned before cooking, because the eggs and bread will mute the flavors slightly as they bake.
The cooked turkey is where you can really let your creativity shine. Dark meat stays juicier and has more flavor, but white meat works if that's what you've got. The key is shredding it into pieces that are small enough to distribute evenly but large enough that you get satisfying turkey bits in every bite. I've used everything from leftover roast turkey to smoked turkey breast, and they all bring their own personality to the party. Even rotisserie chicken works in a pinch — just don't tell your Thanksgiving-purist relatives.
Everything's prepped? Good. Let's get into the real action — and trust me, this next part is where the magic happens.
The Method — Step by Step
- Start by melting your butter in a large skillet over medium heat — and when I say large, I mean it. You're going to be adding a whole mountain of ingredients, and trying to cram everything into a too-small pan is like trying to fit into your high school jeans after three helpings of pie. Let the butter foam and subside; that foaming is the water content evaporating, leaving behind pure butterfat that'll carry flavor like a tiny golden taxi. When the foaming stops and the butter starts to smell nutty and delicious, that's your cue to add the aromatics.
- Throw in your diced onion and celery, but don't just dump and run — spread them out in an even layer so they can properly caramelize. Here's where most people mess up: they stir constantly like they're making risotto, but vegetables need contact with the hot pan to develop those deep, sweet flavors. Let them sit for a full two minutes before stirring, then repeat until they're translucent and starting to brown at the edges. Your kitchen should smell like you've been transported to a cozy cabin in the woods where someone is definitely making soup and possibly brewing cider.
- Add the garlic and cook for just 30 seconds — any longer and it turns bitter and acrid, like that one relative's commentary on your life choices. The garlic should smell fragrant and slightly sweet, not sharp or burnt. This is also when I like to add a pinch of salt to help draw out moisture from the vegetables and start building those layers of flavor that'll make people wonder what your secret is.
- Transfer your aromatic mixture to a large bowl and let it cool slightly while you prep the bread. If you add hot vegetables to the eggs, you'll end up with scrambled egg bits in your stuffing balls, and nobody wants that textural surprise. While it cools, tear or cube your day-old bread into pieces about the size of your thumbnail — not too small or they'll disappear into mush, not too large or your balls won't hold together.
- Add the bread cubes to your cooled vegetable mixture along with the dried cranberries, parsley, sage, thyme, salt, and pepper. Toss everything together with your hands — yes, your hands are your best tool here. You want to distribute everything evenly, making sure each bread cube gets coated with the herb mixture and that the cranberries are scattered throughout like tiny ruby gems waiting to surprise and delight.
- Now comes the moment of truth: add your shredded turkey and give it another gentle toss. The turkey should be in pieces small enough to distribute evenly but large enough that you get satisfying meaty bits in every bite. If you're using dark meat (which I highly recommend for the flavor), break it up slightly but don't shred it too fine — those little chunks of juicy turkey are what make people close their eyes and make happy sounds.
- In a separate bowl, whisk together the eggs and 1/2 cup of the broth until completely combined. The eggs need to be fully beaten so they distribute evenly and bind everything together without creating eggy pockets. Pour this mixture over your bread mixture and start mixing gently with your hands. You're looking for a consistency that's moist but not soggy — the bread should be coated and starting to stick together, but not swimming in liquid.
- Add the remaining broth gradually, mixing gently after each addition. You want the mixture to hold together when squeezed but not be wet or dripping. Think of it like making meatloaf — it should be moist enough to shape but not so wet that it falls apart. Depending on your bread and how dry it was, you might need all the broth or just most of it. Trust your instincts and the feel of the mixture.
- Preheat your oven to 375°F and line a baking sheet with parchment paper or a silicone mat. Now comes the fun part: forming the balls. Using a small ice cream scoop or about 3 tablespoons of mixture, form into balls about 1 1/2 inches in diameter. Pack them firmly enough to hold together but not so tight that they become dense. Place them on the prepared baking sheet with about an inch between each ball — they need space for hot air to circulate and create those crispy edges that make these addictive.
- Bake for 25-30 minutes, rotating the pan halfway through, until the balls are golden brown and crispy on the outside. The bottoms should be deeply caramelized, and when you tap one with a spoon, it should sound hollow. Let them cool for 5 minutes before serving — this sets the structure and prevents them from falling apart when you bite into them. Plus, it gives you a chance to arrange them on a platter and take photos before your family demolishes them like locusts.
That's it — you did it. But hold on, I've got a few more tricks that'll take this to another level and ensure your stuffing balls become the stuff of family legend.
Insider Tricks for Flawless Results
The Temperature Rule Nobody Follows
Here's the thing that separates the stuffing ball masters from the mere mortals: temperature control. Your ingredients should all be at room temperature before you start mixing. Cold eggs don't bind as well, hot vegetables cook the eggs prematurely, and cold turkey makes the mixture harder to shape. Take everything out of the fridge 30 minutes before you start cooking — yes, even the turkey. This isn't just food snobbery; it's science. Room temperature ingredients mix more evenly, bind better, and cook more consistently.
I learned this the hard way when I tried to rush through a batch using cold turkey straight from the fridge. The mixture was stubborn and refused to hold together, resulting in stuffing ball casualties that crumbled into sad piles. Now I plan ahead and let everything come to temperature while I'm sautéing the vegetables. The difference is night and day — your balls will hold together beautifully and cook evenly throughout.
Why Your Nose Knows Best
Don't underestimate the power of your sense of smell during this process. When the onions and celery are perfectly cooked, your kitchen will smell like you're walking through a fall farmers market. When the garlic goes in, you should immediately notice the aroma become more complex and slightly sweet. If you smell anything bitter or acrid, you've gone too far and need to start over — burnt garlic will ruin the entire batch with its persistent, aggressive flavor.
The same goes for the final baking stage. When your stuffing balls are perfectly done, your house will smell like you've been cooking Thanksgiving dinner all day. It's this incredible blend of buttery herbs, toasty bread, and savory turkey that makes people wander into the kitchen asking what time dinner is. If you don't smell this happening around the 20-minute mark, check your oven temperature — home ovens can be notoriously inaccurate.
The 5-Minute Rest That Changes Everything
I know it's tempting to grab one of those golden beauties straight from the oven, but patience is your friend here. Those five minutes of resting time aren't just for show — they allow the internal structure to set, the flavors to redistribute, and the temperature to drop to something that won't destroy your taste buds. During this time, the centers finish cooking from residual heat, and the outside crisps up even more as steam escapes.
Use this time wisely: arrange them on a platter, garnish with fresh herbs, and maybe hide a few for yourself because once people start eating these, they disappear faster than polite conversation at a family gathering. I've seen guests hover around the kitchen like vultures, waiting for the "okay" to dig in. Trust me, those five minutes feel like an eternity when your house smells like edible heaven, but they're absolutely worth it.
Creative Twists and Variations
This recipe is a playground. Here are some of my favorite ways to switch things up, whether you're catering to picky eaters or just want to show off your culinary creativity:
The Breakfast Club Version
Add cooked breakfast sausage, swap the sage for rosemary, and include some sharp cheddar cheese in the mix. These become incredible brunch items that pair perfectly with maple syrup for dipping. The sweet-savory combination is absolutely addictive — I've served these at brunch parties where they disappeared faster than the mimosas. The sausage adds incredible richness, while the cheese creates these little pockets of molten goodness throughout.
The Mediterranean Makeover
Replace the cranberries with chopped dried apricots, swap the sage and thyme for oregano and basil, and add some crumbled feta cheese. Use olive oil instead of butter, and include some chopped kalamata olives for a briny punch. These transport you straight to a Greek island, minus the expensive plane ticket. The apricots provide the same sweet-tart contrast as cranberries but with a more exotic flavor profile.
The Spicy Southern Belle
Add some andouille sausage, swap the cranberries for dried cherries, and include a diced jalapeño in the vegetable mixture. Use Cajun seasoning instead of the herb blend, and serve these with a side of remoulade for dipping. They have this incredible sweet-spicy-smoky thing going on that makes them impossible to stop eating. Fair warning: these have a sneaky heat that builds, so maybe save them for the adults.
The Fancy Pants Edition
Add some chopped dried cherries soaked in port wine, include some toasted chopped pecans, and swap the turkey for duck confit if you're feeling particularly luxurious. Use fresh herbs from your garden and maybe add a touch of truffle oil to the mixture. These are the kind of thing you serve when you want to impress your foodie friends or celebrate something special. They're rich, complex, and utterly unforgettable.
The Kid-Friendly Classic
Skip the cranberries and add some finely diced apple instead, use mild herbs like parsley and chives, and include some mild cheese like mozzarella. Make them smaller — about 1-inch balls — and serve with honey mustard for dipping. Kids love the familiar flavors and the fun shape, while parents appreciate that they're getting some actual nutrition. I've seen picky eaters devour these without realizing they're eating vegetables.
The Vegan Victory
Use olive oil instead of butter, vegetable broth instead of chicken, and add some cooked lentils or chopped mushrooms for umami depth. Include some nutritional yeast for that savory, cheesy flavor, and use ground flaxseed mixed with water as your binder instead of eggs. They're so flavorful that even the carnivores won't miss the meat — though you might want to make a double batch because these tend to disappear quickly.
Storing and Bringing It Back to Life
Fridge Storage
These stuffing balls store beautifully in the refrigerator for up to four days, making them perfect for meal prep or leftover management. Let them cool completely, then store in an airtight container with parchment paper between layers to prevent them from sticking together. The key is to let them cool completely before storing — any residual heat will create condensation that makes the outside soggy. I've been known to hide a container in the back of the fridge, behind the healthy stuff that nobody ever eats, just to ensure I get my fair share.
When you're ready to reheat, the microwave works in a pinch but you'll lose that crispy exterior. For best results, warm them in a 350°F oven for about 10 minutes, or until heated through and crispy again. If they've been in the fridge for a few days, add a tiny splash of water to the pan and cover with foil for the first 5 minutes — this creates steam that rehydrates them slightly, then remove the foil for the last 5 minutes to crisp them back up.
Freezer Friendly
These freeze like champions, which is why I always make a double batch. Let them cool completely, then arrange them in a single layer on a baking sheet and freeze until solid — about 2 hours. Once frozen, transfer to a freezer bag or container, separating layers with parchment paper. They'll keep for up to 3 months, though honestly, they've never lasted more than a few weeks in my house because I keep finding excuses to eat them.
The best part is that you can reheat them directly from frozen — no thawing required. Just pop them in a 375°F oven for 15-20 minutes, or until heated through and crispy. They're almost as good as fresh, which makes them perfect for those "I need comfort food now" moments. I've been known to keep a bag in the freezer for emergency snack attacks or unexpected guests who think I've been slaving in the kitchen.
Best Reheating Method
For the absolute best results, reheat these in a skillet with a tiny bit of butter or oil. Heat the pan over medium heat, add the stuffing balls, and cook, turning occasionally, until they're heated through and crispy on all sides. This method gives you that fresh-from-the-oven texture that makes them taste like you just made them. The outside gets incredibly crispy while the inside stays moist and flavorful.
If you're reheating a large batch, the oven is your friend. Arrange them on a baking sheet, add a tiny splash of water to the pan, and cover with foil for the first 10 minutes at 350°F. Then remove the foil and increase the temperature to 375°F for another 5-7 minutes to crisp them back up. This two-stage method ensures they heat through without drying out, then get that irresistible crunch back.