Picture this: you’re halfway through a holiday bake, the kitchen’s a mess of melted chocolate, peppermint candies, and a single, stubborn cookie that refuses to bake properly. The oven timer buzzes, the timer’s a mess, and you’re staring at a half‑baked slab that looks like a chocolatey, minty slab of disappointment. I swear, that moment is the catalyst for discovering the ultimate chocolate peppermint silk brow. I was determined to turn that kitchen disaster into a masterpiece, and the result was so smooth, so decadent, that I couldn’t keep it to myself.
The scent that filled the room was an intoxicating mix of roasted cocoa, sweet sugar, and that unmistakable minty aroma that makes your mouth water. As soon as the chocolate began to melt, the room was filled with a velvety aroma that seemed to coat every corner. I could hear the faint hiss of butter melting, the gentle clink of a spoon against a mixing bowl, and the soft whir of the mixer. Each sensory cue was a promise of the rich, silky texture that would soon follow. The anticipation was almost tangible, like a sweet secret about to be revealed.
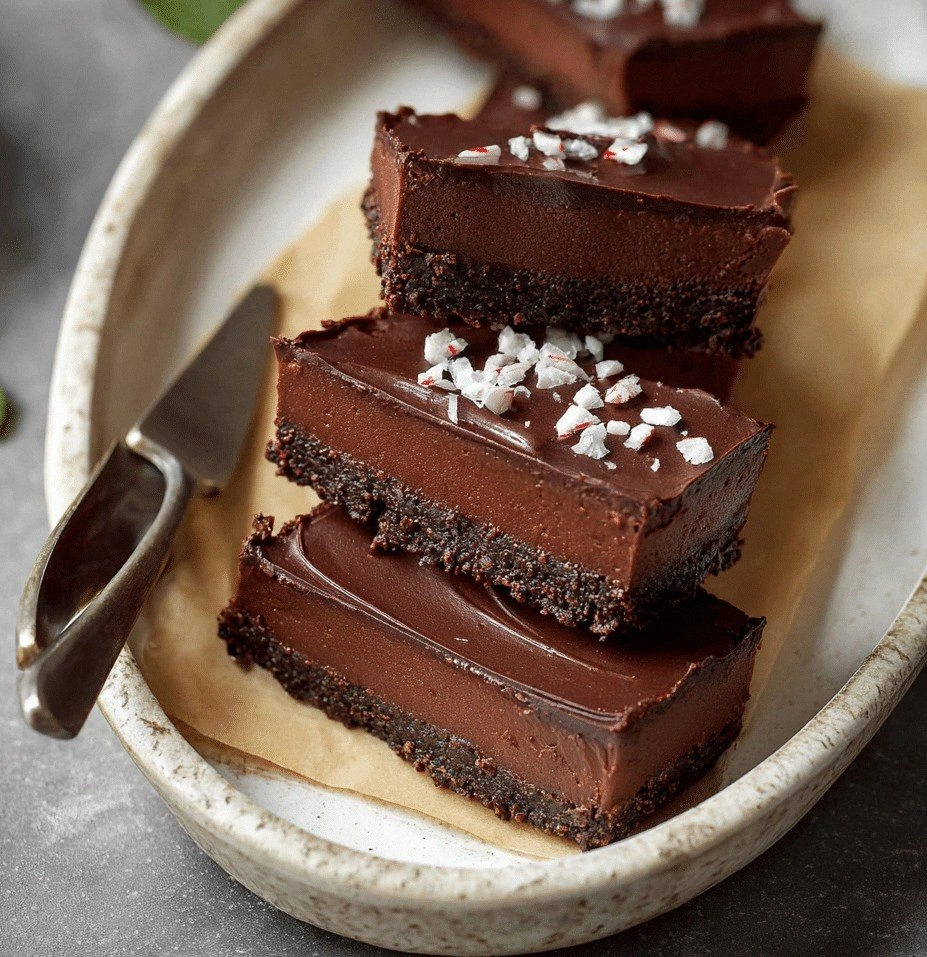
What makes this version stand out? It’s not just the ingredients or the technique—though both are impeccable—but the way they all dance together to create a dessert that feels like a holiday hug. The chocolate melts into a silky sauce that coats the batter like velvet, while the peppermint pieces add a subtle crunch that breaks the smoothness in the best possible way. The result is a brownie that feels airy on the inside yet has a firm, chocolatey crust that snaps like thin ice. I dare you to taste this and not go back for seconds. Trust me, it’s the best chocolate‑mint treat you’ll ever make at home.
I’ve been experimenting with chocolate and peppermint for years, but this version is the culmination of countless attempts. The secret lies in the balance between the dark chocolate’s depth, the peppermint’s brightness, and the silky texture achieved by carefully tempering the batter. The technique I’ll reveal involves a subtle trick that transforms ordinary brownie batter into a silky, melt‑in‑your‑mouth experience. By the end of this guide, you’ll wonder how you ever baked this dessert the old way. Let me walk you through every single step — by the end, you’ll wonder how you ever made it any other way.
What Makes This Version Stand Out
- Texture: The batter is so smooth that it feels like a chocolate mousse on the inside, yet the edges form a crisp, caramelized crust that snaps delightfully with each bite. This duality is achieved by the precise melting of chocolate and butter, creating a glossy, silky consistency that coats the palate.
- Flavor: Dark chocolate’s bittersweet profile is amplified by the subtle, cooling hint of peppermint, creating a flavor profile that is both indulgent and refreshing. The peppermint is added at the right moment so it infuses without overpowering the chocolate’s depth.
- Ease: The recipe uses pantry staples and requires no fancy equipment. Even a novice can follow the steps and end up with a professional‑level dessert.
- Uniqueness: The use of crushed peppermint candies not only adds texture but also introduces a burst of candy cane flavor that surprises the taste buds. This is a twist most recipes miss.
- Make‑Ahead: It’s perfect for parties or holiday gatherings because you can bake it ahead of time, store it in the fridge, and it will stay fresh for days.
- Presentation: When you cut the brownie, the chocolate swirls and peppermint flakes create a stunning visual effect that’s Instagram‑ready.
Alright, let's break down exactly what goes into this masterpiece...
Inside the Ingredient List
The Flavor Base
Dark chocolate chips are the heart of this dessert. They provide a rich, bittersweet foundation that balances the sweetness of sugar and the brightness of peppermint. If you skip them, the brownie loses its depth and becomes overly sweet. For an extra punch, swap in 70% cacao chocolate; it adds complexity without extra sugar.
The Texture Crew
Unsalted butter melts into a silky emulsion that coats the batter, giving the brownie a luxuriously moist interior. The flour and cocoa powder create structure, allowing the brownie to hold its shape while remaining tender. If you substitute all-purpose flour with cake flour, you’ll get an even lighter crumb.
The Unexpected Star
Peppermint extract is the secret that turns ordinary brownie into a holiday classic. A single teaspoon of high‑quality extract infuses the entire batch with a clean, minty flavor that lingers pleasantly. If you’re allergic to peppermint oil, a splash of peppermint tea can serve as a subtle alternative.
The Final Flourish
Crushed peppermint candies add a delightful crunch and a burst of candy cane flavor. They also provide a visual pop of color that makes the brownie look festive. If you prefer a smoother texture, simply omit the candies or replace them with fresh mint leaves for a more natural taste.
Everything's prepped? Good. Let's get into the real action...
The Method — Step by Step
- Preheat your oven to 350°F (175°C) and line an 8‑inch square pan with parchment paper. This creates a non‑stick surface and ensures even baking. The parchment should be long enough to wrap around the sides for easy removal. Place the pan on a middle rack for optimal heat distribution.
- Melt the dark chocolate chips and butter together over low heat in a double boiler or in the microwave in 30‑second increments, stirring after each burst. The mixture should be smooth and glossy, with no lumps. This step is crucial; over‑melting can cause the chocolate to seize and become gritty.
- Whisk the sugar and eggs in a separate bowl until the mixture becomes pale and slightly thickened. The eggs act as a binder, while the sugar adds sweetness and a glossy sheen. Beat for about 2 minutes to incorporate air, which will help the brownies rise slightly.
- Combine the melted chocolate mixture with the egg mixture, stirring until fully blended. The batter should be thick but pourable, with a silky sheen that hints at the final texture. This is the moment of truth: if the batter is too runny, your brownies will be cakey.
- Sift together the flour, cocoa powder, and a pinch of salt. Gradually fold this dry blend into the wet batter, using a spatula to keep the batter smooth. Avoid over‑mixing; the goal is a glossy, uniform batter.
- Fold in the peppermint extract and crushed peppermint candies, ensuring even distribution. The candies should be scattered throughout, creating pockets of minty crunch. If you prefer a stronger mint flavor, add an extra teaspoon of extract.
- Pour the batter into the prepared pan, smoothing the top with a spatula. Tap the pan gently on the counter to release any air bubbles, which helps achieve a uniform rise. The batter should fill the pan to the top, but not overflow.
- Bake for 25–30 minutes, or until a toothpick inserted into the center comes out with a few moist crumbs. The edges should pull slightly away from the pan, indicating that the brownies are done. Avoid overbaking; you want a gooey center that remains moist.
- Let the brownies rest in the pan for 10 minutes before transferring them to a wire rack to cool completely. This rest period allows the chocolate to set, preventing a soggy bottom. Once cooled, cut into squares and serve.
That's it — you did it. But hold on, I've got a few more tricks that'll take this to another level...
Insider Tricks for Flawless Results
The Temperature Rule Nobody Follows
Most bakers bake at a standard 350°F, but the secret to a silky center is to lower the temperature to 325°F (165°C) and bake slightly longer. This gentle heat allows the chocolate to melt evenly, creating a glossy, melt‑in‑your‑mouth interior. I once baked at 350°F and the center stayed too firm, which was a disappointment.
Why Your Nose Knows Best
Before you pull the brownies out of the oven, listen for the aroma. A faint, buttery chocolate scent with a hint of peppermint signals that the brownies are ready. If the smell is too sweet, give them a few more minutes; if it’s too strong, they’re overdone. Your nose is your best judge.
The 5‑Minute Rest That Changes Everything
After baking, let the brownies rest in the pan for 5 minutes before transferring them. This short pause allows the batter to set, preventing the bottom from sticking to the pan. It also ensures a clean cut when you slice the brownies later.
The Perfect Parchment Trick
If you’re using parchment, cut it slightly larger than your pan, then fold the excess over the sides. This creates a snug fit that keeps the batter from spilling over. It’s a simple trick that saves you from a messy cleanup.
The Crumb‑Control Method
Sift the dry ingredients twice to remove any lumps. Lumps can cause uneven texture and pockets of dry chocolate. Sifting twice also aerates the flour, making the brownies lighter.
Creative Twists and Variations
This recipe is a playground. Here are some of my favorite ways to switch things up:
Coconut‑Infused Delight
Swap half of the butter with coconut oil and add a tablespoon of shredded coconut to the batter. The result is a tropical twist that pairs wonderfully with the minty chocolate.
Nutty Crunch
Fold in chopped walnuts or pecans for a nutty crunch. The nuts add a satisfying texture and a subtle earthy flavor that balances the sweetness.
Chocolate‑Covered Surprise
After baking, drizzle melted white chocolate over the brownies and let it set. The white chocolate coating adds a creamy contrast to the dark chocolate base.
Salted Caramel Swirl
Swirl a few spoonfuls of salted caramel sauce into the batter before baking. The caramel adds depth and a hint of sea salt that elevates the minty chocolate.
Vegan Version
Replace eggs with flaxseed meal mixed with water and use dairy‑free chocolate chips. The texture remains silky, and the mint flavor stays intact.
Holiday Gifting
Wrap individual squares in foil and tie with a ribbon for a ready‑to‑give holiday treat. The peppermint flavor is perfect for gift baskets.
Storing and Bringing It Back to Life
Fridge Storage
Store the brownies in an airtight container at room temperature for up to 5 days. For longer freshness, keep them in the refrigerator, where they’ll stay moist for up to 2 weeks. The airtight seal prevents the brownies from drying out.
Freezer Friendly
Wrap each brownie square individually in plastic wrap, then place them in a freezer bag. They can be frozen for up to 3 months. When you’re ready to enjoy, let them thaw at room temperature for 30 minutes.
Best Reheating Method
Reheat frozen brownies in a microwave at 30‑second intervals, adding a tiny splash of water before each burst. The water steams the brownie, restoring its silky texture. For fresh brownies, a quick 10‑second microwave or a 2‑minute oven preheat at 300°F works well.