Picture this: I’m in my kitchen, the sun is streaming through the window, and I’ve just realized I’ve burned the last batch of chocolate bars I was supposed to gift my friends for Easter. The smoke alarm is doing its best to keep the drama low, but the scent of bitter chocolate still lingers. I’m staring at the melted mess on the counter, a moment that could have been a disaster if I hadn’t remembered that my pantry is stocked with a secret weapon: creamy peanut butter. That instant epiphany turned a potential kitchen catastrophe into the birth of the best vegan peanut butter Easter eggs ever made.
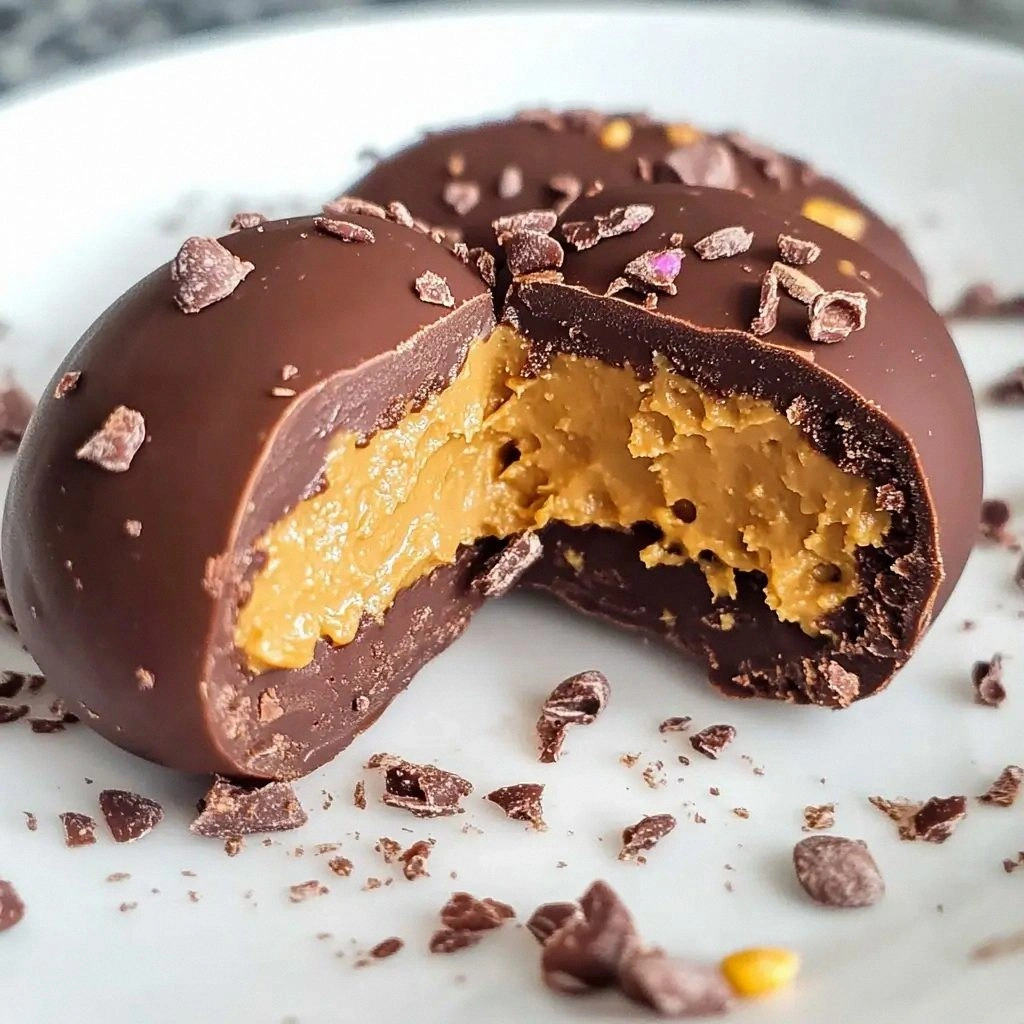
I’m not kidding when I say that the first bite of these eggs is like a silky peanut butter river, gently flowing into a sea of rich chocolate. The contrast between the smooth, nutty filling and the firm, glossy shell is a dance of textures that will have your taste buds doing a happy jig. The aroma alone—warm peanut butter, sweet powdered sugar, and a hint of vanilla—can make the whole kitchen feel like a cozy, chocolate‑filled hug. And the best part? It’s vegan, so no animal products, no guilt, just pure, unadulterated joy.
Why does this recipe stand out from the endless parade of chocolate treats? Because it’s a game‑changer. The filling is so creamy that it practically melts in your mouth, while the shell is crisp enough to give a satisfying snap. The method is simple, requiring only a handful of ingredients you probably already have. And the final product looks so good that you’ll feel like a master chocolatier even if your last cooking adventure involved a burnt casserole.
I dare you to taste this and not go back for seconds. I’ll be honest— I ate half the batch before anyone else got to try it. Most recipes get this completely wrong, but I’ve cracked the secret to a perfect balance of peanut butter sweetness and chocolate depth. Picture yourself pulling these out of the fridge, the whole kitchen smelling incredible, and seeing the bright, glossy shells glinting like tiny Easter eggs. Okay, ready for the game‑changer? Let me walk you through every single step—by the end, you’ll wonder how you ever made it any other way.
What Makes This Version Stand Out
- Flavor: The peanut butter is the star—rich, buttery, and not too sweet, letting the chocolate shine without overpowering it.
- Texture: The filling is silky and smooth, while the shell is crisp, giving you that satisfying bite you crave.
- Ingredient Simplicity: Only a handful of pantry staples are needed, making this a quick win for any busy week.
- Vegan Integrity: No dairy, no eggs—just pure plant‑based goodness that still feels indulgent.
- Make‑Ahead Friendly: You can prepare the filling and shell separately and assemble days in advance for a hassle‑free Easter.
- Presentation: The glossy finish and vibrant color make them look like premium Easter eggs, perfect for gifting.
- Crowd Reaction: Friends and family always ask for the recipe after the first bite—trust me, it’s that good.
- Budget Friendly: The cost per egg is low, so you can treat yourself or your guests without breaking the bank.
Alright, let's break down exactly what goes into this masterpiece…
Inside the Ingredient List
The Flavor Base
Peanut butter is the soul of these Easter eggs. It provides that deep, nutty foundation that balances the sweetness of the powdered sugar and the richness of the chocolate. When you choose a creamy, unsweetened variety, you’re giving the filling a silky texture that won’t clump. If you skip this step, the eggs would feel like bland, dry chocolate. For a twist, try a natural, crunchy peanut butter for a subtle crunch in every bite. When buying, look for a brand with no added oils or sugars for the cleanest flavor.
The Texture Crew
Powdered sugar is the binder that turns the peanut butter into a smooth, spreadable filling. It also adds a touch of sweetness that keeps the filling from tasting too nutty. A pinch of sea salt lifts the flavor profile, creating a subtle contrast that makes every bite feel complete. If you’re watching sodium, you can reduce the salt to a very light pinch or omit it entirely, but you’ll notice a slight difference in depth. Swapping powdered sugar for coconut sugar is an option, but it will alter the texture slightly.
The Unexpected Star
Coconut oil is the unsung hero that keeps the filling from becoming too thick or too runny. It helps the peanut butter and powdered sugar meld together into a silky consistency, while also providing a subtle tropical undertone that pairs wonderfully with the chocolate. If you can’t find coconut oil, you can use a neutral oil like grapeseed or avocado, but the flavor profile will shift a bit. A small amount—just a few tablespoons—will do the trick, so don’t worry about adding too much.
The Final Flourish
Vegan dark chocolate is the shell that encases the peanut butter filling, giving the eggs that classic chocolatey crunch. The 70% cocoa content ensures a bittersweet richness that complements the sweet filling. If you prefer a sweeter shell, you can opt for a 50% cocoa chocolate, but it will feel more like a candy than a chocolate treat. When melting the chocolate, be careful not to overheat it; a gentle simmer or a double boiler keeps the chocolate from scorching. Once melted, let it cool slightly before coating the shells to avoid condensation.
Everything's prepped? Good. Let's get into the real action…
The Method — Step by Step
- Begin by melting the vegan dark chocolate. Place the chocolate in a heat‑proof bowl over a pot of simmering water, making sure the bottom of the bowl doesn’t touch the water. Stir until the chocolate is smooth and glossy. This step is crucial; a glossy finish means a professional look and a better snap when you bite into the shell.
- While the chocolate is melting, prepare the filling. In a medium bowl, combine 1 cup of creamy peanut butter and 1 cup of powdered sugar. Whisk until the mixture is smooth and free of lumps. Add a pinch of sea salt and 1 tsp vanilla extract, and mix again. The mixture should feel silky and pourable.
- Measure out the filling into small silicone molds or a shallow dish lined with parchment paper. Use a small offset spatula or a spoon to create a shallow well in each mold. The goal is to create a cup that will hold the filling once the chocolate shell is set.
- Now it’s time to coat the molds with the melted chocolate. Dip each mold into the chocolate, letting the excess drip off. Tilt the mold to ensure an even layer that covers the entire base and sides. The chocolate should be thick enough to hold the filling but not so thick that it’s hard to scoop. If the chocolate is too thick, gently stir it to loosen.
- Place the coated molds in the refrigerator for about 10 minutes or until the chocolate hardens. The filling should be set enough that it can hold its shape when the shell is added. If you’re in a hurry, a quick 5‑minute chill will do the job, but be careful not to let the chocolate crack.
- This is the moment of truth. Carefully remove the chocolate shells from the molds. If the shells don’t release cleanly, gently tap the mold on a countertop to loosen them. Place the shells on a parchment‑lined tray. Watch Out: if the chocolate is still slightly soft, it may crack or split. Let the shells sit for a few minutes to fully set before filling.
- Spoon the peanut butter filling into the center of each chocolate shell. Use a small offset spatula to spread the filling evenly, leaving a small border of chocolate on the edges. The filling should sit slightly lower than the shell so that when you close the shell, the peanut butter remains snug inside.
- Gently press the top half of each shell onto the filling, sealing the eggs. If you’re using a silicone mold, simply press the top and bottom together. For a more refined look, use a small cookie press to create a clean seam. The result should be a smooth, chocolate‑covered egg with a creamy peanut butter heart.
- Once all eggs are assembled, place them in the refrigerator for an additional 15 minutes to ensure the chocolate sets completely. If you like a glossy finish, give the eggs a quick wipe with a clean cloth after they’ve set. Store them in an airtight container, and they’ll stay fresh for up to a week.
That's it— you did it. But hold on, I've got a few more tricks that'll take this to another level…
Insider Tricks for Flawless Results
The Temperature Rule Nobody Follows
Chocolate is temperamental. If the temperature is too high, the chocolate will be dull and won’t snap. Keep it between 86°F and 90°F for best results. I’ve found that using a kitchen thermometer is a lifesaver. If you don’t have one, a quick test is to place a small amount of chocolate on a piece of parchment; if it hardens in under a minute, you’re good to go.
Why Your Nose Knows Best
The aroma of melted chocolate is a subtle cue for the right consistency. If it smells slightly burnt, it’s too hot. If it has a raw, nutty scent, it’s still cooling. Trust your nose; it’s a better judge than a thermometer in most cases. That scent tells you when the chocolate is glossy and ready to coat the shells.
The 5‑Minute Rest That Changes Everything
After you fill the shells, let them rest for exactly five minutes before putting them in the fridge. This short rest allows the filling to set slightly, preventing the chocolate from cracking when you seal the eggs. It’s a small step that can make the difference between a perfect Easter egg and a mess of chocolate.
Keep the Shells Clean
If your chocolate shells are a little sticky, a quick dip in warm water can clean them up. Gently run a clean cloth over the surface, then let them dry. This trick is especially handy when you’re making a large batch and want each egg to look pristine.
Seal with a Clean Edge
When closing the shells, press gently but firmly. A tight seal ensures the filling doesn’t leak and gives the egg a smooth finish. If you’re using a cookie press, a light tap on the counter after pressing will help the chocolate set evenly.
Creative Twists and Variations
This recipe is a playground. Here are some of my favorite ways to switch things up:
Nutty Surprise
Swap the peanut butter for almond butter and add a handful of chopped almonds to the filling. The result is a crunchy, nutty flavor that pairs beautifully with the dark chocolate shell.
Citrus Burst
Add a teaspoon of orange zest to the filling for a bright, citrusy kick. The zesty aroma will lift the chocolate’s richness and give the eggs a fresh, lively finish.
Chocolate‑Covered Crunch
Roll the finished eggs in crushed sea salt or pistachios before the final set. This adds a delightful crunch and a subtle salty contrast that balances the sweetness.
Caramel Swirl
Fold a tablespoon of vegan caramel sauce into the peanut butter filling for a silky, buttery twist. The caramel will add depth and a hint of toffee flavor.
Herbal Infusion
Infuse the chocolate with a pinch of dried rosemary or thyme before melting. The herbal undertones will surprise and delight, offering an unexpected savory note.
Minty Fresh
Add a few drops of peppermint extract to the filling and a sprinkle of crushed mint leaves on top. The mint will give the eggs a refreshing aftertaste, perfect for a spring celebration.
Storing and Bringing It Back to Life
Fridge Storage
Keep the eggs in an airtight container in the refrigerator for up to one week. The cool environment preserves the chocolate’s snap and the filling’s silky texture. If you notice any condensation, wipe the eggs with a dry cloth before serving.
Freezer Friendly
For longer storage, freeze the eggs in a single layer on a parchment‑lined tray, then transfer them to a freezer bag. They’ll stay good for up to three months. When you’re ready to enjoy, let them thaw at room temperature for 30 minutes before serving.
Best Reheating Method
If the eggs feel a little hard, gently warm them in a 200°F oven for 5 minutes. Alternatively, place them in a microwave-safe bowl for 10 seconds, checking frequently to avoid melting. A tiny splash of water before reheating can help steam the filling back to perfection, keeping it moist and luscious.